Go to http://www.redhat.com/ and http://www.suse.com/ to locate distributors for your country.
Updated June 7, 2000
This chapter explains how to install Linux, to the point of being able to login and have a commandline, or prompt, at which commands can be typed (much like MSDOS). Installing the KDE graphical desktop is covered in Chapter 2.
Although this book mostly refers to Red Hat, SuSE and Debian distributions of Linux, an attempt is made to be as generic as possible. If you have some other distribution, fine. You may find a slight variation on the install procedure and a slightly different directory structure. With regard to the last point, it means that if I refer to a file as being located in a certain directory, maybe your distribution puts it somewhere else. There may also be some differences in what we call script and configuration files. As the developers of Red Hat, SuSE and Debian distributions race to improve their products, there are also variations in different versions of the same distribution.
I have made reference to specific versions, such as Red Hat 6.0, and particular hardware configurations, as case studies, to illustrate issues and problems, with the intention that these can be applied to other versions, distributions, and hardware also. I identify a case study as CASE #1, #2, etc.
Above all, treat this chapter as a supplement to the main installation documentation supplied with your distribution CDROM. In fact, you may wish to consider buying a boxed set from a distributor. A Red Hat or SuSE boxed set has a printed manual (typically about 500 pages) an installation floppy, and a CDROM set. This saves you from the hassle of having to create the floppy, and it sure is nice to have the printed documentation. Red Hat and SuSE will also provide telephone and email support for purchasers of a boxed set.
Go to http://www.redhat.com/ and http://www.suse.com/ to locate distributors for your country.

A xxx Linux CDROM is bundled with this book. It also contains KDE and KOffice. You may install from this CDROM and upgrade to the full set of CDROMs later, if you want all the available applications. The boxed set will also of course give you support and a printed manual.
Installation of Linux is a hurdle. It’s not really difficult, only different, which makes it difficult the first time through. As a Linux newbie, you have to jump this hurdle, and believe me, it’s worth it. Once into running KDE and KOffice, you’ll be delighted. To help as much as possible with installation, I’ve made chapters 1 and 2 quite large and detailed. But if despite my help, you do get stuck, perhaps due to your PC having a peculiar hardware configuration, where do you turn for further guidance? Purchase of a boxed set from SuSE or other distributor will entitle you to limited support. Otherwise, you may find help from your local Linux User Group. These guys are everywhere and rabidly enthusiastic.
Go to http://www.linux.org/ for a worldwide list of user groups.
Ok, you've got a CDROM in your hands. Where to from there? I presume you've got a PC to install it on, and most likely it already has MSDOS and MSWindows installed. The usual scenario is that we keep those, and create another partition on the hard drive (or use a second hard drive) in which to install Linux. However this is very much dependent on the size of your hard drive. Linux is often installed onto older PCs, to give them a new lease of life, and the hard drive may be on the small side.
Obviously there are some issues to think about before you even begin to install, and I have organised installation into logical steps in Installation steps (page xxx). The sections immediately after that are case studies, covering useful issues, and you may like to lightly read through them before doing an actual installation. Having registered the issues involved in your brain, you can then revisit them if any particular problems occur.
Chapter 2 covers installation of the X server, that is, enables your video to switch into graphics mode and run graphical applications. It also explains how to install KDE, a graphical desktop environment. You will find in that chapter also that I frequently explain by actual example, making reference to the case studies. Basically, the case studies are as shown in Table 1.1
Table 1.1: Installation case studies in this book.
CASE |
Linux distribution |
Hardware |
#1 |
Red Hat |
Cyrix 6x86 P300 230MHz CPU, 32M RAM, 4.3G Fujitsu IDE hard drive, CMI8330 sound chip, SiS5598 video chip, 16.4K modem. |
#2 |
Debian |
Intel Pentium 166MMX CPU, 32M RAM, 3G IDE hard drive, S3 ViRGE PCI video card, Realtek RTL8029 Ethernet card. |
#3 |
SuSE |
Cyrix 5x86 100MHz CPU, 16M RAM, Maxtor 71336AP 1.2G IDE hard drive, ESS ES688 PnP AudioDrive sound card, A-Trend Technology WS-3314JS3 PnP 33.6K modem, Quadtel video card with Trident TVGA8900C chip. |
This book has generic installation steps, starting from page xxx.
However, before jumping down, firstly obtain the main installation documentation for your distribution, and print out relevant parts. It will be on your CDROM, usually in HTML format. This means that you need a functioning PC to start with, with a HTML browser (SuSE is different, as explained below).
In Red Hat CDROMs the Installation Manual is located at \doc\rhmanual\manual\index.htm.
In Debian CDROMs it is located at \install\install.html.
In SuSE CDROMs it is located at \docu\book.txt (or book.psz, or book.dvi). The format of these files assumes an already-installed Linux system to view them! You can view book.psz with an MSWindows version of GhostView -- instructions for obtaining this are given in Chapter xxx, Archiving and portability (page xxx). book.psz is a shorter name for book.ps.gz, meaning that it is a Postscript file, in compressed format by the gzip program. GhostView can read the zipped or unzipped file (book.ps), but if you do wish to unzip it, use the gzip/gunzip program for MSDOS, on the CDROM in \dosutils\, or from various MSDOS/MSWindows freeware/shareware download sites on the Internet.
The installation manuals are also on the Internet, at http://www.redhat.com/docs/index.html for Red Hat, http://www.debian.org/releases/stable/i386/install.html for Debian, and ftp://ftp.suse.com/pub/suse/ (follow the path for the required version and language, for example i386/6.3/docu/book-en.pdf or book-en.psz) for SuSE.
Please obtain the official installation documentation for your distribution, as explained above. The following steps are as generic as possible, applicable to any version and distribution.
You may wish to browse from Installation: CASE #1 (page xxx) onward, which are case studies -- just briefly -- and maybe revisit parts of them if problems occur during installation.
This icon is used throughout the book wherever hardware is discussed! All of STEP 1 concerns hardware.
Probably you are starting with a PC that already has MSDOS and maybe MSWindows installed. That makes it easier to find out about your hardware. Mostly what you are going to be looking for is the interface settings for the hardware items. These settings are shown in Table 1.2.
Table 1.2: MSDOS/MSWindows interface specifications.
| Designation | Meaning | Values |
| irq | Interrupt request | 0-15 |
| io | Input/output address | 0000-FFFF |
| dma | Direct memory access | 0-6 |
| com | Communication (serial) | 1-4 |
| lpt | Line printer (parallel) | 1-3 |
Note that the io address is usually specified as a hexadecimal number, and a hardware device will usually use a range of addresses, such as 02F0-02F7. You may like to file the following titbit of information away for future reference, for when you do get around to the actual Linux install -- with most Linux distributions you will only be expected to provide the starting address, for example 02F0 (i.e., not the range), and some distributions (e.g. Debian) will also require you to specify that this is a hexadecimal number, by a prefix, like this: 0x02F0.
You will need to make a list of all of the hardware items, to be sure that you obtain a full set of interface specs. For example, you may have a mouse, CDROM drive, one or more hard drives, sound card or chip, video card or chip, modem card, network card, floppy disk drive, monitor, RAM, printer. You should be able to answer the questions in Table 1.3.
Table 1.3: Questions about the hardware.
Item |
Answer these questions |
Mouse |
Is it Microsoft-compatible serial? A PS/2 mouse? Something else? irq, com? |
CDROM* |
Is it an IDE device or SCSI? Is it a Slave or Master on the Primary or Secondary IDE interface? |
Hard drive* |
IDE or SCSI? On Primary or Secondary IDE? How many? Capacity? |
Sound card/chip |
Model/manufacturer of card, type-number of chip? irq, io, dma? |
Video card/chip |
Model/manufacturer of card, type-number of chip, size of video RAM? |
Modem card |
Model/manufacturer of card, type-number/manufacturer of chip? irq, com? |
Network card |
Model/manufacturer of card, type-number/manufacturer of chip? irq, io, dma? |
Floppy disk drive |
3.5, 5.25 inch? How many, capacity? |
Monitor |
Model/manufacturer? Horizontal and vertical scan rates (range)? |
RAM* |
How much? |
Printer |
Model/manufacturer? lpt or com? |
Note that the “*” denotes entries for which the Linux installation program is most likely to autodetect the hardware configuration for you.
If you have a very ordinary PC, the mouse is probably a Microsoft-compatible serial mouse. The hard drive/s and CDROM drive are probably IDE devices. The sound is probably Soundblaster/16/Pro compatible. Your floppy drive is probably 3.5 inch, 1.44M. Your printer is on a parallel port at lpt1. Maybe, maybe, maybe!
In the case of IDE drives, it is helpful to have an idea how they are connected. Your IDE interface may be a card or on the motherboard, and usually has two sockets, Primary and Secondary IDE. The boot-up (C:) hard drive is the Master IDE device on the Primary IDE socket. Each IDE socket can have a ribbon cable connected that allows two devices to be connected, a Master and a Slave. If you have only one hard drive, it is the Master, and your CDROM drive will probably be on the same ribbon cable as Slave. It may be that the CDROM drive or additional hard drive is plugged into the Secondary IDE socket, which can also have Master and Slave devices.
If you don't know the IDE configuration, but you only have one hard drive and one CDROM drive, most likely the former is Master on the Primary IDE, and latter is Slave on the Primary IDE. However, especially if you have more than one hard drive, it is worthwhile opening up the PC cover and looking at the physical cabling. You should be able to see two sockets together, and if there is a ribbon cable in just one of them, going to both hard drive and CDROM, then you know that you are only using the Primary IDE socket and the hard drive is Master, CDROM drive is Slave.

Note however that the installation program will probably autodetect this for you – so you don’t have to get out the screwdriver and open the case if you don’t want to!
With regard to the modem, if you have a thing called a WinModem (also known as a software modem), throw it out. These stupid things are a nasty attempt by manufacturers to save a few dollars on the retail price, by not having a hardware UART. They simulate the operation of the UART, that is, parallel-serial conversion, in software, and they only work with MSWindows as they require special drivers. Note that you don't need to know the details about connecting (dial-up via telephone) to your ISP (Internet Service Provider) at this stage -- you configure for that after you've got KDE running.
With regard to the Ethernet network card, if you are operating your PC stand-alone you won't have one. If you will be using your PC in a LAN (Local Area Network), you should have the network card in-place before you install Linux. You will need to have answers ready during install, such as the machine's host name, domain name for your network, IP address assigned to your PC -- see your network administrator and get all the specs, or even better have him/her handy when you install Linux. Specifically, obtain the specs in Table 1.4 before you commence installation.
Table 1.4: Typical network specifications.
Network specification |
Example |
Your PC's host name |
bkauler2 |
Network domain name |
fst.ac.cowan.edu.au |
Your PC's IP address |
139.230.141.104 |
Subnet mask |
255.255.255.0 |
Network gateway address |
139.230.141.1 |
Network DNS server |
139.230.128.5 |
Hardware specs |
eth0, io=0x6100, irq=11, NE2000-compatible, PCI bus |
With regard to the monitor, the Linux install process may come up with a list of model/manufacturers of monitors, and if yours is there, great. Otherwise you must obtain the documentation for it, or get the specs from the vendor/manufacturer. What you need is the vertical and horizontal scan rates. These may be specified as discrete acceptable values or as a range or ranges. The horizontal scan rates should be specified in KHz (KiloHertz) and the vertical scan rates in Hz (Hertz). You absolutely must obtain these specs if your monitor type isn't identified by the install program.
With regard to the video adaptor card or chip, once again it should be listed in the install process. It may be listed as the model/manufacturer of the card, failing which it may be listed as the type-number of the video chip used on the card (or on the motherboard). If neither of these are listed, you are in trouble. You can manually enter some specs that the install process will ask you, and you should be able to install Linux, but you won't be able to switch into graphics mode to run KDE. Chapter 2 has troubleshooting procedures for this. Basically, you have two options: maybe an upgrade of XFree86 supports your video chip, or you buy a new video card.
If you have SCSI, Plug and Play, PCI, or PCMCIA devices, and you are at all confused about the configuration, you will find SCSI HOWTO, Plug and Play HOWTO, PCI HOWTO, and PCMCIA HOWTO at http://www.linux.org/help/howto.html. They may also be on your CDROM, in /doc/.
I'm not saying you have to go off and read these right now -- information overload may occur! I'm just mentioning that these docs do exist, and maybe you might like to briefly scan them now, and you will also find some relevant sections in your distribution's Installation Manual. Knowing that they exist is important, and you may want to visit these if you strike a hitch during the actual install.
MSDOS can tell you a lot. Power-up your PC, to the MSDOS prompt. If MSWindows 95/98 is installed, hitting the <F8> key a few times during power-up will bring up a menu that gives you the option of stopping at the MSDOS prompt. Or, you can shutdown from the Start button to the MSDOS prompt.
At the prompt type this:
C:> MSD
This is the Microsoft System Diagnostics program. Write down everything. Note that later systems may not have the MSD program. PCs that have been upgraded from MSWindows 3.x to 9x may have the old MSDOS files still. The newer MSDOS files are in c:\windows\command\, and the old ones may be in c:\dos\ (or somewhere else). The old ones will not be in the search path, so you will have to change into c:\dos\ and execute msd.exe.
MSWindows can tell you a lot. If MSWindows is running on your PC, fire it up, go to the My Computer icon, then the Control Panel, select System icon, then browse around finding out as much as you can to answer the above questions. Above all, write everything down - you never know what might be useful!
You may be able to charge right in and collect all required hardware information, but if you feel that you need your hand to be held a little more, I have spelt out the steps to extract information from MSWindows 95/98 in CASE #2, on page xxx.
All of this background work is good, but when Linux installs it does a lot of auto-probing and will discover many things for itself. In fact, it may discover almost everything -- Linux developers keep improving the install process, including the auto-probe. This will be very good news for you, and you may only have to supply a few items of information, such as the type of printer and monitor. Even a Linux distribution with a most basic install program will auto-probe and find out which lpt port your printer is on, but it may ask you to confirm that -- just accept what it has found. Note that Linux refers to the parallel ports as lp, not lpt, and numbers them lp0, lp1, and lp2 corresponding with MSDOS’s lpt1, lpt2, and lpt3.
As a quick little memory exercise before you start installing, (try to) memorise the names that Linux uses for hardware devices and ports, as shown in Table 1.5.
Table 1.5: Linux hardware devices.
| Name | Device type | Values |
| lp | Parallel port | lp0-2 (lpt1-3 in DOS) |
| ttyS | Serial port | ttyS0-3 (com1-4 in DOS) |
| fd | Floppy disk | fd0, fd1 (A:, B: in DOS) |
| hd | IDE hard/CDROM drive | hda, hdb, etc (C:, etc., in DOS) |
| sd | SCSI hard drive | sda, sdb, etc (C:, etc., in DOS) |
| eth | Ethernet network card | eth0 |
Note that cua0-3 is an older name for the serial ports, now named ttyS0-3.
Don't forget that hda, hdb, sda, sdb, etc, refers to physical drives, not partitions within a drive. This differs from MSDOS, in which C: and D: (for example) could be two partitions on the same drive. As explained in the next section, Linux appends numbers to these to designate partitions within a physical drive. This leads us very naturally into STEP 2 ...
I reckon we can classify hard drive partitioning as "hardware" and use this icon. So anywhere in the book where I've discussed hard drives and drive partitioning and booting, I have stuck this icon in. This icon is used as a generic symbol for all hardware discussion in the book.
If you have MSDOS and MSWindows already installed on your PC, do you want to keep them? Is your hard drive on the small side? Linux will need 100M to 1G, depending on what you want to install. A typical personal workstation will need at least 500M.
If there is enough room on your hard drives to keep MSWindows, consider uninstalling it, repartitioning the hard drive, then reinstalling. Apart from anything else, this is very good from MSWindow's point of view, as you will get a new stable system without junk files and configuration modifications made by various applications that may in the past have been installed and uninstalled. Actually, you basically have three choices, as shown in Table 1.6.
Table 1.6: Partitioning options.
Drive configuration |
Choices |
Only one hard drive |
Do not uninstall MSWindows. perform non-destructive repartitioning to make a partition(s) for Linux. Or, if the drive is already partitioned, maybe the second partition is big enough to be used by Linux. |
Only one hard drive |
Delete everything from the hard drive by repartitioning. Reinstall MSWindows. |
Two or more hard drives |
Delete everything from the second drive and use it for Linux. |
In Installation: CASE #1 (page xxx), I started from scratch with a new 4.3G hard drive. The installation of MSDOS automatically partitioned the drive into a DOS partition of 2G and an extended partition. MSDOS 6.2 only understands partition sizes of 2G, so it simply created that and left the rest of the drive. This was convenient for me, as in the Linux install I was able to select the extended partition as the Linux partition.
In Installation: CASE #2 (page xxx), I had a single 3G hard drive (which was a single partition, i.e., a single C: drive) and I attempted non-destructive repartitioning. I gave up and deleted all partitions and created a DOS partition of 1G and an extended partition for Linux of 2G. I reinstalled MSWindows into the 1G partition.
In Installation: CASE #3 (page xxx), I had a single 1.2G hard drive, and I decided to dump MSWindows entirely. There was just not enough room for both.
I think it's a limitation of the BIOS, but in any physical hard drive there can only be four partitions. A partition in MSDOS is a logical drive. The first partition is drive C:, the second is drive D:, and the CDROM drive tags on at the end. As my above-mentioned CASE #1 had only one DOS partition, it was drive C:. The extended partition is not a usable DOS partition, so MSDOS and MSWindows should ignore it. The CDROM was then drive D:.
Clarifying this a little more, we are allowed to have 4 primary partitions per physical hard drive, but one of these can be declared as extended. This extended partition can have up to 12 logical partitions. So, partition numbers 1-4 are the primary ones and 5-16 are the logical ones. Don't let this confuse you -- these primary and logical partitions are to workaraound the BIOS limitation, but you can behave as though you have at your disposal 16 partitions, numbered 1-16, and there is no need to be concerned that some of them are primary and others logical. That is, as far as the user is concerned, a partition is just a partition.
I also introduced Primary, Secondary, Master and Slave IDE connections, and maybe this should be clarified. Table 1.7 hopefully does that.
Table 1.7: IDE conections.
| Channel | Name | Description | |
| ide0 | Master | hda | Primary IDE channel |
| Slave | hdb | ||
| ide1 | Master | hdc | Secondary IDE channel |
| Slave | hdd | ||
As introduced in STEP 1, your IDE interface probably has two IDE sockets,
Primary and Secondary, each allowing a ribbon cable that can have two devices,
called Master and Slave. The boot drive would normally be
ide0,
Master, and Linux would refer to it as
hda.
From the physical layout of the cabling inside your PC, you should be able
to figure out what is
hda,
hdb, etc. IDE cabling is illustrated in
Figure 1.1.
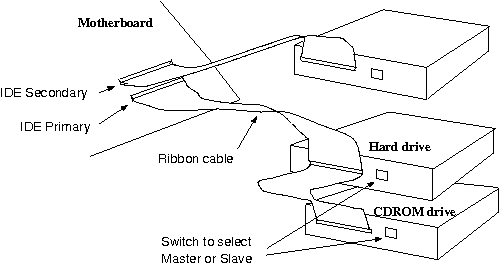
Figure 1.1: IDE cabling inside a PC.
Then, the partitions inside a drive will be numbers, for example, hda1, hda2, etc. If you still find it confusing, it is likely that the autoprobe of your installation program will discover everything for you. But, it's nice if you know, and can confirm what is auto-found.
The more sophisticated Linux distributions will be able to analyse your drive setup and make suggestions for you, which eases things considerably. Hopefully you will not have to worry much about this potentially complicated issue of partitions. However, if you want to dual-boot with MSWindows, it is worthwhile studying some of the issues. Unfortunately, although they install into different partitions, either operating system, or maybe either install process, may corrupt the other.
There are excellent HOWTO documents for dual-booting with MSWindows 3.x, 95. 98, and NT, at this Internet location http://www.linux.org/help/minihowto.html, and probably on your distribution CDROM in /doc/. You will also find the case studies in this chapter to be extremely helpful in this regard.
What you must appreciate is that Linux does not name physical or logical drives as A:, B:, C:, etc. This is explained above, and in Installing Debian Linux (page xxx) but, I want to hammer the point in.
In the abovementioned CASE #1, my 4.3G hard drive is connected as Master to the Primary IDE socket, with CDROM drive as Slave. Linux recognises the hard drive as hda and the CDROM drive as hdb. Linux appends numbers to identify partitions in a physical drive. My hard drive has a DOS and an extended partition, so Linux identifies these as hda1 and hda2. The BIOS only allows four partitions, called primary partitions, but Linux requires more. In the case study, Linux claimed the extended partition (hda2) and then divided it up into logical partitions hda5, hda6, and hda7. The numbering starts from five, so as not to clash with hda1-4 that are set aside for primary partitions.
In Installation: CASE #1 (page xxx), Linux uses hda5 as the boot partition, hda6 for Linux and all the applications, and hda7 as a swap partition.
The official documentation explains the purpose of each of these. An installation may create more partitions, but only these three are created for Red Hat's Workstation class of installation. The Red Hat people have taken steps to simplify the install process by having "classes" of installation, which avoids you having to make complicated decisions, such as about partitioning. Workstation class is intended for Linux running on a standalone PC. Again, read the official documentation. Any other Linux distribution, such as Debian, can install into just 3 partitions also -- in fact, technically it is possible to put everything into a single partition. However, I've never seen this recommended anywhere, and there may be complications.
In Installation: CASE #2 (page xxx) I followed the same partitioning scheme as for CASE #1, but I took the opportunity to explain further details about disk partitioning. You may find this useful reading before you attempt your own partitioning exercise. This was a Debian installation.
Installation: CASE #3 (page xxx) was a SuSE installation. I have only a single 1.2G hard drive on the PC, so decided to throw out MSWindows entirely. I allowed the SuSE install program to choose the partitioning, and it created logical partitions the same as the previous two case studies. That is, hda1 for the kernel (mounted as /boot/), hda2 for the swap file, and hda3 for the filesystem (mounted as /).
Linux installation experts advise that if you are going to dual-boot Linux with another O.S., it is easier if they are on physically separate hard drives. This does seem reasonable, as it would seem less likely that installing one will corrupt the other. If you already have two hard drives in your system, fine.
If you would like a little background reading to examine this issue further, look at Multi-disk HOWTO, a document that is in HTML format and may be on your distribution CDROM, maybe in /doc/, or can be found at http://www.linux.org/help/howto.html.
You have overcome the hurdles of learning all about your hardware in STEP 1, then tackled the mysteries of hard disk partitioning in STEP 2. Now the third great mystery is that of floppy disks. This is a confusing area for Linux newbies, as the official installation manuals refer to a range of different floppy disks that you may or may not need to create.
Most likely you will be installing Linux from CDROM, so my explanation is based on this. Note however, that it is possible to install Linux from the Internet via FTP, from a PC network, from a hard drive, and via floppy disks. Yes, it is possible to obtain a complete Linux distribution on floppy disks, but let me hurry to discourage you from that route.
In the vast number of cases you have a CDROM, and this narrows your installation choices somewhat. Basically, they are two:
However, regardless of whether your PC falls into category 1. or 2., you can choose to boot from an installation disk. Normally, when you reboot or power-up a PC, the BIOS checks first to see if there is a bootable floppy inserted into the A: drive. Failing that, the BIOS will look at the CDROM drive (for a PC capable of booting from the CDROM drive). failing that, it will look at the hard drive (the Master Boot Record of the hard drive). You will find that your PC's BIOS setup can configure this sequence.
Anyway, I will describe the technique of making an installation disk. As I have already stated, even if your PC can boot from a CDROM, you can still use the floppy installation disk method.
Now, what is particularly confusing for Linux newbies is that there are many different floppy disks that you may or may not be required to make. They are listed in Table 1.8.
Table 1.8: Types of floppy disks.
| Floppy disk type | Explanation |
| Installation | Power-up with this in A: drive, Linux CDROM inserted, to install Linux or upgrade. |
| Supplemental | An extra disk required during installation, for special cases. For example, CDROM is on a PCMCIA interface (may also be called a driver, or modules disk). |
| Boot | Power-up with this in A: drive, to run an already-installed Linux, when LILO isn't working. |
| Rescue | When powering-up with the boot disk or installation disk, can choose to insert rescue disk, which loads Linux from the floppy. Use when the already-installed Linux isn't working. Note that some distributions do not have a separate rescue disk; Debian for example, includes the rescue functionality inside the installation disk. |
If you have a CDROM connected to a PCMCIA interface, or you want to install Linux via FTP, hard drive, or SMB shared drive, you will need a supplemental disk. Refer to the official manual for details. I'll assume you have a fairly normal PC and you are going to install Linux from a CDROM -- you don't need a supplemental disk.
I presume your PC can boot into MSDOS, and that you have drivers for accessing the CDROM from MSDOS. Do not go into a "DOS box" inside MSWindows -- you must exit entirely from MSWindows. If you are unclear on this, get to the MSDOS prompt, either during power-up by pressing <F8> or by exiting from MSWindows. Then, try to change to the D: drive, or whatever the CDROM drive is supposed to be (I have assumed D: in the rest of this section, for convenience). If that fails, you don't have the MSDOS drivers for the CDROM running.
Don't panic. Use the MSDOS edit.exe program to open c:\config.sys and c:\autoexec.bat. Or, if you booted from a MSDOS floppy boot disk, look at these files on the floppy disk. You may find CDROM drivers that have been commented-out, by a "rem" at the beginning of the line. If so, restore them and reboot.
If there are no commented-out drivers in those files, still don't panic. Read Non-destructive repartitioning (page xxx), which, among other things, tells you how to create a MSDOS bootable floppy.
Most unfortunately, the terms “boot”, “installation”, and “rescue”, with regard to floppy disks, are used in confusing ways in the various official manuals. To get started with creating an installation disk, you need certain files. Considering each distribution in turn:
Red Hat
The Red Hat CDROM has various MSDOS utility applications in D:\dosutils\, and there you will find rawrite.exe. The various types of floppy disks are kept as complete images, in D:\images\, and the one required to make an installation disk is boot.img (though a boot disk is something different - argh!). Anyway, for Red Hat, you need rawrite.exe, boot.img, and a blank formated 3.5 inch floppy disk.
Debian
In the case of the Debian distribution, you will find both rawrite.exe and the installation disk image on the CDROM at D:\dists\slink\main\disks-i386\2.1.8-1999-02-22\. Unfortunately, Debian uses a directory structure that varies with distribution version. Debian version 2.1 is codenamed Slink and the next version is codenamed Potato. The example given here is for a Slink distribution. Also confusing is that the image for the installation disk is called resc1440.bin. The reason for this is that Debian includes the functionality of the rescue disk on the same disk as the installation disk. So, for Debian you need the two files rawrite.exe, resc1440.bin, and a blank formatted 3.5 inch floppy disk.
SuSE
The SuSE CDROM has MSDOS utilities in D:\dosutils\. Here you will find rawrite.exe. The floppy disk images are in D:\disks\. There are various installation disk images, the one for most systems being eide01. The supplemental disk is modules and the rescue disk is rescue. To get going with SuSE, you will need rawrite.exe, eide01, and a blank formatted 3.5 inch floppy disk.
PLEASE NOTE that if you buy the boxed set from Red Hat or SuSE, you get an installation floppy in the box, along with a printed manual.
At the DOS prompt (not in a DOS-box), change to the directory containing rawrite.exe, place a blank floppy disk in drive A:, and type this:
prompt rawrite
Source file: [path]eide01
Target drive: A
By “prompt”, I mean the DOS-prompt, which you don't of course type. “Source file” and “Target drive” will display on the screen and again you don't type it. For the source file, you specify the image supplied with your distribution (eide01 is an example, for the SuSE distribution), and you only have to put a complete path if the image file isn't in the current directory (which is why I've shown it in square brackets, which is a standard way to designate that this bit is optional).
Note that the Debian documentation mentions making a floppy disk from root.bin, but this is not required for 1.44M floppies, as root.bin is actually inside resc1440.bin. That is, it contains the rescue functionality.
The installation is commenced by placing the installation disk in the A: drive and the first binary CDROM of the Debian distribution into the CDROM drive, then reboot.
These days all Linux distributions have graphical installation programs, and they are generally quite easy to use. You may be able to perform the installation phase without any further reference to the official manual, though of course I do recommend that you read it. Basically, you will be presented with a series of windows, that will tell you what is going on and will ask questions, and it should be smooth sailing.
Refer to the Red Hat, Debian, and SuSE case studies for comments on installation issues for this step. The case studies are in Installation: CASE #1 (Red Hat)(page xxx), Installation: CASE #2 (Debian)(page xxx), and Installation: CASE #3 (SuSE)(page xxx).
Toward the end of the installation, you will be asked if you want to create a boot disk, and maybe a rescue disk (depending on the distribution). Reply “yes”.
The boot disk is different from an MSDOS boot disk. The latter loads its own copy of MSDOS from the floppy, and does not load MSDOS from the hard drive. Actually, this corresponds to the Linux rescue disk.
You use the Linux boot disk most often when you have messed up LILO, the boot loader. Maybe you reinstalled MSWindows after having installed Linux, which changed the Master Boot Record and you no longer have dual-booting. This is a common problem, which the boot disk gets around. The Linux boot disk simply causes a jump to the appropriate Linux partition on the hard drive, and Linux will boot as normal.
The Linux rescue disk on the other hand, loads its own cut-down copy of Linux from the floppy. You use this when you've stuffed up Linux entirely, and you can't log in or whatever. The cut-down version of Linux has various basic utilities for examining your system, and hopefully enables you to repair the fault.
You will end up with two or three disks: installation, boot, and rescue. With Red Hat, you can boot your PC from the installation or the boot disk, and both of these will give you a prompt to type in “rescue” and then you will be asked to install the rescue disk. Debian works slightly differently, in that you boot up on the installation disk and a menu will appear, from which you can choose various remedial actions apart from reinstallation, such as to run a cut-down version of Linux.
That is, you do not boot directly from the rescue disk. For example, if you type “rescue” when the Red Hat boot disk prompts you to, various messages will flash on the screen, then you will see this message:
VFS: Insert root floppy disk to be loaded to ramdisk and press ENTER.
Yeah, that's clear, isn't it? What it's really asking you to do is insert the rescue disk.
Note that some distributions use the same disk as installation disk and as boot disk. Note also that you can create a rescue disk (and maybe others) at any time. In the case of Red Hat, D:\images\ contains rescue.img. For SuSE, look in D:\disks\, where you will find rescue (rescue disk image).
If all went well, you should be able to reboot your PC, and LILO will run, giving you dual-booting capability. After the initial stuff that the BIOS puts up on the screen, you will see one of the following prompts:
LILO
LILO boot:
If the first line appears on the screen, it means that you have to press the <alt> key, then you can type the name of the operating system that you wish to load. If the second line appears, you do not have to press the <alt> key, and can go straight ahead and type the name of the operating system.
The installation phase should have informed you what names it has assigned to each operating system, but if you don't know, just press <tab> after the boot: prompt, and the options will display. You can then type in the one you want.
The prompt will only wait for a few seconds, then will default to loading Linux.
If you want to configure how LILO works, such as eliminate the need to press <alt>, to change the wait period, or to change the default operating system, see Installing Debian Linux (page xxx).
During the installation phase (STEP 4), you will have been asked for a password, so that you can login as superuser, or root user. The superuser has unlimited access to the system. Some distributions will also ask you for a personal username and password, for a user login account. Some distributions will not perform this extra step for you, and it will be up to you to create your own user account.
Let's assume that the installation phase did not create a user account for you. So, the first time you login it must be as the superuser:
Login: root
Password: xxxxxxxx
As always, I only use italics where I want to emphasise the bits that you don't type. I hope you haven't forgotten the password!
Remember, as root you can do anything. When you login as root, a prompt will appear, that will terminate with a #:
[root@localhost /root]#
What appears in the square brackets varies with distributions, and can be configured, but the important thing for you to note right now is that that # is telling you that you are logged in as root or superuser. If it was a $ it would be telling you that you are logged in as an ordinary user.
Well, there is another bit of useful information in that example prompt also. /root/ is the current directory, and is the superuser's home directory.
As the superuser, you have the responsibility to manage the lowly user accounts. Including creating one for yourself. It is considered a bit dangerous to have unlimited power all the time, so you create a user account for yourself, and that's what you will normally use when you login. Some distributions create one user account as well as the root account during installation. If not, one of the first things you should do is create an account for yourself. Type this:
# useradd bkauler -d /home/bkauler -m
New Unix password: xxxxxxxx
Retype new Unix password: xxxxxxxx
In the rest of this book I have shown the Linux commandline prompt as just # or $, as what precedes it is variable. So above, you type “useradd”, which is a program, followed on the same line with the username that you want to be known by. The useradd* program will then ask you for a password, and no, I am not going to tell you my password!
The /home/bkauler entry appended above, is where you want your home directory to be. Normally you will create home directories for all users inside /home/. The -m postfix tells useradd* to copy all the files from /etc/skel/ to your new home directory. These are various default setup files, and you will probably find that they are all hidden files (the filename is preceded by a period).
If you want to logout, and come back in as an ordinary user, type:
# logout
When you login as an ordinary user, you will find yourself in your home directory. In my example, where I named myself bkauler, my home directory will be /home/bkauler/. Each user gets his or her own home directory, so you can create user accounts for the kids, and as superuser you will be able to control their access to the system.
Note that if you want to get rid of a user, type this:
# userdel -r bkauler
The -r option causes the user's home directory to also be deleted.
Now, there is an important point to note here. When Linux boots, it may not go to the commandline, as described above. Instead, KDE (or some other graphical desktop environment) may be launched directly, and you will be presented with a graphical login window. If the installation phase did not give you the opportunity to create a personal user account, you can do so inside KDE (or other desktop environment).
One way to do it inside KDE (or other desktop environment) is to run a commandline window. Locate an icon which looks like a big K (KDE only) - it may be in the panel at the top or bottom of the screen, on the left-hand side. Click on it (left mouse button), then click on Utilities, then click on Konsole. Up will come a commandline window. Note that in the rest of this book I have shown sequences of steps like this in a shorthand notation; in this case it is KØUtilitiesØKonsole.
Once you have the console (or terminal) running, you can execute the useradd* program as described above.
Sometimes Linux newbies are a bit confused about this. Linux does have a shutdown* command, but as most of you, my dear readers, will probably have the system setup so that your PC boots straight into the KDE graphical login screen, I will also describe the logout and shutdown procedure for that setup.
It's that big K button again. Click on it, and choose Logout. You will be asked to confirm by pressing a button marked Logout, and if you do confirm, you will be back at the graphical login window. There you will see a Shutdown button, which will ask if you want to shutdown completely, or reboot and restart. In my shorthand notation that is KØLogoutØLogoutØShutdown. Quite simple.
If you have logged into the text-mode commandline, and are not inside a graphical desktop environment, a crude way to shutdown is to type “logout”, then hit <ctrl-alt-del>, then when the PC just starts to power-up turn it off.
Only the superuser can execute the shutdown* program, which poses a problem for the normal user. However, there is a command that allows you to temporarily change to another user: the su* command .
See Directory Permissions (page xxx)).
If you are superuser, you can execute shutdown* directly:
# shutdown -h now
The -h option means shutdown and halt. The alternative is the -r option, which causes a reset. now means immediately.
An ordinary user can type this:
$ su -c '/sbin/shutdown -h now'
Password: xxxxxxxx
The su* program will ask for a password to switch into superuser mode, then will execute what is between the single-quote marks. That is rather a lot to type in just to shutdown!
Has the installation program installed and configured the X server for your video card and monitor? Has it installed KDE? If yes to both, then you may be able to launch KDE immediately. If not, read this section then go to the sections recommended for further installation instructions appropriate for your distribution.
With certain distributions, the installation may have installed and configured the X server, and installed KDE and set it as the default.
If such is the case, but KDE does not launch when you first login, you may need to type something at the commandline prompt, or you may have X server installed and configured ok but not KDE. Read the official manual supplied with your distribution for further information on this. If X server is installed and configured and KDE installed, login as an ordinary user and type whatever is required. Typically this may be:
$ usekde
$ startx
The first line is typed once only, and configures KDE for your personal use. It will create files in your home directory. The second line is what you type to start KDE. Each user will have to execute usekde* just once, to create their own personal KDE files -- the great thing about this is that each user can mess around with KDE, changing the desktop appearance, and it won't affect other users.
Please read the official documentation, that is, the installation manual, supplied with your CDROM, for the specific instructions to start KDE. Also, I have made notes on installing and starting KDE for Red Hat, Debian, and SuSE in each of the case studies #1, #2 and #3, in Chapter 2.
When I installed the Red Hat system in CASE #1, I had to type the sequence “usekde” and “startx” as shown above. With SuSE in CASE #3, I only had to type “startx”.
What you may find with your distribution is that the first time you login, you will be in the text-mode commandline, but after you have performed the above steps to run KDE for the first time, every time after that whenever you power-up you'll go straight into the graphical login window.
Or, you may have to modify some configuration files to be able to go straight into the graphical login, or to make it work as required. For example, with SuSE I had to modify /etc/rc.config.
If starting KDE is not obvious, if you can't even get the video graphics mode to run, or any problems whatever, you will need to study Chapter 2, which tells you all about the intricacies of installing the X server and KDE. CASE #1 (Red Hat) is in Troubleshooting Xfree86: CASE #1 (page xxx) and Troubleshooting KDE install: CASE #1(page xxx), #2 (Debian) is in Troubleshooting KDE install: CASE #2(page xxx), #3 (SuSE) is in Troubleshooting KDE install: CASE #3 (page xxx).
Note that Section Troubleshooting Xfree86: CASE #1 has information of relevance to all distributions, to get the X server going.
A little while ago I put together a PC out of old and new parts. The motherboard was new, with Cyrix 6x86 P300 230MHz CPU, CMI8330 sound chip and SiS5598 video chip. Both sound and video chips are on the motherboard. The only plug-in card is an old 14.4K modem.
The hard drive is a Fujitsu 4.3G, partitioned with the first 2G a DOS partition and the rest is a single extended partition. The first partition has Win95 (the early version, with the 2G limit), with Red Hat Linux version 5.2 in the second partition.
Actually, the original hard drive was tossed out, and the Fujitsu was new, so I was starting from scratch. This was an interesting exercise, as I had to install both MSWindows and Linux from scratch. Most people are only experienced with upgrading an MSWindows system, and from that deduce that Linux installation is much more difficult. However, my personal experience is that this popular notion is erronious.
A proper comparison is to install both operating systems onto a new hard drive, or drives. Despite the fact that all the hardware components are basically designed to be used with MSWindows, I had difficulty with installing MSWindows, on par with that of installing Linux.
I had (legal) MSDOS 6.2 and MSWindows 95 from the PC that I had gutted to construct the new one, and these I reinstalled. I first installed MSDOS, which was a very smooth operation. As I recall, I simply booted up on the first disk of the set and it detected that I had a new system, then took me easily through the install process. MSDOS 6.2 only recognises 2G hard drive partitions, so it very nicely partitioned my hard drive in half, which was exactly what I wanted.
I was a member of the Microsoft Developer's Network (MSDN) for some years, so I do have a stack of CDROMs, with a large selection of different versions of MSDOS and MSWindows, but I decided to stick with MSDOS 6.2 first, followed by the "first version" of MSWindows 95. The "first version" only recognises 2G partitions.
The motherboard was supplied with a CDROM with drivers for sound, video, and the PCI bus. At first I thought that MSWindow's auto-probing should be clever enough to determine what hardware is present, and that the standard drivers should be able to handle this very ordinary hardware. This is only a cheap board, with nothing special on it. I did get it to install and run, but the Control panelØSystem window indicated an error -- from memory, I think it was something to do with a driver conflict .
At this point I installed Linux, which somehow corrupted my MSWindows install, though I could still boot into MSDOS (by pressing the <F8> key during loading). The story of the Linux installation branches here, to Installing Red Hat Linux (page xxx).
So, I did a complete reinstall of MSWindows, this time using the drivers from the motherboard-manufacturer's CDROM, but it hung near the end of installation. On the third install, knowing that point at which it hung -- after it had asked me to reboot -- I opted not to reboot, and instead examined the System dialog box in the Control Panel (MSWindows was operational at this point in the install process) and found some icons in there with little yellow exclamation marks on them, which is MSWindow's way of showing a conflict.
This was awhile ago, so memory is not exact, but I did put some notes about this into my notebook. There was an exclamation mark on the Windows sound system (WSS) device and also on the Control panelØSystemØOther devicesØPCI card, with the message “Drivers not installed properly”.
Anyway, the point is that I “stuffed around” for some considerable time, before getting it to work. It got down to trial and error, and I eventually fixed the conflicts by going into the BIOS Setup (available at power-up of the PC, usually by pressing the <delete> key). The section Integrated peripherals had PS/2 mouse function, USB controller, and USB keyboard support all enabled. I disabled these, and everything was fine.
The curious thing about the above MSWindows hassles is that I installed Linux with the above BIOS Setup options enabled, and it worked, and Linux still worked when they were disabled, and Linux required no special drivers -- of course the motherboard manufacturer supplied no Linux drivers anyway.
Now for the Red Hat Linux install process. It was version 5.2.
![]()
Refer above, Installing MSWindows (page xxx), for the MSWindows saga.
This section trots through the install process rather fast, assuming you already know the steps required (as you have the installation manual) -- the purpose here is to highlight some issues and difficulties.
See Installation steps (page xxx) for generic (distribution-independent) installation steps.
All went well, and I chose to install LILO, the boot loader, into the MBR (the boot record in the first partition).
See Installing Debian Linux (page xxx) for further explanation of the MBR and where LILO can be installed.
Note that LILO allows multiple operating systems to be installed on a PC, and during power-up displays a prompt that allows a choice. The default behaviour is that after a five second wait Linux will load. Before long I was booting up and logging in for the first time.
Fine, except that now Windows would not load -- that is, DOS loaded fine, but crashed soon after the Windows logo appeared. I could stop at the DOS prompt ok. LILO's dual-boot capability allows “dos” or “linux” to be typed in at the LILO boot prompt, or the five second default is to load Linux. Somehow the installation of Linux had corrupted Windows.
So, I replaced LILO with the original boot loader, by typing this at the DOS prompt (after booting up into MSDOS of course):
C:> fdisk /mbr
Effectively, this took me back to the situation before I had installed Linux. The original boot loader simply boots MSDOS as normal.
I then reinstalled Windows.
See Reinstalling MSWindows (page xxx).
Then I reinstalled LILO, and it all worked. How did I reinstall LILO? Well, I started the install process for Linux, which in my case is done by placing the Red Hat CDROM in the CDROM drive and the Linux installation disk in the A: drive, then I rebooted.
Incidentally, it is important to note that after installation of Linux you should have at least two floppy disks, the installation disk and a boot disk. You create the former before commencing the install process and you are offered the option of producing the latter during install. The boot disk allows you to boot up Linux if it won't boot from the hard drive. This occurred when I removed LILO, but by using the boot floppy I was still able to run Linux.
Anyway, how did I get LILO back into the MBR? I chose “expert” install, then “upgrade” as opposed to a full install. Then I chose to upgrade nothing, and finally came to the part for installing LILO and I chose the MBR.
Hey, dual booting works!
What I must emphasise at this point though, is the issue of coexistence between the various versions of MSWindows and Linux is receiving considerable attention by Linux developers, and the version of Linux that you install probably will install quite happily alongside MSWindows. If it doesn't, then maybe my notes above will be useful.
Further very extensive notes on this topic are to be found on the Internet, at http://www.linux.org/help/minihowto.html.
This site has numerous HOWTO documents, one of which is bound to solve any problem that you encounter. You may also find many of these HOWTO documents on your Linux distribution CDROM in /doc/ directory.
My system is a Pentium 166MMX, with 32M RAM, 20-speed IDE CDROM drive, and 3G IDE hard drive. It already had MSWindows 95 installed. I needed to keep MSWindows. The hard drive was a single partition and the file system was FAT32. This system is permanently connected to a network, and has an Ethernet card. The video card is an S3 ViRGE PCI, sound is an ESS ES1868, the network card is a Realtek RTL8029 PCI Ethernet, and the PCI controller chip on the motherboard is an Intel 82371SB.
I have taken the opportunity in this case study to spell out the steps to obtain hardware information from MSWindows, in case you feel that the instructions in STEP 1: Find out everything about your hardware (page xxx) are too terse.
This case study describes a difficulty I had with non-destructive repartitioning, and once again I started with a clean drive and reinstalled MSWindows (with difficulty).
This case study describes installation of Debian Linux version 2.1.
As the majority of people will be installing Linux on a PC that already has MSWindows, I have taken the opportunity here to take some screenshots.
I use a fairly informal way of describing how to negotiate to a particular window. For example, if I say to go to My ComputerØControl PanelØModemsØCOM1ØMore info..., It loosely describes the series of selections you would need to make to reach the window in question. Each selection could be an icon, a selection from a list, or a button. The example given here can be seen in Figure 1.4, and the user would have to select COM1 then press the More info... button.
The central place to go for finding hardware information is shown in Figure 1.2.
Figure 1.2: MSWindows 9x My ComputerØControl Panel.
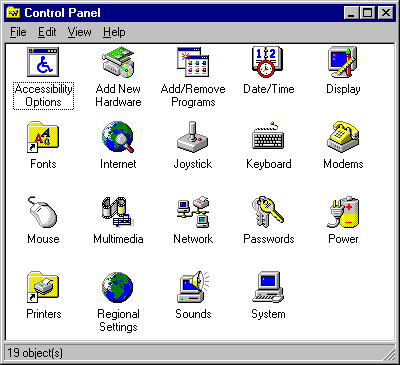
The names of the icons are self-explanatory. For example, if you want to learn about your modem configuration, double-click on the Modems icon. Other icons to look in are Internet for your Internet connection, Joystick, Keyboard, Mouse, Network, Printers, and System. The last one will give most information, and in most cases information found in other icons is a duplicate of that in System.
Figure 1.3 shows the System window.
Figure 1.3: MSWindows 9x My ComputerØControl PanelØSystem.

However, you may find that the System window gives too much, or confusing, information. To be more focused on particular hardware items, look in the other icons.
Basically, what you do is browse around, looking for the specs on the hardware items, as I have tabulated in STEP 1 of the generic installation process.
See the generic STEP 1: Find out everything about your hardware (page xxx).
Note that Figure 1.3 has an item called Other devices, with a big question-mark icon against it. This contains devices that MSWindows has found but cannot identify. However, they are not causing any conflict. If the icon had been a big exclamation-mark, it means that MSWindows has determined that the device is conflicting with something else. The latter is a serious problem.
This particular PC (CASE #2) was purchased with MSWindows pre-installed. You will read as this case study unfolds, that I attempted a non-destructive repartitioning, then decided to wipe the whole disk, partition it, then reinstall it. After some difficulty, I reinstalled MSWindows, but now have the big question-mark icon.
This is discussed further in Reinstalling MSWindows (page xxx).
To illustrate finding information on a specific device, but not in the System window, look at Figure 1.4.
Figure 1.4: MSWindows 9x My Computer/Control Panel/Modems.
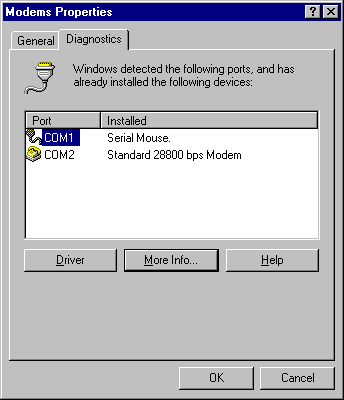
The Modems window is particularly useful, as you can see at a glance what all the COM ports are for, not just which one is used by the modem. Furthermore, you can find out which irq number and io address is used by each, simply by highlighting a COM port and clicking on More Info....
Actually, this PC doesn't have a modem. I put in a hypothetical one for illustration purposes. This PC sits on my desk at work and is connected via an Ethernet network card directly into the department's LAN (Local Area Network). I have a Realtek RTL8029 Ethernet card, for which I supplied a driver disk during the install. You can see it listed, and Properties can be used to obtain information. I can use Netware software to communicate over the network, and share printers and other hard drives (The Netware entry is on the list, just higher up, out of view). However, for Internet access the TCP/IP entry is relevant. Look at Figure 1.5.
Figure 1.5: MSWindows 9x My ComputerØControl PanelØNetwork.
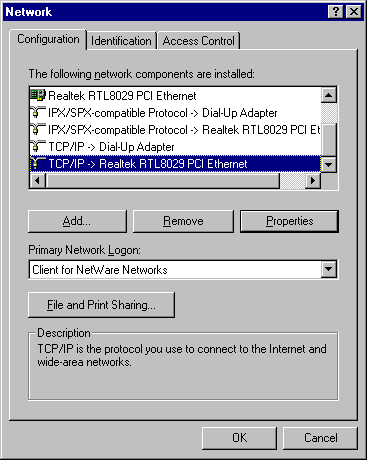
Note that there are two TCP/IP entries, one for the modem and for the Ethernet interface. If your PC has just one, say an Ethernet card, then there will just be the one entry. Note also that the IPX/SPX protocol was automatically put in there during installation of MSWindows, but I do not use it and could have deleted those entries.
Highlight TCP/IP (for the Ethernet card in my case) and click on Properties, and obtain all the setup specs for Internet access.
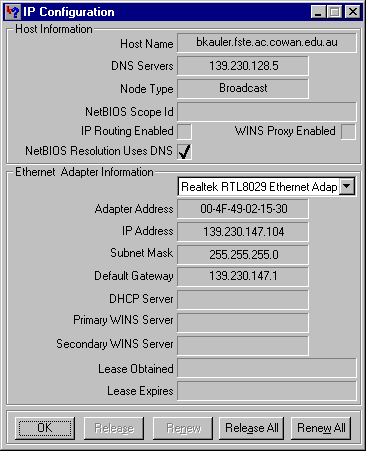
Another way to obtain a quick summary of network settings is by clicking the Start button (bottom-left of screen), then Run, and executing an application called winipcfg.exe. This is shown in Figure 1.6.
Figure 1.6: MSWindows StartØRunØwinipcfg.exe
At the time of writing, there is intense work going on to improve this area of Linux installation. The scenario is that you have a big hard drive, a single big partition (the C: drive), MSWindows installed, and you want to keep MSWindows and make room for Linux.
You will need to partition the hard drive, but normally this will destroy everything on the disk. Caldera, a Linux distributor, have developed a technique for non-destructive repartitioning, in which MSWindows and all files and applications can stay on the disk. The trick is to defragment the hard drive, that is, move all files to the beginning of the drive, to make room for another big partition. Caldera has managed to do this, and it apparently works extremely well. Mandrake, another Linux distributor, has something similar (see below).
To install Debian Linux 2.1, the only non-destructive repartitioning tool available to me at the time was an application called fips.exe. Many people have used fips.exe successfully. In this case study, I could have been successful if I had persisted a little more. Fips.exe is an MSDOS application, and is probably on your Linux CDROM.
It can also be downloaded from ftp://ftp.debian.org/debian/tools/. It needs to be unzipped.
Here are the steps:
Some of these steps need more explanation.
You may already have a boot disk, but you can also create one, with your own customisation. There are two ways to create a new bootable floppy disk. Do this from the MSDOS prompt, but not inside a DOS-box inside MSWindows.
C:> sys a:
C:> format a: /s
Use either of these. The former presumes an already-formatted disk to which you are adding the system files.
Copy these files from c:\windows\command\ to the floppy disk: edit.com, fdisk.exe, format.com, scandisk.exe. Copy fips.exe to the floppy. Copy c:\windows\himem.sys to the floppy.
Copy autoexec.bat and config.sys to the floppy, and edit them. If you have CDROM access from MSDOS, you will find a line in the config.sys file something like this:
devicehigh=\sbcd\sbide.sys /D:MSCD000 /P:170,15 /V
This matches a line in the autoexec.bat file:
LH c:\sbcd\mscdex.exe /D:MSCD000 /M:15 /V
In this example, the name of the CDROM device driver is MSCD000, but it could be different in your system. sbide.sys may also have a different name in your system, but whatever it is called, copy it and mscdex.exe to the floppy.
You may also find reference to a mouse driver in either config.sys or autoexec.bat, if the mouse is to work under MSDOS. It is typically called mouse.sys (if loaded in config.sys)or mouse.exe (if loaded in autoexec.bat).Copy it to the floppy.
Edit config.sys and autoexec.bat (on the floppy!) to access the drivers on the floppy. For my case study, they look like this after editing. Firstly, config.sys:
device=a:\himem.sys
rem (delete EMM386 line if there is one)
dos=high
files=40
buffers=25
devicehigh=a:\sbide.sys /D:MSCD000 /P:170,15 /V
Now for the autoexec.bat file:
@echo off
LH a:\mscdex.exe /D:MSCD000 /M:15 /V
LH a:\mouse.exe
path=a:\
LH means “load high” and is optional. Similarly devicehigh could be replaced by just “device”.
After preparing this floppy, you will able to boot up on it and non-destructively repartition the hard drive. Or, you can destructively repartition it.
You must read the documentation supplied with the fips zip file. There are various warnings. What stumped me is that the Microsoft defragmenter program doesn't shift files that are marked as hidden and system. fips.exe examines the hard drive and determines the “outermost” occupied cylinder, then offers the operator (me) any part of the disk past that for another partition. My hard drive has 782 cylinders, and fips.exe determined that cylinder 739 was in use, so only offered me cylinders 740 to 781 for a new partition, which is only about 100M.
Yet, I knew that I had about 1.8G free on the hard drive! The culprit is the defragmenter, which doesn't move those hidden and system files. The MSWindows swap file is an example, or so I thought. I turned off the swap file, which I presumed was done by turning off virtual memory in My ComputerØSystemØPerformanceØVirtual memory. But then the defragmenter wouldn't run. The fips.exe documentation is inadequate on this point, but further help is on the Internet. Caldera use an MSDOS defragmenter, which I presume does move the hidden and system files, but the fips.exe manual warns that this is dangerous.
Note that you can get the names of all hidden and system files:
A:> dir c:\ /AH /S /W /P
A:> dir c:\ /AS /S /W /P
The first line displays hidden files, the second line displays system files. The option /S causes a search through all subdirectories. /W will cause filenames to display, and /P pauses a screenful at a time. You could delete some of these files, but that is also dangerous.
SOLUTION: Successful defragmentation
I will digress here and tell another story, of a solution to this defragmentation problem. I was unsatisfied with my failure to properly defragment the hard drive in CASE #2, so studied the issue further. I found a nice shareware tool, called ShowFAT, available from http://www8.pair.com/dmurdoch/programs/showfat.htm. This gives a pictorial view of files on a disk, and I was able to see what files the MSWindows defragmenter wasn't moving. Yes, the files marked both hidden and system were not moved. Note that when ShowFAT is started, it is necessary to go into OptionsØAttributes menu to select highlighting of hidden and system files -- then they can be seen easily.
I had to move two files, system.dat and superlok.exe. The former is the MSWindows System Registry file, and must not be deleted, but it can be moved. Note that there is also a file called user.dat, and MSWindows maintains backups of these, as system.da0 and user.da0. None of these required moving in my case. The way I moved system.dat is to remove its hidden and system attributes, as follows. Go to a DOS box, or StartØRun:
C:> attrib -h -s c:\windows\system.dat
I then ran MSWindow's defragmenter again, and system.dat was moved. The file should then have its attributes restored, by
C:> attrib +h +s c:\windows\system.dat
Another file, superlok.exe, was mysterious, as it did not have its hidden or system attributes set. Yet, MSWindows didn't move it! I deleted it, and deleted it from the Recycle bin (don't forget that last step!).
I performed this exercise on another PC, but for now, back to CASE #2.
The rapid pace of development in the Linux world amazes me. Late in the writing of this book, a new product has emerged to tackle just this problem of resizing FAT partitions. It is DiskDrake, a GUI application developed by the Mandrake company and is free. The site for further information and download is http://www.linux-mandrake.com/diskdrake/.
In CASE #2 I opted out, and decided to wipe the hard disk clean. Firstly, I wrote down all the hardware and Internet/network specs obtainable from MSWindows, then I booted up on the floppy disk and executed fdisk.exe.
xxx
The procedure with fdisk.exe is to erase the existing partition, then create a new primary DOS partition, and mark it as active (bootable). fdisk.exe asked if I wanted to use FAT32 and I responded negatively, keeping the DOS16 filesystem (which allows partitions up to 2G). I chose a size of 1G for the primary DOS partition and left the remaining 2G as “free space” - The Linux installation can partition that “free space” as Linux native partitions.
After exiting from fdisk.exe, I formatted the new DOS partition:
A:> format c: /s
Then I installed MSWindows 95, by inserting the CDROM, then:
A:> d:
D:> setup
And off she goes. Note though, that this is my homebrew approach. Your copy of MSWindows may have an installation floppy disk, and you may have some documentation about the preferred method of installation. Beware if you have an “upgrade” CDROM, which won't install if it sees that there is no earlier version of MSWindows present -- oh the joys of commercial software!
I got the MSWindows reinstallation going as described above.
Note that I did not let the MSDOS fdisk.exe program create an Extended DOS partition for the remaining 2G, though I could have. The Linux fdisk* program is somewhat more powerful, and understands various filesystems, and can be used to create the Extended DOS partition as well as Linux partitions.
However, that comes later, in Installing Debian Linux (page xxx).
The PC in CASE #2 is a few years old, and I have a box of manuals and disks that came with it, but I seemed to be missing a driver. I've installed many MSDOS and MSWindows systems over the years, and I've noticed that MSWindows 95 can experience problems with the PCI-IDE interface. What you need to understand here is that five or so years ago most PCs had only the ISA expansion bus. These are the sockets into which cards are plugged, such as video, IDE, sound, parallel/serial ports, network, and modem. I personally found installation in those days to be fairly straightforward. The IDE sockets are where cables from hard drives and CDROM drives can connect, and this is the most common form of interface for these devices. The PCI expansion bus is a computer bus, like ISA, but with enhanced features. PCI also has sockets into which can be plugged cards, and these days video, network and other cards are designed for the PCI bus. Most new PCs have both ISA and PCI sockets, so you have a choice.
Typically in new PCs the IDE sockets are implemented via the PCI bus. What I am finding is that drivers are required for the PCI-IDE devices to work properly. That is, drivers provided by the motherboard and card manufacturers, not by Microsoft. MSWindows has a range of drivers, and during installation an auto-probe can identify if any of these match with actual hardware. Failing which MSWindows has generic drivers.
My experience with MSWindows 98 is somewhat minimal, and no exposure at all to Win2000, but I am sure that the intelligence during installation will have improved from the 95 version.
Although I had what I thought was a standard IDE CDROM drive, and drivers in config.sys and autoexec.bat do work and allow CDROM access from MSDOS (see Non-destructive repartitioning (page xxx)), part-way through installation of MSWindows suddenly the CDROM drive didn't work -- it simply ceased to exist as far as MSWindows was concerned.
I had booted up on a floppy that had the MSDOS CDROM drivers, but during install MSWindows asked to reboot, and the config.sys and autoexec.bat files on the C: drive didn't have the MSDOS CDROM drivers. This shouldn't have happened, and the small amount of documentation I had stated that MSWindows 95 should automatically recognise the CDROM drive. Well, it didn't. It just ceased to exist. I had to put the MSDOS drivers into config.sys and autoexec.bat on the C: drive, then MSWindows installed ok, except that In the My ComputerØControl PanelØSystem window I discovered that both the CDROM and hard drive were being driven in “MSDOS compatibility mode”. This works, but is slow.
Just to clarify what this means. MSWindows has failed to find the hard drive and CDROM drive. So, it uses the MSDOS services (which work by the software interrupt mechanism), enabling access to the devices without actually having found them. MSWindows is intelligent enough to reason out that MSDOS must be accessing them ok, to have got that far.
I have had this problem before, but on those occasions it was a matter of installing a driver or drivers provided by the motherboard manufacturer. MSWindows did recognise and install the Intel 82371SB PCI master IDE controller, but flagged two unrecognised devices for which this driver is the parent. These unrecognised devices are the hard drive and CDROM, but how do I tell MSWindows this simple fact?
Now, I would like to tell you something quite startling. This PC has always had a problem with the floppy drive. In Windows Explorer, selecting the A: drive resulted in a long wait before the contents appeared. The floppy drive worked, but was excruciatingly slow. When I tried to access the floppy drive from MSDOS, the computer would hang. It was like this from new, but I kept putting off doing anything about it, even though it was under warranty for the first year (stupid, I know). The PC was also very slow to shutdown, and the floppy disk motor would startup for sometime during shutdown. Well, guess what -- after reinstalling MSWindows, the floppy drive works perfectly. Fast response, system shutdown is blindingly fast. And I have no idea why!
It took awhile, but I did eventually get both the hard drive and CDROM drive to be recognised by MSWindows 95 and to operate in full 32-bit mode.
One point to note is that device drivers specified in config.sys should also be listed in the file \windows\ios.ini. The latter file contains a list of MSDOS device drivers that MSWindows can “trust”. The CDROM device driver, such as sbide.sys in my case, should be listed in ios.ini. There is the risk that if MSWindows decides that the device driver is not to be trusted, it may operate the device in “MSDOS compatibility mode”, even if it recognises the device. This usually means that MSWindows will use the MSDOS device driver instead of its own 32-bit driver equivalent. In my case though, it made no difference, as MSWindows didn't even recognise the presence of the CDROM drive.
I eventually telephoned the shop where the PC had been purchased from and asked if there is a driver for the motherboard. No, they didn't have one, and told me that a driver disk should have been supplied with the PC, which I assured them they didn't supply. So, they referred me to the Internet site of the motherboard manufacturer.
My motherboard is a GA-586ATV, made by Giga-Byte, and the site is http://www.giga-byte.com/.
If you want any other drivers, go to http://www.driverguide.com/, and for an extensive bulletin board on drivers go to http://www.windrivers.com/.
My board has the Intel 82438VX PCI controller and 82371SB PCI-IDE-ISA controller chips, and the only “Win95 patch” that I could find on the site was TX_PATCH.ZIP, for the Intel 430TX/440LX chipsets. The comment at the site was that this patch will “fix Win95 unknown devices chipset problem”. I doubted that it is the same as my chipset, but I downloaded it and installed it (simply by unzipping and executing install.exe), and then MSWindows told me to reboot a few times, then low and behold, it worked. Suddenly my hard drive and CDROM drive were running in 32-bit mode.
I still have one unrecognised device in the Control PanelØSystem window, and it has a question-mark icon on it, but the Properties button reveals absolutely zero information about what it is or what resources it uses. Everything works though, and very well, so I left it at that!
Is there a lesson to be learned here? yes, and let's enshrine this in a box:
| If you don't have a driver disk for the motherboard, be very fearful of reinstalling MSWindows. |
In fairness though, I'm teasing Microsoft somewhat, as Linux has the same problem, of hardware getting ahead of the software. Generally, the older the motherboard relative to the date of the operating system, the more likely the latter will install without special drivers.
The Debian installation manual has some advice about settings in the BIOS. During power-on, hit the <del> key (for Award and AMI BIOSs) or <ctrl-alt-esc> (for Phoenix BIOS) to bring up the BIOS Setup screen.
In CASE #1, I turned off (disabled) USB and PS/2 mouse support, as one of those appeared to be causing a conflict with other MSWindows drivers. The Debian manual advises some settings be disabled to avoid conflict with Linux. The advice is to:
As with Red Hat and most other Linux distributions, if the CDROM is not bootable at power-on, it is necessary to create an installation floppy disk. In the case of Debian version 2.1, called Slink, the DOS tools and the floppy disk images are located on the CDROM at \dists\slink\main\disks-i386\2.1.8-1999-02-22\. At the DOS prompt (not in a DOS-box), change to this directory, place a blank floppy disk in drive A:, and type this:
prompt rawrite
Source file: resc1440.bin
Target drive: A
By “prompt”, I mean the DOS-prompt, which you don't of course type. The other stuff in italics will display on the screen and again you don't type it. The documentation mentions making a floppy disk from root.bin, but this is not required for 1.44M floppies, as root.bin is actually inside resc1440.bin.
The installation is commenced by placing the installation disk in the A: drive and the first binary CDROM of the Debian distrinbution into the CDROM drive, then reboot. The Debian installation process is long and complicated, and you will glad that you gathered lots of hardware specs beforehand. Debian version 2.1 has far less auto-probing than other major Linux distributions.
During installation, the default disk partitioning tool is cfdisk*, which is somewhat more “graphical” than fdisk*. However, I prefer fdisk*. The problem with cfdisk* is the way in which partitions are shown. I chose a partitioning scheme as shown in Table 1.9.
Table 1.9: CASE #2 partitioning scheme.
| Partitions | ||||||
| Primary | Logical | Active | Filesystem | Mount | Size | Comment |
| hda1 | PRI DOS | C: | 1028M | DOS/Win95 | ||
| hda2 (extended) | yes | EXT DOS | 2051M | Boots with LILO | ||
| hda5 | Linux native | /boot/ | 20M | |||
| hda6 | Linux native | / | 1968M | |||
| hda7 | Linux swap | 63M | ||||
Ok, the mental picture to build here is that this is a single 3G hard drive, and I used the MSDOS fdisk.exe program to create a primary DOS partition of 1028M, with the rest “free space”. Now, Linux calls this first partition hda1, as shown above (note that you may like to flip ahead and refer to Figure 1.7, which shows these partitions graphically). The Debian install process allows me to create logical partitions in that free space. This is where cfdisk* is odd compared with Linux's fdisk*. The former makes no mention of hda2, asking for creation of the logical partitions hda5, hda6 and hda7. The graphical screen inside cfdisk* shows just these: hda1, hda5, hda6, and hda7. Whereas, Linux fdisk* shows all partitions as per the above table, correctly identifying hda2 as an extended DOS partition.
It is important to note that MSDOS fdisk.exe will only recognise the first two in the above table, whereas Linux fdisk* understands multiple filesystems and displays all the partitions. From MSDOSs point of view, I had created two partitions, of 1028M and 2051M, making 3079M total disk capacity. Either the MSDOS or Linux fdisk* programs could have created the extended DOS partition, but I have had trouble when MSDOS fdisk.exe does it, for reasons not determined.
In the install process I chose to create three logical partitions inside hda2. Logical partition hda5 is a small 20M partition for the Linux kernel, which Linux mounts into the filesystem as /boot/. Logical partition hda6 is big and where all the Linux files go. It is mounted as /, meaning the root directory (a directory named root is not the same as the root directory!!! The latter is / ). The Linux swap file normally has its own partition, which is logical partition hda7. 63M is a reasonable size. Note how the capacities of each of these logical partitions adds up to that of hda2.
Now for what people find tricky: the installation of LILO, the boot loader. The partition marked “active” is the one that will boot at power-on. This partition must have a boot-loader program in the first sector of the partition. Normally, hda1 is active, and this has a boot-loader program in its first sector that loads MSDOS and MSWindows. However, the Debian install defaults to making hda2 active, and installs the LILO boot-loader into the first partition of hda2. The default for LILO is to boot Linux.
Now, there are lots of unanswered questions, such as how to get the PC to dual-boot, i.e., chose either operating system?
Firstly, the place where LILO got installed. I could have installed it into hda1, but that would overwrite the DOS boot-loader. I could have installed it into hda, in the Master Boot Record (MBR), which is the way most installations are done, as far as I know. CASE #1 does it this way. However, in CASE #1 I had trouble with the installation of Linux corrupting DOS/Win somehow. By choosing to install LILO into hda2, there was no problem with Win95 being corrupted. I chose to leave the MBR and DOS boot-loader alone.
Therefore, to go back to pre-Linux conditions is achieved simply by using DOS fdisk.exe to make the first partition active, which leaves LILO and Linux entirely intact. Optionally, fdisk.exe can be used to erase the extended partition, totally wiping out Linux.
How is the operation of LILO configured? The secret is in the file /etc/lilo.conf, which is the configuration file for LILO. It seems, when I installed Debian Linux, that I made a wrong choice, and did not achieve dual-booting. All I got was booting straight into Linux. I looked into lilo.conf:
boot=/dev/hda2
root=/dev/hda6
install=/boot/boot.b
map=/boot/map
vga=normal
prompt # actually, I added this line later!
delay=20 # this needs to be changed. see below.
image=/vmlinuz
label=linux
read-only
If you compare this with how the drive is partitioned, you will see that it makes sense. LILO is told in the first line that it is to be installed into the first sector of hda2 (the active partition). Then on the second line LILO is told that hda6 is to be mounted as the Linux root directory (/, remember). The third line says that the Linux install program is in /boot/. Don't worry about the rest: it's very standard.
To achieve dual-booting, I added this:
#dos/win95 stuff
other=/dev/hda1
table=/dev/hda
label=dos
The other= line defines another partition that can optionally be booted. table= defines where the hard drive's first partition table is kept (at the beginning of the hard drive). The label= assigns a name to this option. When the PC is powering up, the LILO prompt will appear, and the operator can enter either “linux” or “dos” in response. The timeout is 2 seconds, defined by the delay= line, which I changed to 100, giving 10 seconds. Note that if the prompt line is not there, it is necessary to hit the <alt> key when the LILO prompt appears, then one of the options can be entered.
Editing /etc/lilo.conf in itself is not enough. The changes must be put into effect. That is, the newly configured LILO boot-loader must be written to its assigned place. The way to do this is:
# /sbin/lilo -v
The -v option means “increase verbosity”.
Reboot, and we have dual-booting!
I have taken the opportunity in this case study to explain further how hard drives are partitioned and how LILO works, but I think I can wind it up with a picture that clarifies it even further -- look at Figure 1.7
Figure 1.7: Partitioning for CASE #2

Every partition has a boot-record-area, even logical partitions. It is at the beginning of a partition, and in the first sector is some disk-parameter data followed by boot-code. After this there is the partition table, file directory, and File Allocation Table (FAT). Note from the figure that even the overall physical drive (hda) has this boot-record-area, but it is a little different in that it doesn't have information about files (i.e., the FAT and file directory). This area at the beginning of the physical drive is called the Master Boot Record (MBR), and has boot-code and a partition table.
Partition hda1 has the boot code and FAT/file directory for all the MSDOS and MSWindows files. In a normal system in which Linux is not installed, The boot-code in the MBR executes at power-on and examines the partition table to determine which partition is active, then jumps to the boot-code in that partition. Hence the MSDOS boot loader would take over.
However, in my case, hda2 is the active partition, so the boot-code in the MBR sees that and execution jumps to LILO, which is the boot-code in hda2. LILO can then decide, based on your response to the prompt, which partition to jump to, or to continue with the default of loading Linux.
Note that it is not normally acceptable to install LILO into a logical partition, though theoretically possible. What is common though, is to install LILO into the MBR, replacing the original boot-code. LILO can then decide which partition to jump to (and hence that partition's boot-code will execute).
The version 2.1 Debian install process is somewhat less clever than commercial competitors such as Red Hat version 6.0, and many choices have to be made manually. For example, the operator has to go through lists of device driver modules and choose those for which he/she has the hardware. For example, my PC has an Ethernet card, but a driver for my card wasn't listed. However, this is where some background knowledge comes in handy -- I knew that just about all Ethernet cards are NE2000-compatible. There were two NE200-compatible drivers, one ordinary one, presumably for ISA-bus cards and one for PCI cards. Although my PC has a PCI Ethernet card, I made a mistake and chose the ordinary driver -- which worked anyway.
Another disturbing thing for the novice is that when a driver is installed, a window may pop-up asking for commandline parameters.
Some help text is given, but brief. In the case of the Ethernet driver install, I knew that it used io address 0x6100 (the 0x prefix means this is a hexadecimal number) and irq 11, so when the commandline parameters were asked for, I typed “io=0x6100”. I could also have typed a space followed by “irq=11”, but in this case the I/O address was enough and an auto-probe found the irq number and confirmed the Ethernet card accessable. If you type something wrong, the worst is that it will report the device unaccessable and you can try something else.
What has been described so far is the installation of the “base system”, which is enough to login to the commandline. The next step is to use Debian's dselect* program to install the applications, known as packages. Debian version 2.1 (codenamed Slink) comes as two binary CDs, and installation is cumbersome. The developers have improved this with later versions, but I found the process with version 2.1 to be confusing.
I gave up trying to install from the two CDROMs and instead installed directly from the Internet. As I had answered all the right questions during the base install about the network card, I was Internet-ready immediately. However, as my Internet connection is through a proxy server, I had to type this after logging in:
# EXPORT http_proxy=http://proxy.cowan.edu.au:80/
# EXPORT ftp_proxy=ftp://proxy.cowan.edu.au:80/
# dselect
In fact, I added the first two lines above into /root/.bashrc, so they are automatically executed whenever I login as root or superuser.
That is, my proxy server was proxy.cowan.edu.au and it used port 80.
The third line (above) executes dselect*, which has a menu-list as follows: Access, Update, Select, Install, Configure , Remove, and Quit, in that order. The first item enables choice of access method for obtaining the packages. This is where I could choose the multi-CD set, or the Internet. The option named apt selects the Internet. I accepted the default site from which to download the Packages file -- this file contains a list of all available packages.
The second menuitem, Update, downloads the Packages file, which lists all packages that are available for download. Select enables selection of which packages are to be installed, except that I skipped this option as I had already selected an installation profile earlier in the install process. Install downloads and installs them. Configure and Remove are normally required also, and finally Quit. It is normal that each of these menu items is selected in the order shown.
![]()
Installation of packages for Debian Linux is covered in more detail in Chapter
xxx, Debian package management (page xxx).
After dselect* has been used to install Linux, there is then the matter of getting X windows running. This is covered in Chapter 2. This chapter also covers installation of KDE.
![]()
Specific notes on CASE #2 are to be found in Troubleshooting KDE install:
CASE #2 (page xxx).
I purchased SuSE Linux as a boxed set, which means that it came in a box with a printed installation manual, installation & supplemental floppies, and four CDROMs.
I have an older PC -- well, I've got a few of them, and the one I chose is somewhat “less old” than the others -- which has a Cyrix 5x86 100MHz processor chip and 16M of RAM.
I wondered how this would perform running KDE. One point I would like to make is that KDE is a little sluggish in comparison with MSWindows 9x, a fact that is attributed to the X server. The latter has certain architectural features that make it technically superior to the graphical API (Application Programming Interface) “server” of MSWindows, but with a slight speed penalty. At least, this is the gist of the feedback I have obtained from those in the know on the Linux newsgroups and mail lists.
To let you know in advance; after installation I did indeed find KDE to be a bit too slow for my liking. The hard drive is very busy, and I think that if you wish to install KDE on a system with similar hardware to this, go for some extra RAM. 32M minimum, I would say. Furthermore, install the extra RAM before you install Linux. The reason for this is that all of the Linux distributions choose a default swapfile size of twice the amount of RAM. It is extremely difficult to change this afterward.
The Cyrix 5x86 100MHz chip is considerably more sprightly than the more common Intel 486DX2/66, so if you have one of the latter, expect even more sluggish performance. I would rate it at about equivalent to an 80MHz Pentium CPU. I'm still running my system with 16M, and of course the term “sluggish” is relative. It's still usable. I do warn though, not to believe the hype that Linux can be used on any old PC. Or rather, don't believe it as far as KDE is concerned. Non-GUI Linux applications may be very fast on a 486.
The video card is by Quadtel, with a Trident TVGA8900C chip and 1M of video RAM. The main glue chips on the motherboard are part numbers UMC8886BF and UMC8881F. The modem is an A-Trend Technology WS-3314JS3VoiceFaxDataFDSPPnP, 33.6K bits per second and plug and play. The hard drive is a Maxtor 71336AP, IDE, 1.2G capacity. The sound card is an ESS ES688 Plug and Play AudioDrive.
The SuSE installation procedure is fairly smooth. As usual, I powered up the PC with the installation disk in the A: drive and CDROM number 1 inserted. A series of windows appeared, that asked fairly understandable questions.
The mouse is not available to navigate around in these windows, and you have to use the keyboard. However, it is easy to figure out:
One window asked me if I wanted to keep the existing hard drive partitions or repartition the drive; I chose the latter. I had decided that 1.2G is not enough for more than one operating system, so MSWindows had to go. I was also asked if I wanted to use the entire hard drive for Linux and I replied in the affirmative.
I quickly reached a menu item labelled Start installation, which launches the main installation program, called YaST (Yet another Setup Tool). Although I ended up really liking YaST, at first I was slightly confused by the menus. Fortunately the <F1> key can be pressed at any time for extra help, and I was quickly progressing. The main menu for YaST is shown in Figure 1.8.
Figure 1.8: YaST main menu.
The idea is to select each item in turn, starting from the top. The main work is done by the item Choose/install packages, which brings up the menu shown in Figure 1.9.
Figure 1.9: YaST Choose/install packages menu.
I soon realised is that I had to select these menu items in turn also, starting from Load configuration, followed by Save configuration, Change/create configuration, Check dependencies of packages, then Start installation. I did not select the rest of the items (which was one of the areas that confused me slightly), but went straight to the bottom one; Main menu. This took me back to the menu in Figure 1.8, where I proceeded to choose Update system, System administration, then Exit YaST.
Another point of initial confusion was when I selected Load configuration, a list of standard installation classes appeared. This is the same concept that Red Hat has, in which a set of applications is chosen for you, to be installed from the CDROM. As the number of applications is in the thousands, a Linux newbie will greatly appreciate this help. I moved the down arrow to SuSE default system, then I saw three buttons along the bottom, labelled Add, Replace, and Abort. I used the right arrow key to highlight Add then pressed <enter>. I soon realised that this was a mistake. What I should have done is press <enter> when I had highlighted SuSE default system item. I did go back and do it right, after some messing around. So, my warning is, ignore those buttons along the bottom.
After having selected an installation class, I then selected Save configuration, which is no trouble, followed by ChangeØcreate configuration, which showed me which groups of packages were selected for installation and which weren't.
Packages are programs in a certain format, described in Chapter xxx, Package management (page xxx).
I soon noticed lots of packages that I would like to have installed, so I moved the highlight to the package group of interest, pressed <enter>, then inside that group I was able to select individual packages. I merrily chose all sorts of things, not realising that doom lay ahead ...
Back at the menu of Figure 1.9, I chose Check dependencies of packages, and everything was ok. There is a nice feature that if a package is dependent on other packages also being installed, you can select the Auto button to do this automatically.
Start installation is the menu item that installs all of the selected packages from CDROM to your hard drive. This process continued for some time, and it was most of the way through, when briefly a message flashed up about “invalid preinstallation” -- I think but I'm not sure, that an “X fonts” package was being installed. After that brief message, a window appeared with the message “An error occurred during installation”, and below it was an OK button. I love these helpful error messages don't you? (#$@*&%$)
After pressing the OK button, I was back right at the very first installation menu. I went through all the steps again, and by keeping the existing partitioning I was able to get the thing to continue installation from where it left off. That is, it recognised that the system was partly installed. Second time through though, I did not add any extra packages. YaST can be used to install additional packages at any future date. The lesson here is caution. The default installation classes have been tested to install ok, so stick to the minimal defaults only.
It went right through the second time, but I was not given any information about the error, why it occurred or whether it will have any repercussions in the future.
The main YaST menu in Figure 1.8 has the menu item Adjustments of installation, which is selected prior to Choose/install packages. It enabled me to configure various hardware settings, although most had already been chosen earlier. I configured the hard drive as shown in Table 1.10.
Table 1.10: CASE #3 hard drive partitioning.
| Drive | Cylinders | File type | Capacity | Mount point |
| hda1 | 1-2 | Linux native | 3.7M | /boot/ |
| hda2 | 3-17 | Linux swap | 32M | |
| hda3 | 18-648 | Linux native | 1.17G | / |
Mouse and keyboard configuration are straightforward. I dealt with sound and video later.
![]()
Setup of SuSE video is covered in Troubleshooting KDE install: CASE #3
(page xxx). SuSE sound setup is in Configuring SuSE Linux with OSS
(page xxx).
Depending on your installation, you may have to install sound capability separately. Your PC has an internal speaker and most likely a sound card with external speakers. It is the latter situation that is of concern.
There is one way to find out if your sound card is working - type this at the prompt:
# cat /usr/bin/gs > /dev/audio
cat is a command to read a file and send it to the screen, i.e., display its contents. The > is a redirection operator, that redirects output away from the screen to, in this case, the audio device. /usr/bin/gs is a file - any file will do. Actually, gs is an executable application, which is totally irrelevant here - sending it to the audio device will produce noise, and all we want is a noise, any noise, as a quick and nasty way of determining that the sound works.
If there is no sound, read on.
The first thing to do of course is to find out all about your sound card. It may be just a chip on the motherboard. If you have a manual for the sound card or chip, write down anything that looks important, particularly the part-number of the chip, and the model/manufacturer of the card.
For example, in my case study of Installation: CASE #1 (page xxx), the system has a CMI8330 chip on the motherboard.
If it's a card, it may have switches or jumpers. Examine these, refer to the card manual, and write down the settings. It may be a Plug and Play card, with no jumpers. Or, maybe your card has jumpers but no manual. Whatever, if you can't determine all the setup details, you can go into MSWindows and find out. I'm presuming here that you have a PC with MSWindows running, onto which you want to install Linux, or you have already done so.
In fact, what I am writing about here is what you should have already done if you followed the generic installation steps in Installation steps (page xxx). That is, you will have already written down everything. If perchance you haven't done so for the case of sound, go to that section now and follow the instructions for determining your sound system settings.
The utility sndconfig* was developed by Red Hat, but also appears in other distributions. It is therefore useful for many distributions, and of course some distributions have their own equivalent.
sndconfig* is of course relevant to the Red Hat installation case study, CASE #1., begun in Installation: CASE #1 (page xxx).
Login as root and type this:
# sndconfig
The nice thing about this utility is that it does an auto-probe to determine if you have a Plug-and-Play (PnP) sound card, failing which it enables you to enter all the settings manually. If it finds a PnP card, it writes the found settings to /etc/isapnp.conf and renames the old one as /etc/isapnp.conf.bak. If your card is not PnP, the settings get written to /etc/conf.modules only (in both PnP and non-PnP case the latter file gets written to.
The unfortunate thing about this utility is that mine was version 0.27, and I thought it didn't work properly. But that is good for the purposes of this case study, as we get to consider what to do if this utility doesn't write the correct settings to conf.modules.
Figure 1.10: sndconfig*, selecting chip/card type.
Figure 1.10 shows the window that appears after the autoprobe, if sndconfig* has failed to detect a PnP card. You select the closest match possible. The three Soundblaster options shown are fairly generic and supported by a wide range of cards and chips. In my case, the CMI8330 chip is not listed, so I chose “Soundblaster 16”.
Figure 1.11: sndconfig* interface settings.
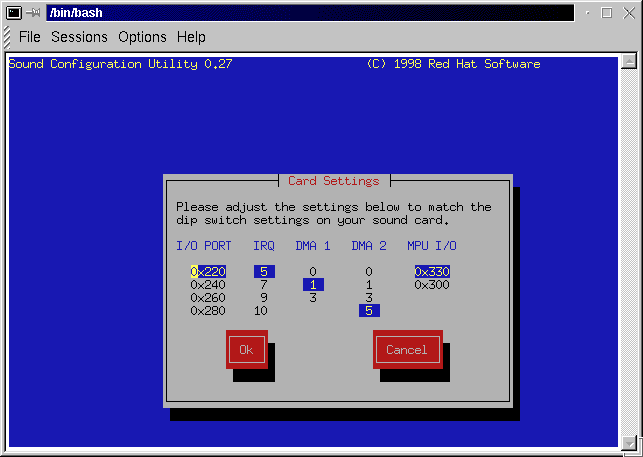
Figure 1.11 is the next window, and this is where I had trouble with the early version of sndconfig*. Well, it was a case of the documentation not matching the actual behaviour. The docs stated that I had to <tab> between columns and press <enter> to edit an entry. Pressing <enter> however completes the window and the next window comes up. The next window, unfortunately, states that it is about to write to conf.modules, and there is only an OK button.
I had to kill the sndconfig* application, and I over-reacted by going straight into conf.modules and editing it directly.
The figure shows you the information that you must have gathered beforehand. Actually, what you do is use <tab> to move to a column, then the <up-arrow> and <down-arrow> keys to select the required setting. If a column doesn't have the option you require, say irq 14, well, as far as I can make out you're stuck and you have to edit conf.modules. Hopefully, though, the options shown cover all bases, and when you <tab> to the OK button, press <enter>.
If you do have to edit /etc/conf.modules, make sure that you are logged in as root. If you don't yet have KDE running, use the vi editor.
The vi editor is introduced in vi text editor (page xxx).
Otherwise the beautiful KDE graphical editors are at your disposal, such as KEdit. This is part of conf.modules:
alias sound sb
options sb io=0x220 irq=5 dma=1 dma16=5 mpu_io=0x330
You simply edit the second line to suit your sound interface settings, and save.
Red Hat 6.2 sound
Jumping ahead in time, I had another go at installing a Red Hat distribution. CASE#1 was version 5.0, and now I'm trying version 6.2 that I got off the front of a magazine. sndconfig* is now up to version 0.43 and I think that both it and pnpdump* are flakey, flakey, flakey!
I installed RH 6.2 onto the same PC that I had previously installed SuSE 6.1 (CASE#3), in which I had successfully got sound working with OSS sound driver (a commercial product supplied with the SuSE boxed set). This PC has a ESS688 PnP AudioDrive ISA-bus card.
When I used sndconfig*, I got a "Device or resource busy" error message. Ditto when Linux powered-up and it tried to load the sound module. I looked on some bulletin boards on the Internet, and lo and behold, zillions of other people have the same problem! (a lot of Mandrake 7.0 users have the same problem, as they use the same Red Hat tools)
sndconfig* appears to be a frontend for modprobe* and pnpdump*. So, you could drop down to these latter two if sndconfig* is too troublesome. The following line is to be typed:
# /sbin/pnpdump -c > /etc/isapnp.conf
This creates isapnp.conf, which causes the ISA-bus PnP devices to be configured (i.e., setup with non-conflicting irq, io, dma) when Linux loads. The -c option causes the safest settings of isapnp.conf to be un-commented-out -- well, I did this and then looked at isapnp.conf, and everything is commented out -- and I can't see which one is best to uncomment -- I tried some uncommenting, but it doesn't work.
I disabled "Automatic PnP configuration" in the BIOS, to no avail. I fiddled around trying all sorts of things, no good.
So, what to do? I had the settings written down from when MSWindows was installed on the PC, and I reasoned that MSWindows would most likely have detected that the BIOS had already detected and configured the sound card and would have left the settings as-is. Therefore, I reasoned, turn on the BIOS automatic PnP configuration again, delete /etc/isapnp.conf (yes, wipe it out completely, so Linux will not attempt to configure any PnP cards), and manually edit /etc/conf.modules to the same as per MSWindows.
After deleting isapnp.conf, I rebooted and pressed <del> (or <alt-ctrl-esc> on some PCs) to enter BIOS setup and restored the automatic PnP configuration. Then when back inside Linux, I used modprobe* to test the settings obtained from MSWindows:
# /sbin/modprobe sb io=0x230 irq=9 dma=3 mpu_io=0x300
sb is the SoundBlaster driver, and my card is SoundBlaster compatible. It worked. So then I edited /etc/conf.modules to match:
alias parport_lowlevel parport_pc
alias sound-slot-0 sb
options sound dmabuf=1
alias midi opl3
options opl3 io=0x388
options sb io=0x230 irq=9 dma=3 mpu_io=0x300
Note that I only changed the last line -- the opl3 module was already working, so I left that one alone (if you watch the messages while Linux is loading, you will see these two modules being loaded, with an "OK" alongside if successful). Yippee!
My sound card in CASE #3 is a plug and play device, and it is recommended that these be correctly configured at boot time. In a nutshell, I typed this:
# /sbin/pnpdump -c > /etc/isapnp.conf
pnpdump* scans all the plug and play cards that are plugged into the ISA bus and writes what it finds to isapnp.conf. This text file is read during boot time by a program called isapnp*. PCI PnP sound cards are not supported in this version, but will be in future versions.
To install the driver module for sound is another matter. The SuSE boxed set has a commercial sound product called OSS, which is an acronym for Open Sound System. This is particularly easy to use, except that once again it wasn't installed. I had to go back into YaST, and the oss package is in the pay package group. Actually, there are two packages, called oss and ossdemo -- do not select ossdemo.
Once installed, I had to manually run another install program:
# /tmp/osslinux-3.8.1z/oss-install
Obviously the version number will be different by the time you do this. This install program gave me various options where I would like to install OSS, and I chose /opt/oss/. The program successfully identified my sound card, which was great.
To activate the sound driver requires:
# /opt/oss/soundon
However this only works when logged in as superuser. There is also a program called soundoff*, to turn off sound. To automatically turn on the sound for all users, the superuser has to add this line to /sbin/init.d/boot.local:
/opt/oss/soundon
To test that it works, go into KDE, execute the media player KMedia, open /opt/kde/share/sounds/ktalkd.wav, and hey presto!
(c) Copyright Barry Kauler 2000. All rights reserved.
Extract from book Linux for me, to be published sometime, maybe.
Main page:
http://www.crosswinds.net/~goosee/
or http://www.goosee.com/ or http://goosee.net/