

|
|
PET (Puppy's Extra Treats) is the unified package system adopted in Puppy version 2.14 and later.
If you have compiled an application from source, or downloaded a precompiled binary tarball, and have tested it in Puppy and now you want to make it available for all to use, read on...
Want to know what is inside a PET package? Want to know how to install a PET package? Read on...
Firstly, read the Puppy package management page for an introduction to package management.
How to install a PET package
Always remember that there are two types of PETs, the "official" and the "unofficial".The official PETs, those from the Unleashed suite, can be installed by starting the PETget package manager (see the icon labelled "install" on the desktop, or look in the "Setup" menu). You will then see a list of all the official packages and you choose what you want.
On the other hand, PET packages, official or unofficial, can be installed just by clicking on them.
The ROX-Filer file manager understands any filename that ends with '.pet' and if you click on it then ROX-Filer will launch PETget. Any PET package, official or unofficial, can be installed this way.
In addition, so does SeaMonkey, the web browser. Click on any ".pet" file on a webpage and SeaMonkey will offer to either download it or immediately open it in PETget. The latter means that you just click on a PET package on a web page and it gets installed!
In fact, any application that reads mime-type information from /etc/mailcap and /etc/mime.type will recognise .pet files and launch PETget. Ditto for the mime-type database in /usr/share/mime.
How to create a PET package
There is a suite of "PET tools", scripts for creating PET packages and for converting between other package formats.Firstly, to answer the most important question: you download a source package from the Internet, and you want to compile it then create a PET package. How?
It's very simple: after compiling the package and you are ready to do the final "make install" step, do it this way instead:
# new2dir make install"new2dir" is a script that will execute the "make install" and in addition will create a directory with all the installed files (and directories) in it. I don't need to give any more details here, as the script explains exactly what it is doing as it does it.
For example, if you had compiled "abiword-2.5.6" then the above will create a directory "abiword-2.5.6-i486" with all the installed files.
The next step is also simple:
# dir2pet abiword-2.5.6-i486This will create a PET package, file "abiword-2.5.6-i486.pet". That's it, all done.
Having created a PET package, you can make it available for others to use. A PET package can even be submitted to me for possible inclusion in the "official" Unleashed suite.
PET tools
Puppy has a suite of scripts for working with PET packages:| Script |
Example |
Description |
| dir2pet |
dir2pet abiword-2.5.6-i486 |
Convert a directory to a PET package |
| new2dir |
new2dir make install |
Create a directory of installed files |
| pet2tgz |
pet2tgz abiword-2.5.6-i486.pet |
Convert .pet to .tar.gz tarball |
| pup2pet |
pup2pet abiword-2.5.6.pup |
Convert a DotPup to a PET package |
| tgz2pet |
tgz2pet abiword-2.5.6.tar.gz |
Convert a .tar.gz file to PET package |
They are all located at /usr/bin. They are all easy to use. Most will ask simple questions and inform you what is happening at each step.
A ".pet" file is actually a tarball, that is, a ".tar.gz" file, except that it has a 32-byte md5sum (file integrity verification code) appended on the end of the file.
All that the "pet2tgz" script does is remove that trailing md5sum. All that "tgz2pet" does is append the md5sum.
The script "pup2pet" is much more sophisticated. It will convert any DotPup to a PET package. It does ask a few questions and it is preferable that the conversion is done by the same person who authored the DotPup, but the questions are not difficult and anyone else can easily figure out the correct answers.
The script "new2dir" is very clever. It will execute whatever is specified on the commandline, usually "make install" and it will monitor what files get installed and will copy them to a separate directory.
For example, the source package "abiword-2.5.6": a separate directory named "abiword-2.5.6-i486" will be created and installed files copied into it. The "-i486" is the CPU type for which the package is compiled -- other possibilities are "-i586" and "-i686".
"new2dir" can do more. It can split off the "development", "documentation" and "international" components of the installed package into separate directories. There is one main target directory, for example "abiword-2.5.6-i486", but optionally any components can be diverted to "abiword_DEV-2.5.6-i486", "abiword_DOC-2.5.6-i486" or "abiword_NLS-2.5.6-i486". Where to do this splitting is up to the creator of the PET package -- the idea is to reduce the size of the main PET package. Normally if a package has shared libraries it is best to split out the "development" component at least.
The script "dir2pet" can be applied to each of these directories to turn them into PETs.
How to convert a DotPup to PET
I created a script called 'pup2pet', introduced above. However, this does not really convert the DotPup, just embeds it inside the PET package. Say that you have "abiword-2.5.6.pup" and you run:# pup2pet abiword-2.5.6.pupThis will change the package to "abiword-2.5.6.pet", but if you were to look inside the PET package (see how to open up a PET package in the next section) then you would see two or three files: "abiword-2.5.6.pup", "abiword-2.5.6.pet.specs" and optionally "abiword.desktop" -- so, the DotPup is still there.
When PETget installs such a PET, it recognises the embedded DotPup and calls the DotPup installer, dotpuprox.sh. So, the DotPup installs exactly as per normal.
One slight problem with the above method is that the DotPup install scripts may popup a message that an entry has been added to the menu, however this is not true. PETget does not allow the DotPup installer to mess with the window manager menus, as this is now handled by ".desktop" files.
The above technique has the advantage that the DotPup installs exactly as it did before it was converted to a PET package. However, there is another way to do it, which is a total conversion to PET format:
# new2dir dotpuprox.sh `pwd`/abiword-2.5.6.pupWhat this does is use the DotPup installer to install the DotPup, but monitor installed files with "new2dir", which creates a directory "abiword-2.5.6-i486" with the installed directories and files. Then convert the "abiword-2.5.6-i486" directory to a PET package.
# dir2pet abiword-2.5.6-i486
Just taking a snapshot of installed files and creating a PET package from that may not work for all DotPups but should do for the vast majority.
Inside a PET package
Open a PET package, and the directories and files inside it look much like any other binary tarball. In the Puppy package management page I gave the example of the Torsmo package -- let's follow through and think how it will look as a PET package.To reiterate, the Torsmo package has just these two files:
/usr/local/bin/torsmoIf we knock the md5sum off the end of the "torsmo-1.0.pet" file:
/usr/local/lib/X11/mini-icons/torsmo.xpm
# pet2tgz torsmo-1.0.petThen open it up with:
# tar -zxf torsmo-1.0.tar.gzThis is what we would see:
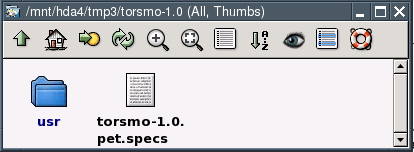
The "usr" directory contains the subdirectories and the two files.
Most PET packages have a "specs" file which is a text file with some information that is used by PETget for package management purposes. The scripts "dir2pet" and "pup2pet" create this file.
Note that you can also place a 16x16 XPM image alongside the "specs" file and PETget will move this to /usr/local/lib/X11/mini-icons (the standard location for menu 16x16 icons).
You can also place a 48x48 XPM or PNG image alongside the "specs" file and it will be moved to /usr/local/lib/X11/pixmaps (current limitation: it must be named 'something48.xpm' or 'something48.png', that is, have the '48' in the name for PETget to recognise it and move it to the correct destination).
In the Torsmo example, instead of putting the "torsmo.xpm" file inside the "usr/local/lib/X11/mini-icons" directories, it can be placed as follows:
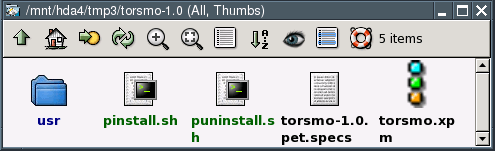
The above graphic shows two more optional files: "pinstall.sh" that executes immediately after the package files are installed, and "puninstall.sh" that executes immediately after the files are uninstalled. (Note that PETget will copy the uninstall script to /root/.packages/ and rename to "torsmo-1.0.remove")
Just to complete the circle, having opened the Torsmo PET package above, poked around inside, maybe modified something, it can easily be put together again:
# tar -c -f torsmo-1.0.tar torsmo-1.0/
# gzip torsmo-1.0.tar
# tgz2pet torsmo-1.0.tar.gz
The post-install script
This is an optional script that you would have to create yourself. Very few PET packages need this. Ditto for the post-uninstall script.But, if you did need to create a "pinstall.sh" script, here are some notes:
The post-install script needs further clarification. There is no difference between a standalone PET package and a PET package in the Unleashed suite, except for where they are used. Unleashed packages are used to create a Puppy live-CD ISO file, whereas standalone PET packages are are available on the Internet for individual download and installation by the PETget package manager.
In both cases, the post-install script will be executed after the package has been installed.
Here is the basic format, taken from the Dillo web browser package:
#!/bin/shIt is important to know what the "current directory" is when execution enters the script. In the Unleashed environment, directory "rootfs-complete" has the just-created complete Puppy filesystem, and rootfs-complete/ is the current directory when the script is entered.
#post-install script.
#creatuppy: current directory is rootfs-complete, which has the final filesystem.
#pupget: current directory is /.
#dillo is by default the default internal html viewer.
#if no other browser, then dillo will also have to be the default web browser...
if [ "`ls -1 ./usr/local/bin/ | grep --extended-regexp "opera|mozstart|links|hv3"`" = "" ];then
echo "Configuring Dillo as the default web browser..."
echo '#!/bin/sh' > ./usr/local/bin/defaultbrowser
echo 'exec dillo "$@"' >> ./usr/local/bin/defaultbrowser
echo -n "dillo" > /tmp/rightbrwsr.txt
fi
However, when the package is downloaded and installed with PETget, the current directory is the top of the running Puppy filesystem, that is, "/".
That is why the script has a dot on front of "/usr/local/bin", so that it will work in both cases.
That "dot in front" is the only special thing that you need to remember when creating a "pinstall.sh" script.
.desktop menu files
A PET package that is to have a menu entry must have a '.desktop' file. The usual location for this file is /usr/share/applications/.Take that Torsmo package as an example. If it requires a menu entry (that is, an entry in the 'Menu' at bottom-left of screen) then another file needs to be in the package:
/usr/local/bin/torsmoThe PET creation scripts 'pup2pet' and 'dir2pet' will optionally create a '.desktop' file.
/usr/local/lib/X11/mini-icons/torsmo.xpm
/usr/share/applications/torsmo.desktop
From Puppy v2.14+, the menu is created dynamically everytime a PET package is installed or removed, or whenever a new version of Puppy is booted (or a simulated version upgrade using "pfix=clean" boot parameter). There is a little program that reads all of the '.desktop' files and generates the window manager configuration file (which has the menu information). Raul (rarsa on the Puppy Forum) created the infrastructure for '.desktop' files in Puppy and also wrote those generator programs (one for each of the main window managers).
It is this dynamic generation that makes it so great. Install a package, restart the window manager, and there is the new menu entry, in an appropriate location in the menu as well! Uninstall the package, restart the window manager, the menu entry is gone.
You can open a '.desktop' file and see for yourself, but basically it is a text file that specifies everything needed to create a menu entry, such as the text and icon, whereabouts in the menu hierarchy and the executable to be launched.
This '.desktop' system is part of the XDG menu specification. Further information is to be found here: http://www.freedesktop.org/Standards/desktop-entry-spec
and: http://www.freedesktop.org/wiki/Standards_2fmenu_2dspec
Menu config file
The default window manager in the "standard" release of Puppy has the JWM window manager. This has a configuration file /root/.jwmrc, that among other things has all the specifications for the menu layout and entries. As mentioned above, this file gets auto-generated whenever the menu needs to be updated. So, what if you want to edit that config file?Other window managers have equivalent menu configuration files, for example IceWM has /root/.icewm/menu and Fvwm95 has /root/.fvwm95. They may contain more than just specifications for the menu, so you may want to edit them.
Some window managers do not support a popup menu, and in that case a separate menu program can be used, for example "fbpanel" -- it also has an equivalent menu config file.
When a PET package is installed or removed, PETget calls a little program called "fixmenus" (located at /usr/sbin). This reads the window manager (or fbpanel) configuration template files from /etc/xdg/templates and generates the actual config files.
For example, the template file for JWM is /etc/xdg/templates/_root_.jwmrc and from that generates /root/.jwmrc. Therefore, if you want to manually edit the JWM config file, edit the template file.
The template file is named in a certain way that shows its destination. The "_" characters will get converted to "/" characters. So, the "_root_.jwmrc" template file will generate "/root/.jwmrc".
Template files should be self-explanatory when you look at them. If you are familiar with the ".jwmrc" file then the template file will also be familiar, and you should be able to see clearly the parts that you can edit.
For developers, if you want to create a window manager PET package, for example FluxBox, please also create a template file in /etc/xdg/templates.
(c) Copyright Barry Kauler 2007 www.puppylinux.com
No part of this page is to be reproduced anywhere else. I have found
that there is a problem where parts of my web pages are being inserted
at other sites, then not updated, whereas I am updating my pages
regularly. This is not a desirable situation, so please just link to my
pages.