
Coasters for camping stretcher legs
This was a nice little mini-project. My old camping stretcher is
coming unstitched, and is too low to the ground. I don't spring up from
ground-level like I used to!
I didn't want to spend much, and it turned out that one of the
cheapest in the local stores is, in my opinion, the best. This is what I
bought, a Wanderer Fraser Single, at AU$59.99:
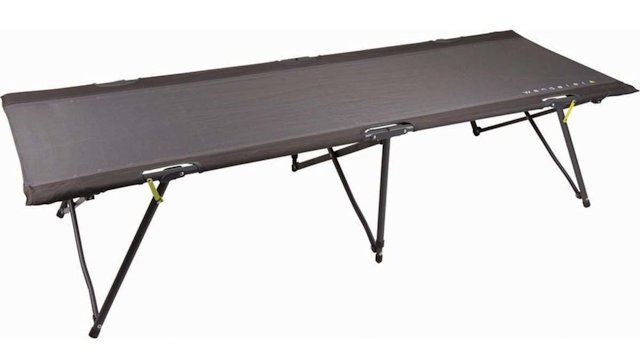
https://www.bcf.com.au/p/wanderer-fraser-folding-stretcher-single/521056.html
Here is what I like about it: high off the ground, very sturdy,
doesn't wobble, strong construction, and no end-bars. And, of course,
cheap. Oh yeah, it unfolds and folds up in seconds.
Can't find a video, but this one, Zempire Speedy stretcher, looks
like it comes from the same factory in China, just some different design
on the canvas:
https://www.youtube.com/watch?v=WsuHBsEAAU0
...see how incredibly quick to unfold (and refold). That one is the
same size as mine, 190cm long, 65cm wide, plenty enough for me.
What I don't like about it is the base of the legs, they could punch
through a tent floor. This is a problem that many campers have, as most
stretchers have a very small surface area at the bottom of the legs.
So, it needs some "shoes", or "coasters". It needs to be something
that the legs won't slide off, and cheap. What I did is very simple...
Bought six of these 40mm push-on PVC caps, at AU$1.39 each:
https://www.bunnings.com.au/holman-40mm-pvc-dwv-push-on-cap_p4750163
And two chopping boards (one big and one small) from Kmart, for AU$4:
https://www.kmart.com.au/product/2-chopping-boards/2090303
I used a tenon saw and cut the larger chopping board into six
100x100mm squares, and sandpapered the bottom of push-on caps and the
matching surface on the pieces of chopping board.
Note, the push-on caps have embossed lettering on the end, so it is
essential to sandpaper it flat. Also, roughening up the two surfaces is
probably good for adhesion, and I used a fairly coarse sandpaper.
I used normal PVC pipe solvent/cement, blue coloured, though I do see
that Bunnings stocks it in clear colour, which would have been better
for the appearance:
https://www.bunnings.com.au/protek-250ml-type-n-clear-pvc-cement-for-non-pressure-pipes_p4750117
...there is a primer available, which I have never used.
I put the two pieces together, with a small weight on top, in this photo it is a vase filled with sand:
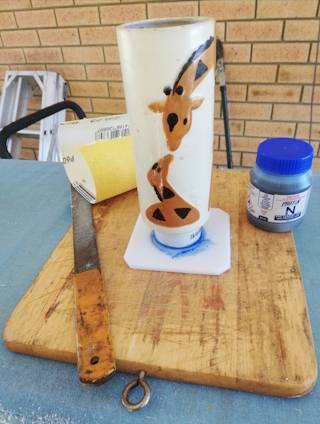
...the hand-file in the photo was not needed. Just lay the sandpaper
flat and rub the cap over it to remove the embossing, then rub the
middle of the chopping-board piece with the sandpaper.
Oh yeah, I did use the hand-file. After cutting the squares, chamfered the edges with the file.
Although the solvent does grip fairly quickly, I thought it wise to
leave the weight on it for awhile, until it reaches maximum strength.
Left it overnight, and next day tested it. A pretty good join. I don't
know what kind of plastic the chopping board is made of, hence the
experiment. But, it is a good join. So went ahead and did the other
five.
Here is the first one placed under a stretcher leg:
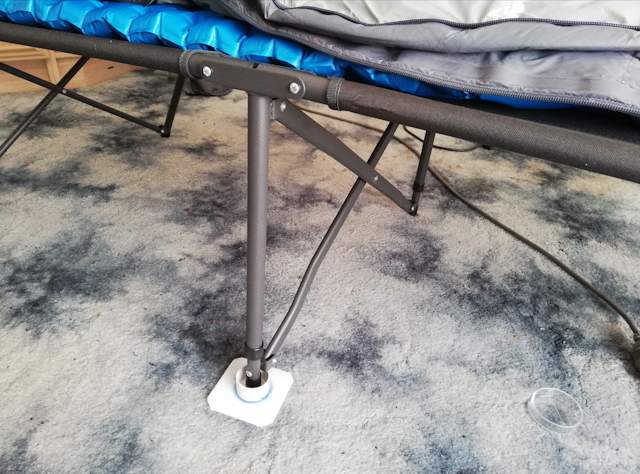
What I will probably also do, is drill a hole in each one, and tie with string to each leg, so that the shoes never get lost.
Looking at the photo, you might think that 100x100mm (4x4 inches) is
bigger than really needed. Maybe, You could cut smaller rectangles, or
circles if you have suitable cutting tool.
OK, this is a very simple project, but there will be many people with
the same concern about potential damage to the tent floor, and this
blog post shows a low-cost and easy-to-make solution. Total cost of each
shoe is about AU$2, and I have one chopping board left over (the small one) to use in the kitchen.
Tags: nomad