
Refinements to glueing tarp
Continuing TreeHugger 1P Mark-2 project, previous post:
https://bkhome.org/news/202106/treehugger-1p-tarp-mark-2.html
Some issues have been identified, and solutions...
Glueing reinforcements
I have glued on the tie-out reinforcements, and it has, in some of
them, been unsatisfactory. These reinforcements are at the tie-out
points, where webbing is to be sewed on, to spread the tension. They are just pieces of the same fabric
glued onto the tarp.
The procedure is to spread silicone adhesive on a reinforcement,
using the fingers, then lift it up and place it onto the appropriate
place on the tarp. Getting it to lay nice and flat, and in the right
place, no ridges and no bubbles, is a challenge.
There is a video on YouTube where a guy shows how to do this, that I
have linked to in an earlier blog post. However, I have concluded that
his method is not suitable for me. Where is that video? Ah, here:
https://www.youtube.com/watch?v=Ec8YhQffRj8
He might have got away with it using heavier fabric, however, 10D
silnylon is incredibly stretchy. Using the fingers to smooth out the
piece of reinforcing, and push out bubbles, stretches it -- and here is
the thing -- the underneath fabric does not stretch, or will stretch
less. So, after attempting to smooth the piece of reinforcing, ridges
can form in the underneath tarp. You might then battle to stretch the
tarp to remove those ridges.
One factor though, in support of his method, he is using Gear Aid
Seam Grip seam sealer. In his case, the surface is PU, but for
silicone surface, as for silnylon, Gear Aid have "Silnet", also known as
"Seam Grip + Sil", which is a thinned silicone adhesive. Seam sealer,
being thinned, is quite runny -- it is designed to seep into the sewn
threads.
Silnet is far more runny that
straight silicone adhesive from the tube, that you buy in a hardware
store. The runny seam sealer has much less "grip" between the
two surfaces, so you are more easily able to push the reinforcing around
after placing it on the tarp.
Note, I have experimented with that Silnet. You buy it from camping
stores, it is for seam-sealing tents. It is very runny. Also, it is much
less "sticky". I found when folding the hem, that it was somewhat
reluctant to stay down. The straight silicone, you fold the hem, and
that's it, it is stuck.
So, using straight silicone adhesive and pushing the reinforcing
around with the fingers, what you end up with is a weirdly distorted
reinforcing.
Extra notes about the video:
Do not use bare fingers, as he has done in the video. Exposure to harsh chemicals may not have an immediate effect, but in the long term the body will react.
Also, I think the way that he has spread the seam sealer is inefficient -- dribble beads over the entire surface first, in roughly parallel lines, then simple sweeps with side of a finger can spread it.
Also, with care, the piece of reinforcing can be laid pretty much in the correct place, without all the wrinkles requiring to be pushed out as he has done.
He used a soldering iron and comments that it cauterizes the edge so won't fray -- however, as the reinforcing is glued to the tarp, there won't be any fraying -- besides, ripstop doesn't fray. Cauterizing will cause lots of little melted lumps -- notice, later in the video he trims some of them off. OK to cut out the circles with scissors.
I used this finger method on a few of the reinforcing pieces, then
remembered that with Mark-1 I only used the fingers a little bit, then
used the Uni-Pro seam roller. See photo of the seam roller here:
https://bkhome.org/news/202105/tarp-glueing-hems-and-ridgeline.html
Yes, this is the way to do it. Hopefully, lay the piece of
reinforcing down accurately, so you don't have to pull it around, then
run over with the seam roller.
So, some of the reinforcing tie-out points look good, some look crappy.
Spreading adhesive
I posted about a problem with spreading the adhesive for hems and
ridgeline. A dribble of adhesive along the line to be joined, then use
side of a finger to spread it. But of course the adhesive will spread
out, and the problem I had was the chalk mark getting erased. I posted
about this problem, with a suggested workaround to draw arrows:
https://bkhome.org/news/202106/treehugger-1p-tarp-mark-2.html
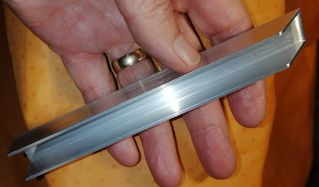
However, today I devised another solution. Bought 16x16x1.5mm
aluminium channel from Bunnings, cut it at 45 degrees, and very
carefully filed the tip so that (hopefully) a thin film of adhesive will
be spread, only 13mm wide:
 |
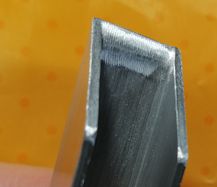 |
I filed so that an extremely thin film of adhesive will slide
through. The channel is held with the index finger pressing lightly so
that the sloped end slides over the fabric, following the marked chalk
line, the sides keep the adhesive from spreading out. Adhesive still
needs to be dribbled down the line-to-be-joined beforehand.
Length is non-critical, I cut off 14cm of channel, which fits nicely
in the hand. Cut at 45 degrees because my hacksaw-jig thingy only does
22.5, 45, or 90 degrees. Perhaps a steeper angle would be even better.
A little bit of experimenting, and it works well. The great thing
about this is two-fold. Firstly, the chalk line is still there, so can
see where to fold the hem, or overlap the ridgeline. Secondly, no glue
is wasted.
That second point is very important. I have found when constructing
Mark-1 and Mark-2, that the glue can very quickly become a significant
part of the weight of the tarp. I would even say, that if you apply it
liberally, you could even double the weight of the tarp-sans-glue.
A little thought about the weight compared to sewn tents. They need
seam-sealer, such as Silnet, and you can very easily use up a 50g tube
on one tent. My glued tent does not need seam-sealing, except where the
tie-outs are sewed on, and the amount of glue used could be similar to,
or less, than that used to seam-seal a sewn tent. As long as there is no
excessive glue applied.
The 16x16x1.5mm (13mm inside width) channel is OK for the hems. For
the ridgeline, need wider channel, but the biggest that Bunnings sell is
20x20x1.5mm (so 17mm inside width). Actually, the 3cm overlap that I
have done so far for the ridgeline, is probably more than needed. Will
think about that. Might shop around, see if can find slightly bigger
channel.
Chalk marking
I have posted about using a fabric marking pencil. Still not happy
about it. It is some kind of "chalk", but is too hard, and I have to
press harder on the fabric than I would like.
What I am using now is a chalk bar, designed for use on fabric:

...I bought the second one, because the first is out of stock at my
local Spotlight. The inbuilt "sharpener" is a joke -- just use a blade,
or any sharp edge.
I also bought some chalk from the kid's section in Kmart, but found
it to be unsuitable -- too crumbly. It tends to come off in chunks
rather than a nice line on the fabric. Maybe it is just the cheap brand
-- "Anko", which is Kmart's own brand.
EDIT:
Bought 25.4x25.4x1.2mm, 0.45m long, "Connect It" rectangular aluminium
extrusion from Bunnings. So that is about 23mm inside width. Cut it at
45 degrees. Here it is:
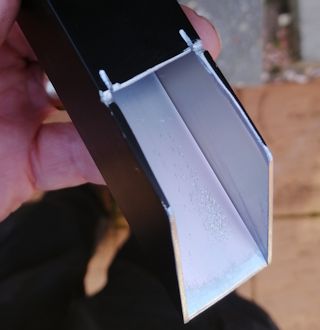
Not yet tested. I think that it would be
necessary to dispense the adhesive in a zig-zag pattern along the line
to be joined, to optimize even spreading.
Tags: light