
Start of DIY plans for solar water distiller
Hopefully, anyway. Posting in stages to my blog, and if the end
result is good, then will put the plans together in a single page.
The basis of this is the "simple basin-type prototype #2", with some
further refinements, named as "prototype #3", as posted here:
https://bkhome.org/news/201912/designing-distiller-basin-type-proto3.html
I have refined the design in SolveSpace. Here is the diagram exported as a PNG:
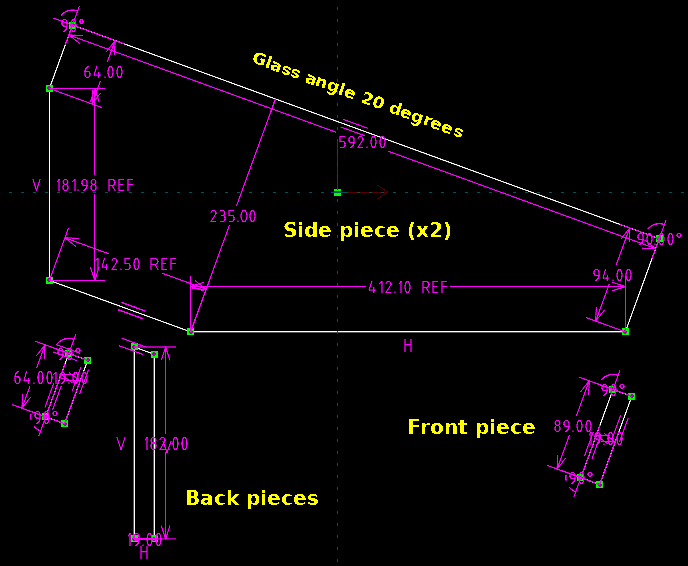
The wood is dressed pine, 19mm thick. The two side pieces are to be cut from a single 235x19mm 1.2m piece of pine.
EDIT 2020-01-11:
Here is the SolveSpace file for the above picture. It is for SolveSpace v2.3 and will need to be uncompressed first:
https://bkhome.org/news/201912/files/basin3-frame3b.slvs.gz
For construction to be as simple as possible, I want the wood surface
on which the glass will lay, to be perfectly flat, hence the unusual
proportions on the back side. Along the back side, there will be a
64x19mm piece of wood, at 90 degrees to the plane of the glass. Then
there will be a 182x19mm (actually, Bunnings sell 184x19mm) piece
oriented vertical -- cut with a 20 slope on the top so as to fit against
the piece above it.
At the front, there will be a 94x19mm (will use 89x19mm from
Bunnings) piece, oriented at 90 degrees from the plane of the glass.
I will use 572x672mm glass, 3mm thick. You can see that the length of
the side piece is 592mm. That is to allow the glass to sit on top of
the wood frame, with 10mm wood outside of the glass, all around. I was
planning to use a router to cut an indent in the wood, so that the glass
can sit flush with the wood surface, however, to keep construction as
simple as possible, won't use a router.
Instead, the glass will just sit on top of the wood frame, held down
with aluminium brackets. There will be silicone sponge between glass and
wood.
Ideally, I would like these DIY plans to require absolute minimum of tools, perhaps even just a hand saw. So, the router is out.
My piece of glass is 572x672mm, taking off 9mm all round where it
sits on the wood frame, that leaves active dimensions of 554x654mm,
which is a surface area of 0.362 metre-squared. If you want to build a
bigger distiller, aiming for more than 1.8 - 2.0 litres per day in
summer, you can keep the wood dimensions that I have shown above, just
make the front and back pieces longer (in my case, they will be 672 -9
-9, which is 654mm). For example, if you use 572x872mm glass, that will
give you an active surface area of 0.473 metre-squared, upping the water
output to around 2.4 - 2.6 litres. However, you might then want to
consider using 4mm thick glass, for the strength.
The previous prototype used expanding foam for floor insulation, with
black silicone sealant spread directly on top of the foam. It was very
light, but the method needs improvement, as there were "waves" in the
floor. This time, I propose to use a piece of 6mm plywood:
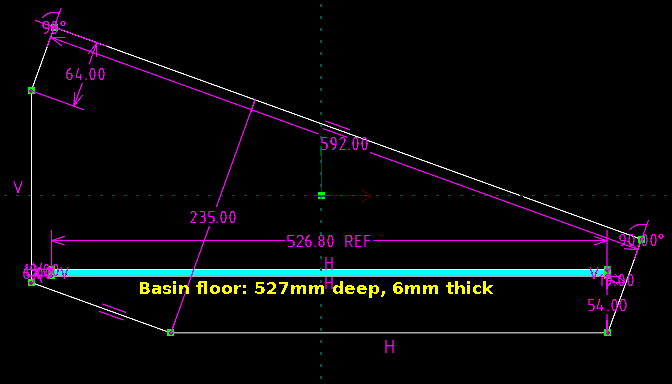
...by "deep", I mean 527mm will be the measurement of the plywood
from front to back, and it will be 654mm long (or wide, depending on
your point of view). It will require some framing underneath. The floor
of the basin will be 60mm above the bottom of the distiller.
EDIT 2020-01-11:
When I got to actually constructing the distiller, I decided to raise
the basin floor by 6mm, so the "54mm" in the above photo has become
60mm. Also, the plywood now measures 530.7x654mm. The corrected
SolveSpace v2.3 file (uncompress it first):
https://bkhome.org/news/201912/files/basin3-frame3b-internal2.slvs.gz
I have not yet decided what insulation to use. I am now wary of
expanded foam! Might use fibreglass insulation -- Bunnings do not sell
individual batts, so maybe I can use the leftover batts somewhere else.
Fibreglass insulation does have one advantage -- I can take it out if
want to mess around with the plumbing underneath. Also, if the plywood
gases due to the heat, the gas can escape.
There is proposed to be plywood on the bottom of the distiller.
I have toyed with various ideas for the floor and sides of the basin,
such as black silicone sheet stuck onto the floor. However, have
decided to stay with what has already been tested, and used in the
previous prototype, spreading silicone sealant onto the wood.
Here is the shopping list for the pine:
| Section (mm) |
Length (m) |
Price (AU$) |
| 42x19 |
2.4 |
7.65 |
| 64x19 |
1.2 |
5.00 |
| 89x19 |
1.2 |
6.00 |
| 184x19 |
1.2 |
13.00 |
| 235x19 |
1.2 |
21.00 |
And marine plywood:
| Dimension (mm) |
Price (AU$) |
| 1220x810x6 |
34.60 |
A grand total of AU$87.25.
EDIT 2020-02-13:
Bunnings doesn't seem to have that size of marine plywood any more. You
need sufficient for the floor of the basin and underneath the distiller.
You may have to buy a bigger piece, or two smaller pieces. Not online
anyway -- you could check in-store.
If I was to rummage around in scrap yards, I am sure that suitable
wood could be found, at a fraction of that price. For me, it is a matter
of convenience, as the Bunnings store is only a 5 minute drive from my
home. Also, I want pine for the light weight, but if that was not a
concern then a hardwood would be OK, and more durable. Perhaps also,
marine plywood is not needed, a cheaper plywood should be OK - or a
sheet of aluminium or steel.
Tags: nomad