
ethtool utility missing
See here:
https://forum.puppylinux.com/viewtopic.php?p=174022#p174022
Now added builtin.
Tags: easy
Handle mailto mime in xdg-open
In response to question about /usr/sbin/mailto.sh in Easy:
https://forum.puppylinux.com/viewtopic.php?p=174000#p174000
I cannot recall how mailto.sh was used, anyway have removed it.
/usr/bin/xdg-open has handling for an email address.
An application can call xdg-open, passing an email address, and it
is then supposed to open in the appropriate email client app.
The line that does this in xdg-open:
 *@*.*)
  exec rox -U "mailto:${1}"
 ;;
...which does nothing.
I have created /etc/xdg/rox.sourceforge.net/URI/mailto:
#!/bin/sh
#20260718

if type -p mozmail >/dev/null;then
 exec mozmail -compose "to='${1}'"
elif type -p claws-mail >/dev/null;then
 exec claws-mail --compose "$1"
elif type -p claws >/dev/null;then
 exec claws --compose "$1"
elif type -p sylpheed >/dev/null;then
 exec sylpheed --compose "$1"
fi
I'm not 100% sure about this mechanism, but it is a step in the
right direction.
Tags: easy
Fix round brackets in URI
A URI to a local video file, for the chromium-based VIDplay media player, aborted as the filename had round brackets:
https://forum.puppylinux.com/viewtopic.php?p=173964#p173964
The fix has been applied to /usr/sbin/vidplay in
woofQ2.
Tags: easy
Simple solution to boil water while camping
Fine-tuning the gear for upcoming "grey nomad" adventures. I have an alcohol stove, also a small gas cylinder with screw-on burner; these are for "one pot" cooking, probably twice a day.
But also want to make two cups of tea and one coffee per day, and it might turn out to be a chore to boil water 3 times per day in addition to cooking 2 meals. Had a think about it, and decided why not purchase a tiny electric kettle.
This is my lithium power box:
https://bkhome.org/news/202601/bluetti-ac70-power-box.html
It has a 1,000W sine-wave inverter, rated at 2,000W surge. Little
mains-powered portable kettles that draw only 300W are available.
There are 12V kettles, that run off the cigarette-lighter socket in a car; however, I think that they overly stress the current limit of the fuse, socket and cabling in the car.
Checked them out; those 12V kettles. To limit current draw to
something safe, they are very low power. Looked at one, just 96W
...how long is the user expected to wait for the water to boil?!
Found another that boils fast, but draws 31.5 amps!!!!
I bought this, Balabulala 500ml 240V 300W:
https://www.ebay.com.au/itm/257394510124
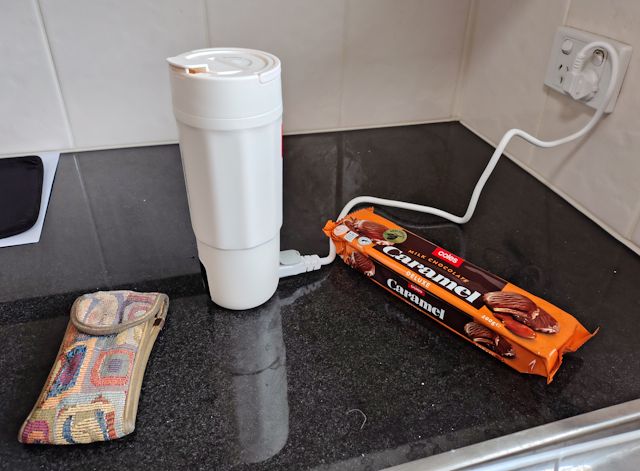
...the phone wide-angle lens distorts the image somewhat, giving the false impression that the diameter tapers out toward the top.
I was going to buy two kettles, one other type for a comparison report. This one, Focustar brand, 400ml 300W:
https://www.amazon.com.au/Focustar-Portable-Electric-Temperature-Protection/dp/B0BFHYHY1L/?th=1
...not from those particular vendors. I ordered it on eBay, then canceled the order after discovering their misleading postage details.
A thumbs-up to the Balabulala vendor; they shipped it by
Australia Post tracked parcel, and it arrived 6 days after
ordering, shipped from the other side of Australia.
The Focustar is considerably cheaper, but reviews are very mixed.
The 400ml for example; some reviewers say that you should put in
less than 300ml -- one reviewer said 275ml -- if intend to bring
it to the boil. Also, there is no digital temperature display.
The Balabulala does hold 500ml, with a marking at 400ml; no more than 400ml must be put in if the water is to be boiled. I don't have a measuring jug, but do have a Toaks 450ml titanium mug, and was able to judge approximately that the Balabulala claimed capacity is correct.
400ml took about 6 minutes to boil. So, three cups of tea and coffee per day, that is about 30Wh per cup, 90Wh per day. The Bluetti battery is rated at 768Wh, so happy with that.
Bearing in mind though, will be running a 12V fridge, LED lights and laptop. Solar panel puts out about 150W, so should be OK.
An interesting point to note: the Balabulala has a diameter of
80mm, same as the Focustar, and is 215mm high, 15mm higher than
the Focustar -- which is to be expected, given its larger water
capacity. But the Balabulala is still pleasingly small, easy to
pack away somewhere in the car.
Tags: nomad
Fix sudo run as another user
EasyOS does not have 'sudo', instead has a light-weight replacement named 'sudo-sh':
https://bkhome.org/news/202510/sudo-sh-reverted-to-simpler-design.html
There is a script /usr/bin/sudo, that is a wrapper for sudo-sh. It is far from implementing everything that sudo is capable of. The guys found when install Zoneminder, that it tries to use sudo to launch an app as user 'www-data':
https://forum.puppylinux.com/viewtopic.php?p=173863#p173863
I have modified 'sudo' script:
#!/bin/ash
C=''
while [ -n "$1" ];do
 case "$1" in
  -*)
   case "$1" in
    --user=*)
     #ref: https://forum.puppylinux.com/viewtopic.php?p=173863#p173863
     USERx="${1/*=/}"
     shift
     exec /usr/sbin/run-as-user ${USERx} ${@}
    ;;
    -u)
     shift
     exec /usr/sbin/run-as-user ${@}
    ;;
    -g|-p|-U|-C|-r|-t)
     shift
    ;;
   esac
  ;;
  *)
   C="$@"
   break
  ;;
 esac
 shift
done

if [ -n "$C" ];then
 #exec sudo-sh ${PPID} ${0} ${C}
 exec sudo-sh ${PPID} ${C}
fi
###end###
The 'run-as-user' script was introduced here:
https://bkhome.org/news/202602/enhanced-script-to-run-app-as-any-user.html
If you try and run it, like this for example: run-as-user www-data myapp
It will fail, as folder "/home/www-data" does not exist. I have
modified the 'run-as-user' script to call
/usr/local/clients/create-client-environment if www-data not in
/etc/passwd, or if it is, to not require existence of
/home/www-data.
Tags: easy
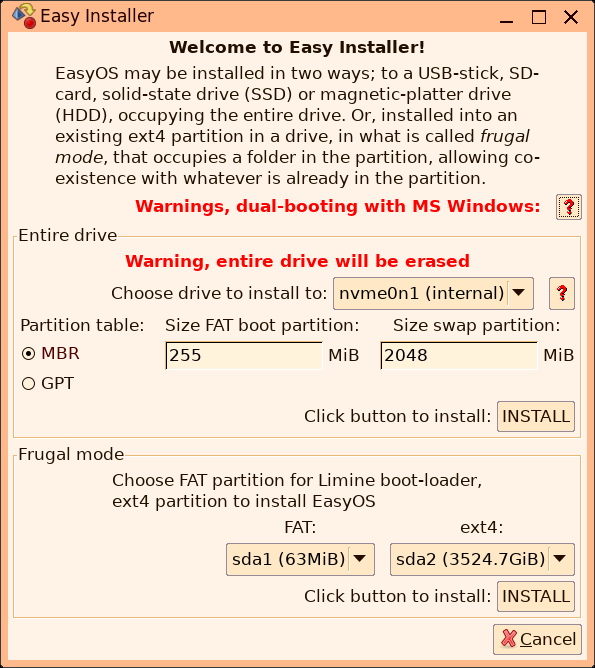
Started work on EasyOS graphical installer
Still a lot to do, but here are some snapshots. The startup window:
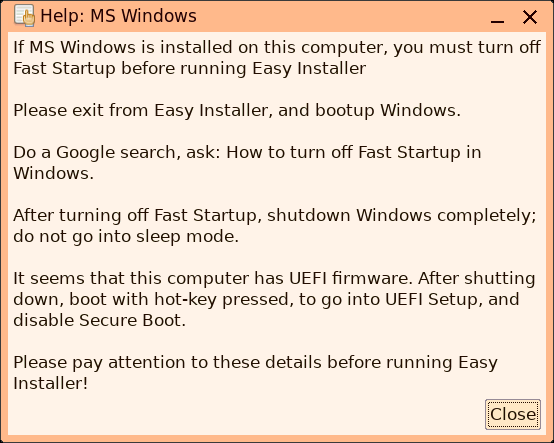
MS Windows help popup:
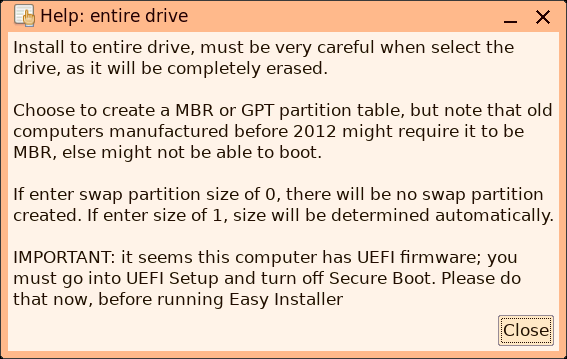
Install to entire drive help:
For frugal install, the Installer cannot do everything. Just like the mainstream installers, such as Calamares, some things have to be done in a running MS Windows. Especially these days, as it seems most Windows installations in modern computers have encrypted drives, using BitLocker.
So, I will need to revise and improve the instructions for
defragmenting and shrinking the main C: partition, and turn off
Fast Startup. After that, there will be free space in the drive,
and gParted can be used to make a ext4 partition, and maybe
another FAT partition. Though, Easy Installer could also be coded
to do this.
Tags: easy
Set Limine default in UEFI
Reviewing Limine Installer, this code adds the new installation of Limine to the UEFI (/usr/local/limine-installer/limine-installer, line 572+:
    DRVdest="$(echo -n "${ESPdest}" | sed -e 's%[0-9]*$%%' -e 's%p$%%')" #ex: sdb
    efibootmgr -c -d /dev/${DRVdest} -p ${ESPdest/*[a-z]/} -L limine -l "\EFI\limine/"${EFIname}".EFI" 2>/tmp/limine-installer/efibootmgr-install-error.log
...where "-c" is the short form of "--create", "-d" is the drive,
"-p" is partitition number, "-L" is the label, and "-l" is path
the to Limine .efi file.
According to online documentation, this new entry should become the default at next bootup. However, I seem to recall, from testing sometime ago, that might not have been the case, so have added extra code to ensure it is first in the boot order:
     ENTRY="$(efibootmgr 2>/dev/null | grep ' limine' | grep -o '000[0-9A-Z]')"
     BO1="$(efibootmgr 2>/dev/null | grep '^BootOrder:' | cut -f 2 -d ' ' | tr ',' '\n' | grep -v "${ENTRY}")"
     BO2="${ENTRY}${CR}${BO1}"
     BO3="$(echo -n "${BO2}" | tr '\n' ',')" #ex: 0005,0000,0001
     efibootmgr --bootorder ${BO3}
I have started to think about a graphical installer for EasyOS,
and Limine Installer will be part of it. So, checking the code in
Limine Installer, that it looks sane.
Tags: easy
Wayne is homeless
Wayne is from Perth, Western Australia, and today travels in Asia, staying in cheap accommodation. He makes a living, just enough, from his YouTube channel "Fiasco da Gama" (a take on the Portuguese explorer Vasco da Gama).
In this video, Wayne explains about his lifelong desire not to accumulate possessions, to just be a wandering spirit:
"60 And The Freedom Of Having Nothing. Goa."
https://www.youtube.com/watch?v=PUa_SSz29Mo
I've been turning over Wayne's philosophy in my mind...
He does come back to Perth sometimes. I think the last time was for dental treatment. He stays with his sister, who is a regular married person with a home.
Can't say that I agree with him, not 100%. A person can be very happy owning a home, and have pleasure in having kids. Just as, alternatively, those things could be a not-so-happy experience. I think, mostly, it is where you are in your own mind.
Wayne will qualify for the Age pension when he reaches 67, as
long as he has been resident in Australia for 10 years, 5 of which
must be continuous. There is something called "Australian Working
Life Residency" (AWLR), which is how many years you have been
resident in Australia since age 16; a figure of 35 or more confers
the full Age pension. below that, it declines proportionally --
which could be a problem for Wayne.
However, as far as I can make out, this AWLR rule only applies if you are living overseas while retired. Google AI says this:
The 26-Week Rule:
You can receive your full Age Pension rate while traveling
overseas for up to 26 weeks, regardless of your AWLR.
After 26 weeks:
Your AWLR calculation kicks in to determine your ongoing
rate.
...so it looks like that 26-week rule will suit
Wayne.
Tags: general