
Distiller DIY floor construction
The previous post, construction of the wood frame:
https://bkhome.org/news/201912/distiller-diy-assembling-the-frame.html
Now for the plywood floor. I decide to increase the thickness of the
floor insulation from 60mm to 66mm. This is a consequence of deciding
not to indent the glass into the wood, rather to just sit it on top,
with silicone foam strip between glass and wood frame. This gives a bit
more height under the glass at the front, so the floor can be raised a
bit.
I purchased marine plywood, 6mm thick, so marked out a height of 60mm
from the bottom of the distiller, for affixing framework to hold the
ply. I also put framework along the bottom, as it is intended to affix
6mm ply on the bottom of the distiller also.
As I had some 42x19mm pine, I cut it lengthwise into three strips
about 13mm wide each. This was done with the rotary saw. The strips were
then screwed to the distiller frame, using 6G 30mm screws, predrilled
with 2mm drill bit and 3.5mm into the top 19mm, and countersunk by hand
using a 7mm drill bit. This is what it looks like:
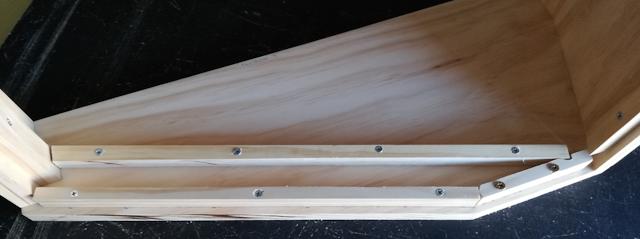
A straightforward operation, no need for detailed plans, anyone can
do this just by seeing this photo. One detail though: the back wall is
vertical, so no problem, however the front wall is 20 degrees off
vertical. Therefore, the strip of wood that I used along the front, I
cut with an angle of 20 degrees (my rotary saw has angle adjustment,
making that operation easy). This photo shows the strips looking from
the top, so that you can see the 20 degree cut on the front strip:
...the wide-angle lense on the phone distorts the image -- the back wall is actually vertical.
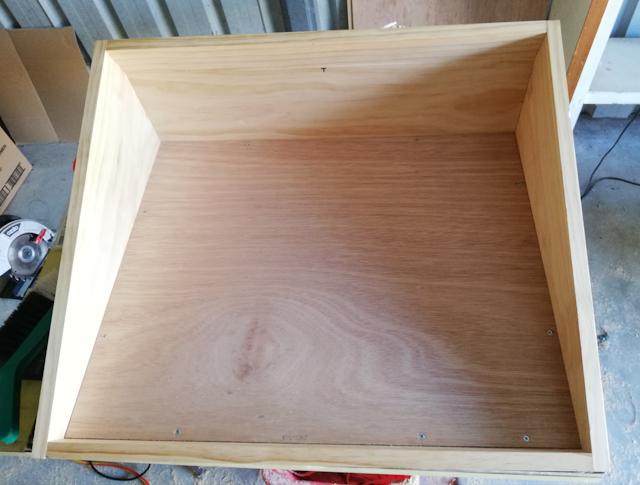
I cut the plywood with a handsaw, a tenon saw actually, 654x531mm,
with a slight angle to front, and it fitted in snuggly. I then used 6G
20mm screws, predrilled with a 2mm drill bit and countersunk by hand
with a 7mm drill bit.
| 6Gx20mm zinc-plated countersunk-head, 40pk |
AU$3.98 |
EDIT 2020-01-11:
The 6Gx20mm screws were purchased from Bunnings, Zenith zinc-plated
countersunk-head. Looking at Bunnings website now, can't see any
zinc-plated, but there are brass-plated:
https://www.bunnings.com.au/zenith-6g-x-20mm-brass-plated-hinge-long-threads-countersunk-head-timber-screws-40-pack_p2420082
...there are 6G 15mm zinc-plated, which would have enough reach.
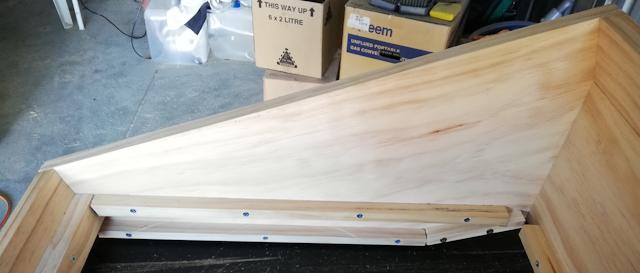
Assembled view:
That was when I made an "interesting" discovery: While brushing wood
particles off the surface of the basin floor, tiny wood hairs lifted off
the surface of the plywood, and stuck up. I looked on the other side,
and the surface is more consolidated, wood hairs do not lift up.
This is a concern. Now that it is screwed in place, I really don't
want to lift it up and flip over. Besides, I chose that orientation as
the plywood sheet had a very slight bow -- only slight -- which I want
to to have the convex side on top. now that it is in place, it is very
flat.
I will probably give a fine sandpaper, but not if it is going to lift
up more hairs. Anyway, will try and get rid of the hairs, and hope that
when spreading the silicone sealant none of the hairs stand up.
EDIT 2020-01-11:
I used 120grit (fine) wood sandpaper on the plywood surface, and it took
off the wood "hairs". Looks good, ready for the sealant to be applied.
A construction detail that is not in the above photos: the distilled
water runoff pipe will be on the right side, coming out underneath in
the extreme right corner. So I left a gap in the floor support strips,
of about 15mm in the front right corner (as viewed standing in front of
the distiller). I could have cut out the corner of the plywood also,
however decided to drill it after the silicone has been spread.
There will also be inlet and drain holes.
Tags: nomad