
Battery insertion and more bits and pieces
The previous post was "bits and pieces" information about construction of the lithium powerbox project:
https://bkhome.org/news/202004/cable-and-soldering-guidelines.html
This post is notes about battery insertion, and various notes about
connectors. In a previous post, I had discussed concerns about the
current capability of some blade fuse holders, and I also mentioned that
spade terminals might not be suitable above 10 amperes -- today's post
has more on this.
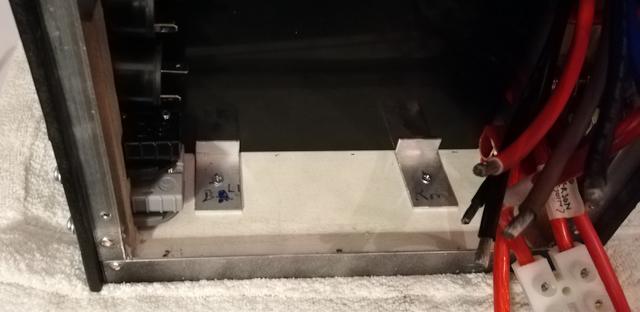
Today I inserted the Amptron 50AH lithium battery into the powerbox.
The front and back panels have to be taken off, for insertion of the
bracing bar that will hold the battery down:

Construction of the bracing bar is described in an earlier post. You
can see it in the above photo, with a bolt that will be adjusted to
provide tension. The bracing bar is 10x10mm aluminium channel, and the
bolt is M4 16mm hex head, purchased from Bunnings:
I used two nuts on each bolt, to lock the nuts.
The battery is held firmly, but just in case, to stop horizontal
creep, I put two pieces of old foam at each end, and on the side of
battery facing the the front panel, put two pieces of 12x20 angle:
WARNING:
As the frame is made with aluminium, I placed electrical tape over the
battery terminals before inserting the battery. Advice to everyone: do
not skip this step!
Also, I wrapped electrical tape around the spanner, for doing-up the terminal bolts. Again, important precaution.
Which reminds me: in a previous post, I suggested that an extra 5mm
height for the box would be an improvement. Yes, I have slim fingers,
but it was difficult to get into the narrow gap between top of battery
and top-inside of the box. Someone with chunky fingers would find it
impossible. Make that an extra 10mm.
Oh, and about the spanner, do not use an adjustable spanner. A proper
flat 13mm (for the Amptron battery) spanner is required. There is just
enough space to slip a spanner over the hex head of the terminals, and
very little swing to tighten it.
At the risk of being overly-verbose in this post, another thought has
occurred to me. I did also mention in an earlier post that a wood frame
might be better than using aluminium. It certainly would be safer when
inserting the battery and accessing the terminals (note, I have not
connected the aluminium frame to either +ve or -ve, which does make it
safer). With a wood frame, the top plate of the box could be screwed
from the top, such that the top plate could be lifted off, thus giving
easy access for both inserting the battery and doing-up the terminals --
worth considering!
I do have thoughts how to design the wood frame, and if anyone wants
to go that way, contact me. Or, if you create a design, let me know and I
can post it.
Now for some connector details...
Washers
The bolts on the battery terminals do not screw all the way down, and
require washers. I have used two washers plus the cable eyelet-lug. The
binding posts also require an extra washer on each. The washer that I
have used for both situations is this:
https://www.bunnings.com.au/pinnacle-m8-stainless-steel-flat-washer-12-pack_p0130534
Also used these in a couple of places, 3/16 inch and M5:
https://www.bunnings.com.au/zenith-3-16-zinc-plated-machine-washer-50-pack_p2420280
Eyelet lugs
Eyelet lugs are required for battery terminals, binding posts,
coulometer shunt, and the 30A circuit breakers. I purchased these two
sizes from Jaycar:
https://www.jaycar.com.au/6mm-non-insulated-eye-terminal-6mm2-pk-8/p/PT4934
https://www.jaycar.com.au/8mm-non-insulated-eye-terminal-10mm2-pk-8/p/PT4936
Spade terminals
I have posted earlier about current capability concerns. As I am
soldering all connections, not crimping, I purchased these female spade
connectors:
https://www.jaycar.com.au/6-3mm-non-insulated-spade-connectors-pk-10/p/PT4630
However, they have very thin metal, and I could feel they had less
grip compared with others that I already have. Those others are going to
be much more suitable for currents up to 15A, but unfortunately are
only available as crimp-type:
https://www.jaycar.com.au/female-spade-yellow-pk-8/p/PT4707
...the plastic covering is very tough, can't even get it off with a
hacksaw, so used my soldering iron to cut down its length. I then had
naked connectors, to which the cable can be soldered. Note, these
connectors will take up to 6mm auto cable.
Rubber feet
The wiring-board is not going to be bolted to the box, instead will
rely on everything around it to keep it in place. There are screws
sticking out the back of it, and as the back side will be against the
battery, I screwed rubber feet onto the back side of the board. These
ones:
https://www.jaycar.com.au/11mm-screw-fixing-rubber-feet-pk-8/p/HP0800
Final product notes
Tomorrow the plan is to do some finishing touches to the assembly,
and powerbox will be ready to go. It is anticipated that the next blog
post will be about the final assembly.
An interesting point about practical usage: the completed powerbox
weighs just on 11kg, which is OK for me, but I wouldn't want to lug
anything heavier. The battery is 50AH, effectively equivalent to an 80AH
AGM battery, which is also OK for me -- but what if one day in the
future, I want to run more things off the battery, or find myself in
situations where there are many days without sunlight, and want more
battery storage?
No problem, just attach another battery. What I would need is another
50AH lithium battery, in a box, with fuse and short cable with a black
Anderson plug. Plug it into the black Anderson plug on my powerbox, and
hey presto, power storage is doubled (make sure both are full-charged
beforehand!). Having two separate boxes is also easier to lift.
My Amptron mains-input lithium battery charger will also have a black
Anderson plug, and can be used to charge either battery.
Tags: nomad