
Cable and soldering guidelines
Continuing the lithium powerbox project, this is the previous post:
https://bkhome.org/news/202004/holders-for-blade-fuses-in-powerbox.html
Today's post has some bits and pieces of information about electrical circuit construction techniques. Those who are skilled with soldering, etc., will be OK to construct a powerbox like mine. Others, however, might need some hints.
Cable sizes
I have used various sizes of cable in the powerbox, as you can see in photos posted in earlier blog posts:
https://bkhome.org/news/202004/holders-for-blade-fuses-in-powerbox.html
...the thinner cable is "6mm auto cable", purchased from Big Als via
eBay. This has copper area of 4.59mm2. The thicker cable is two types,
purchased from Altronics. I do have some 8AWG from Big Als, however that
is twin core, besides, I want to use that for extension leads. So I
popped into Altronics and bought one metre of each of their "61A" and
"90A" power cables, red and black. Here are links to the red cable:
https://www.altronics.com.au/p/w4100-630-0.12-red-61a-power-cable/
https://www.altronics.com.au/p/w4216a-119-0.30-90a-red-power-cable/
The differences between these is very interesting. The 61A cable has
thinner strands, which makes the cable more flexible. Here they are
compared with 6mm-auto and AWG sizes:
| Cable type |
Copper area (mm2) |
| 6mm auto |
4.59 |
| 10 AWG |
5.26 |
| 9 AWG |
6.63 |
| W4100 61A |
7.1 |
| 8 AWG |
8.36 |
| W4216A 90A |
8.4 |
Much more expensive buying locally, but ordering over the Internet is
currently very slow, as vendors such as Big Als are based in the
Eastern States. I have used both of those cables from Altronics, using
up what has been purchased.
Soldering
Soldering technique varies, according to individual style. I prefer
the old-school copper tips on soldering irons -- modern irons do have
copper tips, but they are coated with something -- that I file off to
expose the copper -- as I find that solder sticks better to the copper
surface. The copper corrodes, which is why it has the coating,
but I use a file to keep the copper tip clean and flat. I also prefer a
chisel-tip.
This is the iron that I am using for this project:
https://www.bunnings.com.au/tradeflame-60w-240v-soldering-iron-kit_p5910275
...60 watts is more than enough for soldering 8 AWG cable. I use a
wet cloth to wipe the tip of the iron, but it would be nice to have this
one, with stand and sponge:
https://www.bunnings.com.au/tradeflame-30-60w-soldering-iron_p6270385
I do not own a crimping tool, so all joins are soldered. Eyelet lugs
and Anderson plug lugs are connected to cables by the flood-fill method.
See demo here:
https://www.youtube.com/watch?v=6IjG6-PxNBs
...difference for me though, is I apply solder to the expose cable
ends, before inserting. This ensures that solder has flowed through all
the fine wires in the cable, avoiding what is called a "dry join".
The video shows a flame being used to heat the Anderson lug. As I use
a soldering iron, just a dab of solder on the flat surface of the
chisel-tip, held against the side, will heat the wall and the solder can
be inserted -- as the video says, take care not to overfill, otherwise
it will overflow and run down the outside of the lug, perhaps rendering
the lug unusable.
I also solder the ends of the cable that is inserted into screw
terminals. This strengthens the cable, as the twisting action of the
screw can break the fine wires, plus some wires thrust to the side of
the screw are not tightly bonded electrically to the terminal.
Regarding solder, for this fairly heavy work, I prefer 1.6mm thick solder, available from Altronics:
https://www.altronics.com.au/p/t1122-1.6mm-200gm-roll-60-40-leaded-solder/
...Jaycar, only has 1mm solder. Bunnings, on the other hand, only stock much thicker solder, used for plumbing.
Cable splicing
The iTECHBCDC25 DC-DC charger came with Anderson plugs, that I cut
off. It also came with three more Anderson plugs with short lengths of
cable. I need to extend the length of the cables coming out of the DC-DC
charger, so I used the short lengths that were attached to the other
three Anderson plugs. The cable is 10 AWG.
The most common way that two cables are joined together, what we call
"spliced", is a special metal sleeve, which is then crimped. I have
neither the sleeves nor a crimper. Instead, I used this simple method --
just push the two ends into each other.
Doing this, the strands become intertwined, and it will grip
together. Note, I haven't tried this with the ultra-fine copper strands
in the Altronics "61A" cable -- perhaps it might not work. This slightly
out-of-focus photo shows the two cable ends pushed together:
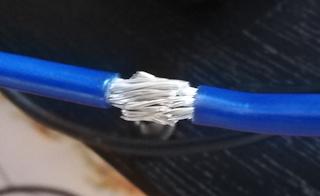
It is then easy to solder, and forms a very strong bond. Heatshrink
tubing needs to be slid over the join. many years ago, I bought a pack
of mixed sizes, and the largest, 6.4mm, fits over 8 AWG cable. Ah yes,
it is still available:
https://www.autobarn.com.au/narva-heatshrink-selection-3-2-6-4-56600
So, there are six Anderson plugs that I have removed the lugs from. I
have plenty other Anderson plugs, but if I wanted to re-use these, it is
possible to buy the lugs, in packs of 20, from eBay.
Tags: nomad