
Holders for blade fuses in powerbox
I posted yesterday about the start of wiring the powerbox, and a problem with using blade fuses at 20-30 amperes:
https://bkhome.org/news/202004/wiring-of-powerbox-underway.html
Originally, I had purchased this blade fuse holder 4-way box:
https://www.autobarn.com.au/narva-fuse-box-blade-54420bl
However, after watching the Redarc video (see above link), I became
concerned. The Narva packaging has "Maximum 30A per circuit", and if you
believe that, then you could put a total of 120A through it, 30A per
fuse.
I did a bit more reading on the topic, and it looks like the 6.3mm
spade terminals, as used in the above Narva fuse box, are only designed
to handle 10-15A. A 6-way blade fuse box sold by Jaycar, which, apart
from having 6 slots looks identical in its internal construction to the
Narva box, states "15A/circuit max" and "45A/block max":
https://www.jaycar.com.au/automotive-fuse-box-6-blades/p/SZ2002
Jaycar have these female spade terminals, rated at 10A maximum:
https://www.jaycar.com.au/6-3mm-non-insulated-spade-connectors-pk-10/p/PT4630
Comparing different blade fuse holders and spade terminals, some are
thicker metal, and appear to be designed to handle higher current.
Looking at what blade fuse holders are on offer, some indeed are
thicker metal and grip the fuse more firmly. I bought two of these
inline blade fuse holders:
https://www.jaycar.com.au/standard-duty-30a-blade-fuse-holder/p/SZ2040
...these have superb grip on the fuse, and actually require some
force to fully insert the fuse. Good, but I want to mount these on my
"wiring-board". That board is 150mm horizontal by 170mm vertical, 6mm
thick marine ply, and I posted a photo of the start of wiring it in the
previous blog post. Here is a photo with two of the inline blade fuse
holders mounted on the board:
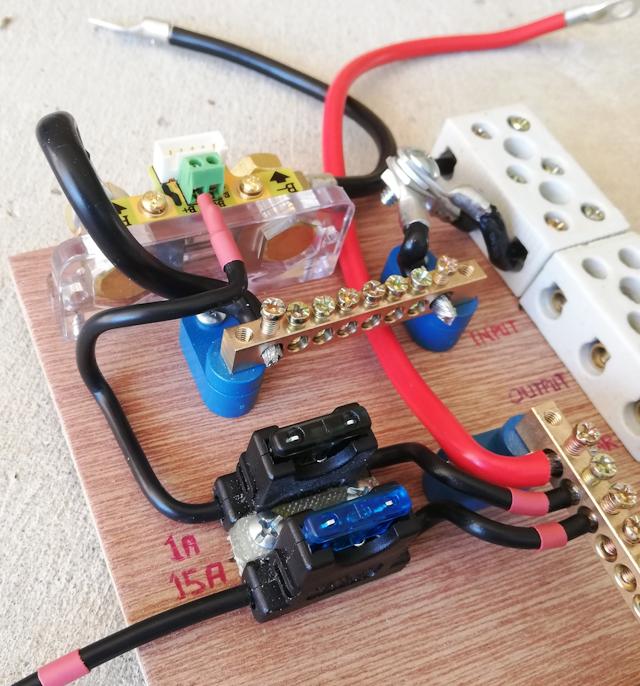
...overkill using that heavy-duty fuse holder for the 1A fuse. To
mount these fuses on the board, I used Selleys "All Plastic Fix" glue
and a small piece of plastic cut off a chopping board.
I have used that Selleys glue on previous projects. It consists of a
primer-stick and an adhesive tube, and will glue all types of plastic,
giving a very strong bond. The primer-stick lasts a lot longer than the
adhesive, and I was reading somewhere, someone just used superglue and
it worked the same as the All Plastic Fix adhesive tube.
The 1A fuse goes to the coulometer, via the shunt. The 15A fuse will
go to the cigarette-lighter sockets. I still have to put in fuse holders
for the DC-output black Anderson plug, and for the solar input grey
Anderson plug -- these will be 30A and 25A fuses.
EDIT 2020-04-26:
Fuse holders for the 30A and 25A blade fuses have been added to the board:
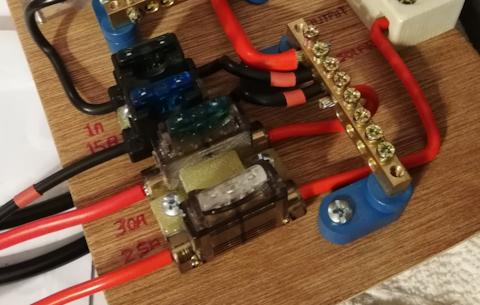
I wanted screw terminals, so chose these:
https://www.jaycar.com.au/screw-terminal-30a-blade-fuse-holder/p/SZ2044
These blade fuses need even more force to
insert than the other ones, so it is a very good connection between fuse
and holder, so I am confident these will handle 30 amperes. The screw
terminal holes look like they will take up to 9 AWG -- I have just
noticed that the table here has the wrong area for 9 AWG cable -- it should be 6.6mm2.
Same construction, the two fuse holders have
been glued together for mounting on the board. Given the force to insert
and remove fuses, I put an extra piece of chopping-board plastic to
more securely bond the two holders together.
The two red cables going out to the left, have
Anderson plug lugs on the ends, for insertion into the black and grey
Anderson plugs.
Tags: nomad