
Catenary cut for tarp ridgeline
After constructing the TH1P tarp Mark-1 and erecting in my lounge
room, then eye-balling it, I realised that it would be better if the
ridgeline is joined in a catenary-cut. Previous post, showing photos
erected in lounge room:
https://bkhome.org/news/202106/bottom-tie-outs-and-tarp-completed.html
It is not apparent from those photos, but the fabric either side of
the ridgeline is loose, not taut. even though I pulled the cords fairly
firmly at each end. The problem is, the ridgeline is never going to be a
straight line, no matter how firmly you attempt to tie each end. It
will sag.
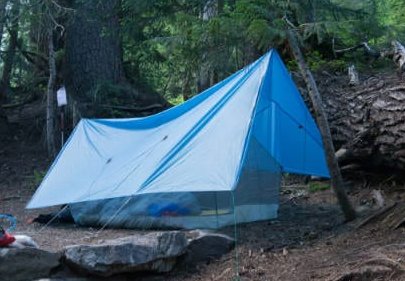
This photo shows the sag in a straight-cut ridgeline. OK, it is a bit
exaggerated, because the ends have not been pulled firmly, but the
shadow does show you the effect of the sag:
This sloppiness can be mitigated by having extra tie-outs on the
sides of the tarp, but I would prefer not to have more stakes to hammer
in.
There is a fix for this problem, to join the ridgeline in a curved
shape, so when erected, the fabric either side of the ridgeline will be
taut. This photo shows a tent which has such a curve:
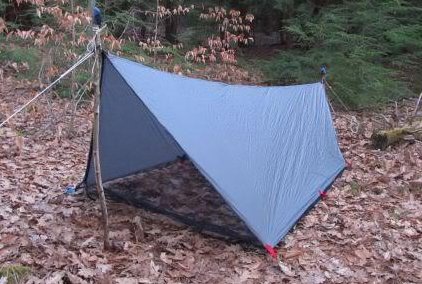
...you can see, a reasonably firm tension applied each end, the ridgeline has a sag, but the fabric each side is taut.
My apologies to whoever posted the above photos, for not acknowledging you. I downloaded them and don't recall the URLs. Ah ha, found one URL, but he also has "borrowed" the photo from somewhere else.
The curve shape is known as a "catenary". The Wikipedia defines a catenary as:
A catenary is the curve that an idealized hanging chain or cable assumes under its own weight when supported only at its ends.
So, it would be good to join the two halves of the tarp so that the
ridgeline has this natural hanging shape. As I have already created a
straight ridgeline, I decided to modify it to be a catenary.
Firstly, I need a formula for calculating the points along the catenary. Fortunately, 'XTrekker' has done it:
https://www.hammockforums.net/forum/showthread.php/85208-Catenary-Parabola-Curve-Calculator
...you can run the formula online, or download the Excel spreadsheet -- which runs great in LibreOffice.
I have uploaded the Excel spreadsheet here.
Note, XTrekker's formula is for both ends of the tarp to be at the
same height. My tarp is lower at the foot-end, but I don't think it
matters if the cut is not to an exact catenary mathematical formula.
Back in an early post of these tarp construction instructions, I gave
the dimensions of each side of the tarp, and the ridgeline was 222.2cm.
After folding the hems, the final ridgeline length on my tarp is
215cm.
But the big question, how much "sag" to put into that formula? After a
bit of reading other people's experiences of a minimal catenary, I
chose 4cm. Tabulating the results from the spreadsheet:
| Distance | Offset "b" |
| 0 (centre) |
4.0 |
| 25.0 |
3.8 |
| 35.5 |
3.6 |
| 43.5 |
3.4 |
| 50.0 |
3.2 |
| 55.5 |
3.0 |
| 61.0 |
2.8 |
| 65.5 |
2.6 |
| 70.0 |
2.4 |
| 75.0 |
2.2 |
| 78.0 |
2.0 |
| 81.0 |
1.8 |
| 85.0 |
1.6 |
| 88.0 |
1.4 |
| 91.0 |
1.2 |
| 94.0 |
1.0 |
| 97.0 |
0.8 |
| 99.5 |
0.6 |
| 102.5 |
0.4 |
| 105.0 |
0.2 |
| 107 (end) |
0 |
I have modified my tarp, by cutting along the ridgeline, then re-glueing.
For someone constructing the tarp from scratch and wanting the
catenary curve on the ridgeline, I would like to theorize on a couple of
ways it can be done. Let's call them "method-1" and "method-2"....
Method-1: variable overlap
This
sketch explains theoretically how I think it could be done:
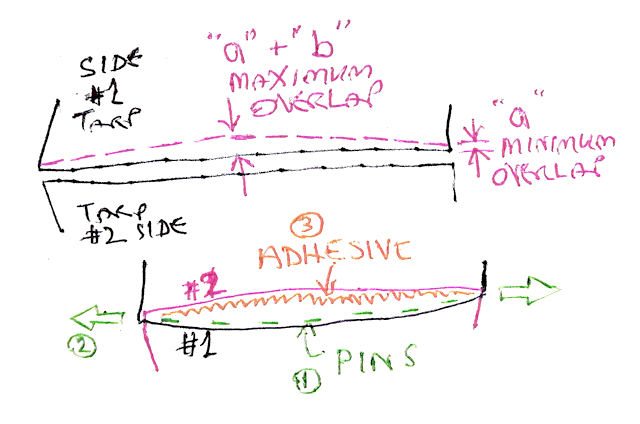
The top sketch shows the two tarp ridgelines placed together, and the
red dashed line is the pencilled catenary shape. There has to be some
overlap at the ends, named "a", and in the centre there will be an
overlap of "a" + "b", where "b" is from the above table.
One thing that I think you will need to be careful about, is not just
to pull #2 side up to the pencil line, as the ridgeline will be
slightly wonky. #1 and #2 edges need to be pulled equally. I think that a
way to achieve a nice non-wonky join, is to do what I suggest in the
bottom sketch.
I have indicated a sequence, 1, 2, 3, but you might find it better to
do 2 first. That is, anchor each end firmly with weights, then pull the
two edges so that they overlap and follow the pencil line. Then put in
pins to hold the overlap in place.
Then step-3, glue. Tarp #2 will be sitting on top of #1, and you can
glue it down. Usual procedure: dribble a line of silicone adhesive, then
run your finger along to spread it, then press down. The only thing to
be concerned about is that the spread of glue as you run your finger
down, reaches the edge, so edge #2 is glued down all the way along.
Take out the pins, leave overnight. Next day, flip over and glue the
other edge. It is then wise to leave for several days, to fully
cure.
Method-1 is wasteful of fabric and glue, and the tarp will be
unnecessarily heavy, as the "b" value gets bigger. Plus, I am not sure
how the ridgeline will hang with a large centre overlap.
I came up with that 4cm sag figure from reading forum posts, but
those people were using method-2. So, "b" should be doubled for
method-1, but 8cm fabric overlap is, I think, not the way to go. I am
describing method-1 in this blog post, for consideration if you only
want a tiny sag value.
The alternative is the traditional way, cut a catenary shape on the
ridgeline edges of both tarps, and then join them with a constant overlap the
entire length. This is Method-2...
Method-2: Catenary cut
Another sketch to show this:
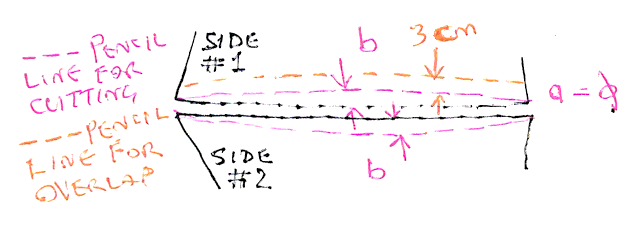
With this method, you mark catenary lines on both edges, then cut.
This is shown by the pink dashed lines. If you used a "b" value of 4cm,
as per the above table, then you are going to get twice the catenary
effect than for method-1.
To glue the two sides, I think that you could still use the pins. So you
would pull side #2 over side #1, pull each end and put weights, then
pin, then glue.
Leave overnight, then flip over and glue the other edge.
I used method-2 on my tarp, and used pins. To make it easier to
insert the pins, I hung the two tarp-sides near vertically, using a
plank. The plank is dressed pine, 184x19x2400mm. Use a large crocodile
clip at one end, to hold the two pieces of tarp together, with 3cm
overlap, onto the end of the board. At the bottom end, you could use
another crocodile clip to hold the tarp pieces together, again 3cm
overlap.
Haven't got a photo of that, but it should be easy enough to visualize. That made it very easy to insert the pins.
I then laid it horizontal and glued. I left the pins in, but that is
OK, next day flipped the tarp over and glued the other flap.
I had removed the tie-outs at each end of the tarp. Need to
reconstruct those, then will take a photo of the erected tarp, and will
update the tarp construction details here:
https://bkhome.org/news/202105/tarp-glueing-hems-and-ridgeline.html
This time, will use some heavier-duty webbing for the ridgeline tie-outs.
EDIT: TH1P tarp mark-1 with catenary-cut
I cut along the ridgeline, cut the catenary curves, re-glued, sewed
new webbing tie-outs. Unfortunately, all this messing around has
resulted in a lot more glue and some extra reinforcing bumping the
weight from 178g to 218g, a jump of 40g. That is unnecessary extra
weight, would have been less if had done the catenary-cut from the
start.
Here is a photo:
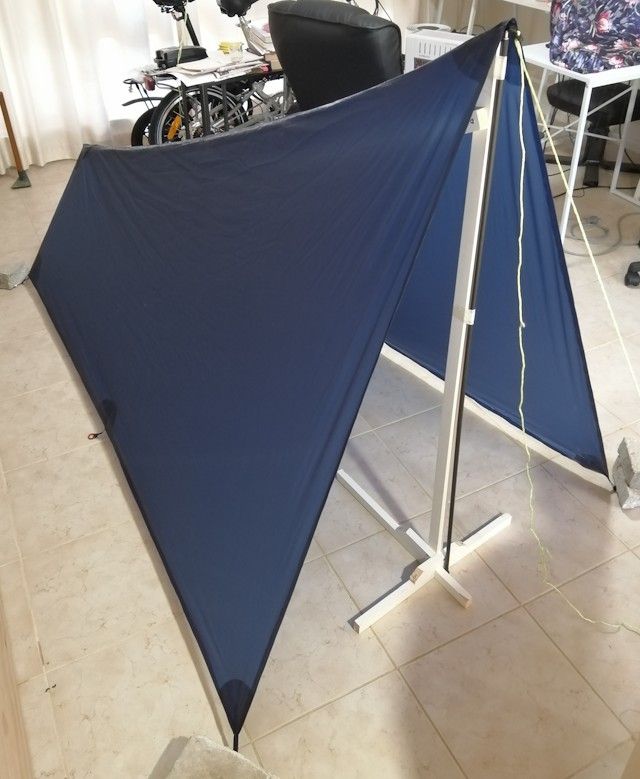
I am really not convinced that the catenary-cut is worth the effort.
Yes, it does take up some of the slackness along the ridgeline. The
tautness will also have an advantage when wind hits the side of the
tarp, it will more readily flow over the tarp, instead of trying to push
it over. Some people cut even deeper catenary, but then they are going
to be loosing more height inside.
A straight-cut is probably preferable if you want to erect the tarp in other ways, not just as a V ridgeline.
For the tie-outs on the ridgeline, I have gone for a thicker webbing. This, 12mm wide by about 1mm thick:
https://www.aliexpress.com/item/4000126877988.html
...it is only available in black.
Tags: light