
TreeHugger 1P Mark-1 tarp deep catenary cut
On June 5, 2021, I posted instructions for a glued tarp, straight-cut, that weighs only 178g:
https://bkhome.org/light/treehugger-1p-tarp-weighs-only-178g.html
After that, I speculated about a catenary-cut on the ridgeline, to
try and get rid of looseness of the fabric along the ridgeline:
https://bkhome.org/news/202106/catenary-cut-for-tarp-ridgeline.html
...and cut a minimal catenary curve along the ridgeline.
However, the fabric along the ridgeline was still very floppy, so
decided to experiment with a much more aggressive catenary cut.
To this end, I thought about what the curve shape should look like.
It seemed to me that the curve of a boat mooring line looks "good", as
calculated here:
http://abc-moorings.weebly.com/catenary-calculator.html
I can't say that this is the mathematically best shape for the
deep-cut ridgeline, but it intuitively looks "right". I downloaded the
spreadsheet file, and gzipped it, uploaded here:
Catenary-Mooring-Line-Shape-Tool.xlsx.gz
Here is a table that I got from that spreadsheet:
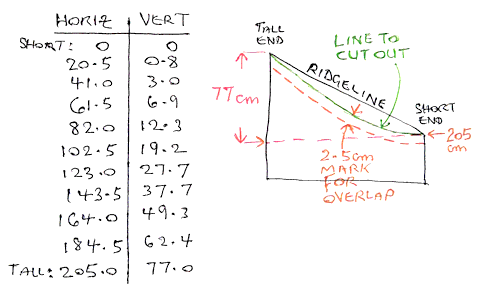
...you enter "77" for the "d" parameter, and "205" for the "X"
parameter. "X" is whatever the actual horizontal distance is, as shown
in the sketch. Transfer the table to the fabric, gives the green line.
This will be done on both pieces of fabric (the first can be used as a
template to mark out the second), and when the two ridgelines are
brought together, to be glued, there will be an overlap of 2.5cm, and it
is necessary to mark a line on the fabric that will be underneath the
overlap.
The ridgelines are now curved, and have to be pulled straight, so as
to be glued. I did that by placing them overlapped and held down at each
end with concrete blocks:
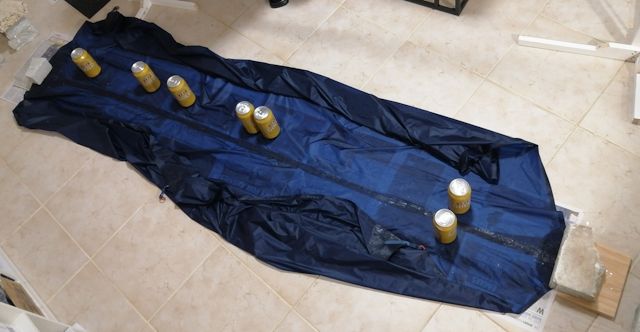
...so, in theory, I can run adhesive along the underneath fabric, and
the top piece should just about flop back into the correct overlap position. The
main problem with this plan, is couldn't lift the fabric at the ends,
because of the blocks, so had to start further in. But that is OK, glued
the ends afterward.
In the above photo you can see newspaper underneath. One layer of
newspaper, with cling-wrap over that. The cling-wrap is important,
because silicone adhesive does not stick to it. When I ran the seam
roller over the overlap, a tiny bit of sealant bleeded out underneath,
which is OK -- it will simply be flattened by the roller and won't stick
to the cling-wrap.
I have posted about this before, but reiterating here, this is the roller I use:
https://www.bunnings.com.au/uni-pro-30mm-seam-roller_p1662302
Glueing worked reasonably well. I used the 25.4x25.4x1.6mm spreader tool that I discussed in an earlier post:
https://bkhome.org/news/202106/refinements-to-glueing-tarp.html
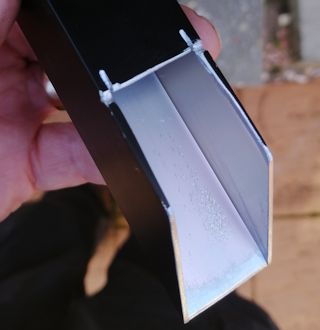
...that worked really well. Using the applicator gun, ejected the
silicone adhesive in a zig-zag pattern, fairly generously as the
spreader tool will catch any excess glue -- it just piles up inside.
Here is the ridgeline after glueing, with one side pulled out flat, so you can see the curve:
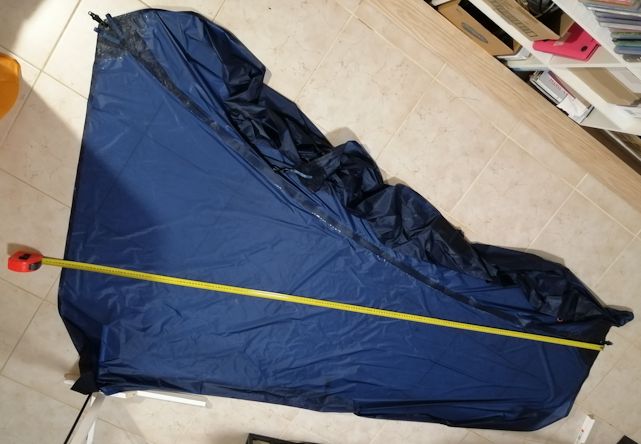
...and as you can see in the photo, the tie-out webbing has been sewn
on. It is best to wait several days after glueing, before sewing, to
avoid gunking up the sewing machine. Here is close-up of the short end:
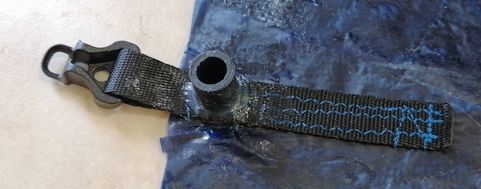
And here is close-up of the high end:

In the original straight-cut ridgeline, I experimented with "sockets"
to hold the carbon-fibre poles. What I have done as shown above is very
simple, just silicone end-caps glued to the webbing. These, 7.7cm ID:
https://www.aliexpress.com/item/1005001609758449.html
I have experimented with this, and found it to be very strong.
Silicone adhesive bonds to the silicone end-caps very strongly -- so
strong, that it can't be separated. The weak point is the bond with the
webbing -- I used the applicator gun pressed firmly onto the webbing and
forced silicone adhesive as much into the webbing fibres as possible.
Then used my finger (wearing disposable gloves) to press the adhesive
firmly to try and force it into the fibres even more.
The end-cap is glued right on top of where the webbing loop is sewn together, so it is, I think, a pretty strong end-result.
I have mentioned in an earlier post, reiterating here, I now use a
mini-applicator gun, that takes 150g tubes of silicone sealant:
https://www.bunnings.com.au/monarch-mini-compact-caulking-gun_p1662108
...I find this easier to wield while glueing hems and ridgeline, and
also, unlike the full-size gun, the flow stops immediately I take my
fingers off the lever -- I like that very precise control.
The black webbing is this, nylon 12mm wide, and 1mm thick:
https://www.aliexpress.com/item/4000126877988.html
The blue webbing at the high end is for when want to erect the tarp
in "tree hugger" mode, tied around a tree trunk. That is much lighter,
nylon 10mm wide, 0.5mm thick:
https://www.aliexpress.com/item/1005001666741572.html
Oh, and that cord-tensioner on the black webbing is from here:
https://www.aliexpress.com/item/1005002198346631.html
Here is the final weight of the Mark-1 deep-cut tarp: 183g (6.46oz)
Photo erected:
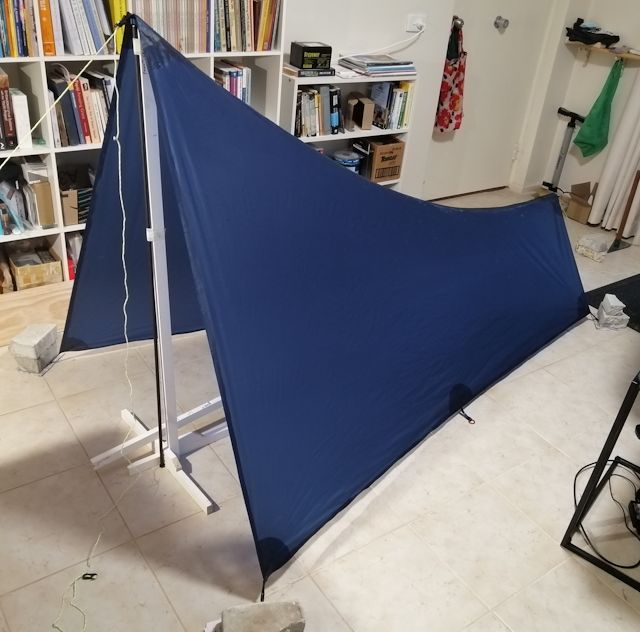
...yes, very good, the sides are fairly taut.
Of course, you do lose head-height, but it still looks OK. When erected in "tree
hugger" mode, I will be sitting at the very end, leaning against the
tree trunk (or wall inside a shelter), so my head will be at the highest point of the tarp. And yes, there will need to be
rain protection to make that feasible, will get onto that stage of
construction soon.
Actually, the weight is a little bit higher than it could have been. I
cut the ridgeline open twice, going from a straight-cut, to a slight
catenary curve, then a deep-cut curve. This resulted in a mess at the
ends of the ridgeline and had to glue extra layers of reinforcing fabric
to rejoin the ends of the ridgeline. Even so, 183g is pretty good.
Next instalment coming soon!
Tags: light