
Tarp ridgeline tie-outs
Continuing the "Mark 1" tarp construction project, this is the previous post:
https://bkhome.org/news/202105/constructing-short-pole-for-tarp.html
So far, the tarp has been constructed by glueing, no sewing, but now,
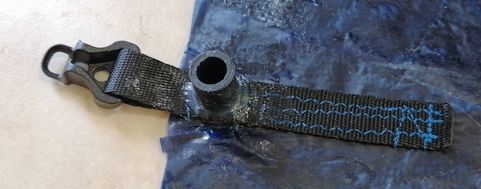
I have sewed the webbing onto each end of the ridgeline. The webbing I
used is this:
https://www.aliexpress.com/item/1005001666741572.html
With a cord tensioner:
https://www.aliexpress.com/item/1005002198346631.html
I am going for lightest possible weight, but uncertain if have taken
it too far with this webbing. It is nylon, 10mm wide and only 0.5mm
thick. Apart from nylon having limited UV resistance, it is very thin.
Might be better described as ribbon, than webbing, but it seems strong
enough. If it breaks, I suppose can sew on something else later.
I have a Singer 4411 sewing machine. Set it to zig-zag stitching,
width "1" and length "3". Using standard Guterman polyester thread from
Spotlight -- I think this is known as "sew all" thread at some stores --
Spotlight also have "extra strong" but didn't use that. Set the tension
to just above "4". Using a walking foot.
One more thing, used a sharp needle, size 80/12:
...apparently, the standard needle that comes with the sewing
machine, has a slightly rounded point, designed to push-aside threads,
which is (apparently) not the best for sewing ripstop.
The reason to stitch zig-zag is that polyester thread is far less
stretchy than nylon. This means that a straight thread may break when
the tarp ridgeline is pulled very tight. At least, that is advice I got
off the Internet.
The original plan was to sew a nylon washer underneath, for the
support-pole to slot into. I did that, but it doesn't look sufficiently
robust:
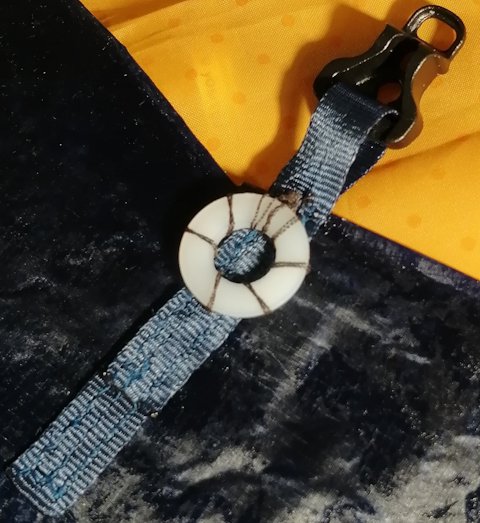
Scrap that idea. The carbon-fibre pole has a rubber end-cap, so there
is some spread, but what is needed is something to keep the pole in
place. I want the pole to be right under the webbing.
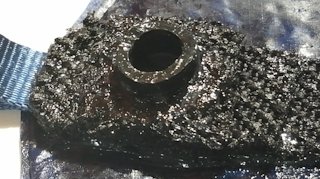
Found a length of 25mm nylon webbing, cut two pieces, clamped them together, then used a soldering iron to make a hole:
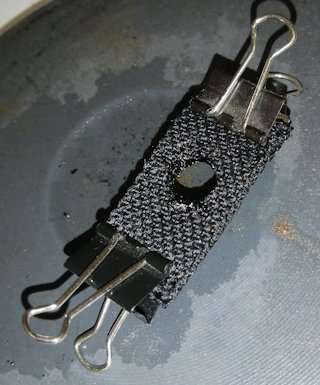
Good, created a hole into which the pole end-cap can be inserted,
with side-walls high enough to keep the pole in place. Then glued it to
the tarp:
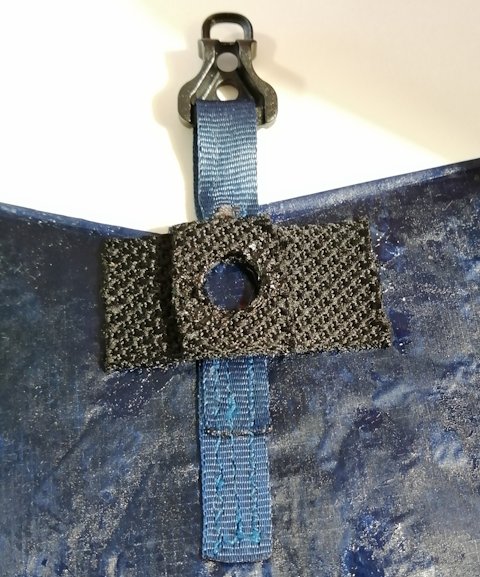
Looks good. Could have gone even further, with 3 layers of webbing.
Note, glued a tiny piece of ripstop underneath, so the pole is not rubbing directly on the webbing.
Note, if that sewing looks a bit wonky, it is. I'm a sewing newby,
was experimenting with different zig-zag widths etc., while doing it.
Yes, did try on some scrap fabric first, but still had to play with
settings while doing the actual job.
Will do the same for the other end. Then will do the tie-outs on the
bottom of the tarp. A bit of delay there, as ordered plastic hooks, that
go onto end of webbing or cord, and they haven't arrived.
Some other items ordered from Aliexpress also haven't arrived. Then I
made a discovery. Although I had chosen "Aliexpress Standard Shipping"
when ordering, these non-arrived items were shipped by China Post --
which is considerably slower to Australia. The vendors took the extra
money that I paid, and then posted by the cheapest means.
I have complained to two of them, asking for a refund of the
difference. Anyway, I found another vendor of those plastic hooks on
Amazon, placed an order.
EDIT 2021-05-31:
The above picture is for the ridgeline at the low-end of the tarp. The
high-end is a different story, as the walls form an acute angle. The
"cup" that will hold the pole will have to be as narrow as possible. I
oriented along the ridgeline and also trimmed the width a bit with
scissors:
...it is 4 layers, 3 of them form the "socket" into which the pole will be inserted.
Still concerned that this is too wide. Maybe also too fragile. Anyway, will see how it performs when in use.
Though, I don't intend to use a pole at the high-end, so the
fragility might just be an academic issue. Most interested in erecting
it in "tree hugger" mode.
Ideally, want the "socket" to be no wider then the webbing. An idea
is a plastic screw-on top off something -- like the screw-top on a tube
of toothpaste, but it would have to be wider. Then drill tiny holes in
the base, so that it can be sewed onto the tarp. Or even glued to the
webbing with epoxy resign. Maybe will do that for tarp "Mark 2"!
EDIT 2021-05-31:
Thinking about it some more, a narrow "socket" for the high-end could be achieved by these silicone end-caps:
https://www.aliexpress.com/item/1005001609758449.html
I already have some with 7.7mm ID, 11mm OD,
which would be just right. As they are silicone, they can be bonded
strongly to the webbing. A bit of reinforcing around the end-cap could
enhance the bond integrity. Maybe even some epoxy resin in the bottom,
to spread the force. Just making a note of this alternative, a
possibility for the "Mark 2" tarp.
EDIT 2021-05-31:
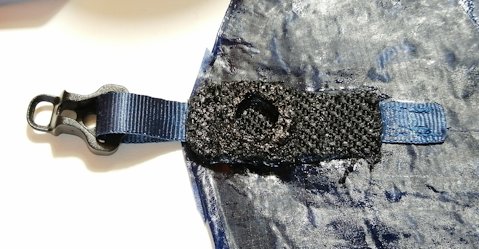
Hey, why not? I cut the 7.7mm ID silicone end-cap a bit shorter, and glued it into the hole previously created:
Now, just insert the metal pointy-end of my
carbon-fibre pole (or a trekking pole), and we are good to go. The
ridgeline width is still a concern, but we shall see once it is up and
in use. The CF pole I am referring to, is this one, purchased awhile ago
(125cm, 5-segment):
https://www.aliexpress.com/item/32918962406.html

Actually, I have two CF poles, see report here, but the other one is not suitable for this tarp, as shorter:
https://bkhome.org/news/202103/two-cf-straight-tent-poles-compared.html
EDIT 2021-07-04:
I am now favouring a simpler method for the "sockets" in which the poles
are inserted. Just glue the silicone end-cap onto the webbing. That's
it, nothing else. See details here:
https://bkhome.org/news/202107/treehugger-1p-mark-1-tarp-deep-catenary-cut.html
Tags: light