
Plans for TreeHugger 1P tent Mark-3
The TreeHugger 1P tarp/tent Mark-1 project is documented here:
https://bkhome.org/light/treehugger-1p-tarp-weighs-only-178g.html
I started a Mark-2 design, with spreader-bar for head-space, but abandoned it:
https://bkhome.org/news/202106/treehugger-1p-tarp-mark-2.html
Thought about the design a lot more, and decided, rather than have a
spreader-bar, will make the high-end higher. This means will do away
with the constraint of using a carbon-fibre or trekking pole to hold up
the high-end. The high-end will be held up by tying to a tree trunk or
branch -- unless can use an extra-long pole.
With Mark-1, I first constructed a tarp, and then added end-panels to turn it into a tent,as shown here:
https://bkhome.org/news/202107/end-panels-for-treehugger-1p-mark-1-tarp.html
I was going to construct a built-in mesh bivvy for the Mark-1, but
now jumping to Mark-3, based on Mark-1, with lessons learned, higher
high-end, slightly longer, and end-panels included in the original cutout.
What I mean is, instead of adding the end-panels afterward, plan to
include them in the fabric cutout. This will simplify construction. So,
there won't be an intermediate tarp, the tent will be constructed
directly.
Here are the SolveSpace 3.0 files, gzipped:
mk3-2d-5.slvs.gz
mk3-3d-5.slvs.gz
mk3-cut-5-cloth2.slvs.gz
mk3-cut-5.slvs.gz
SolveSpace is a "parametric 2D/3D CAD" application, for Linux, Windows and OSX, described here:
https://solvespace.com/index.pl
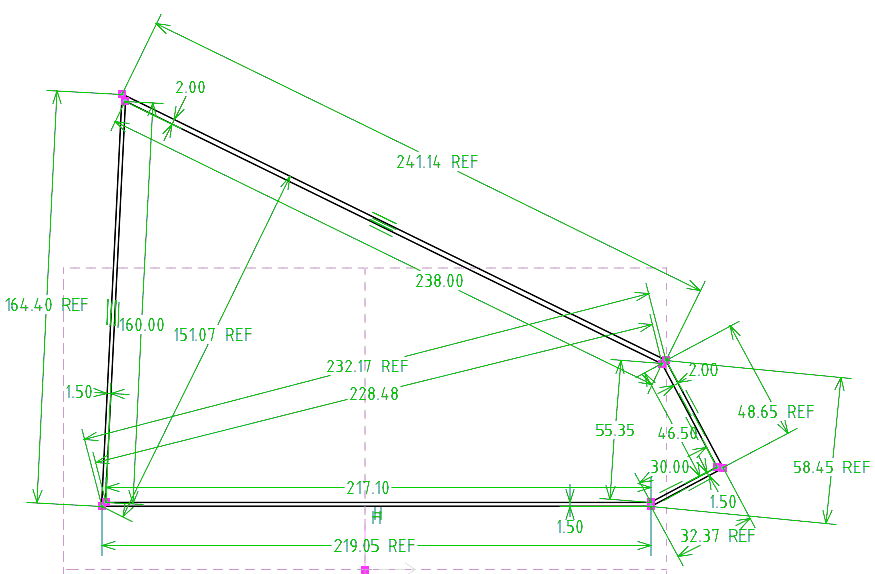
Here are the dimensions for each side. The outer lines include the
hems and ridgeline overlap, the inner lines will be the actual
dimensions after the hems are folded over and the ridgeline overlap
glued together:
The other side includes the panel on the high-end:
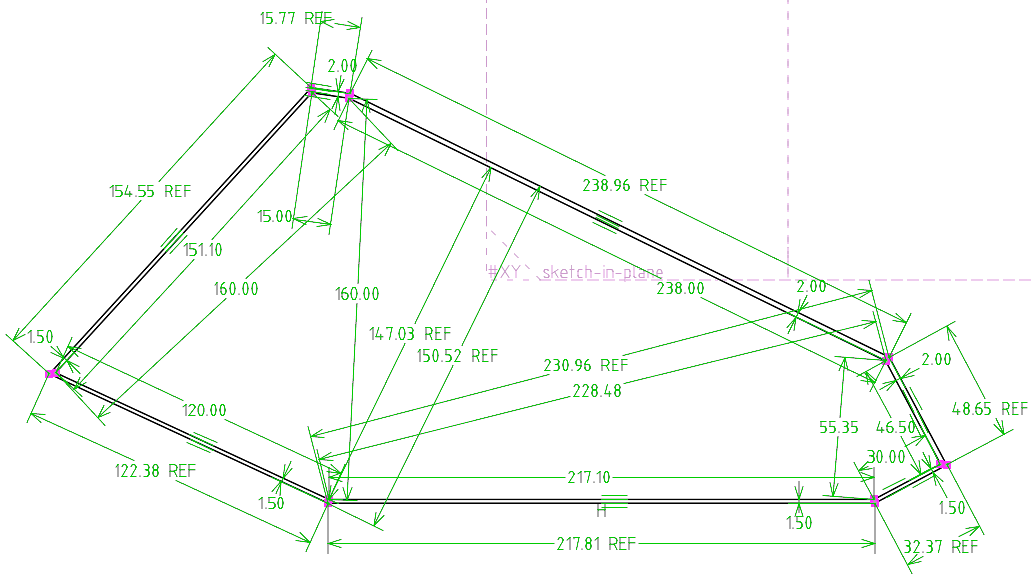
Those 1.5cm measurements are hems, that will be folded over. The
2.0cm measurements are the ridgeline, and the two sides will be glued
together at the ridgeline, by 2.0cm overlap.
Here are the two pieces put together, to show the length of fabric that will be required:
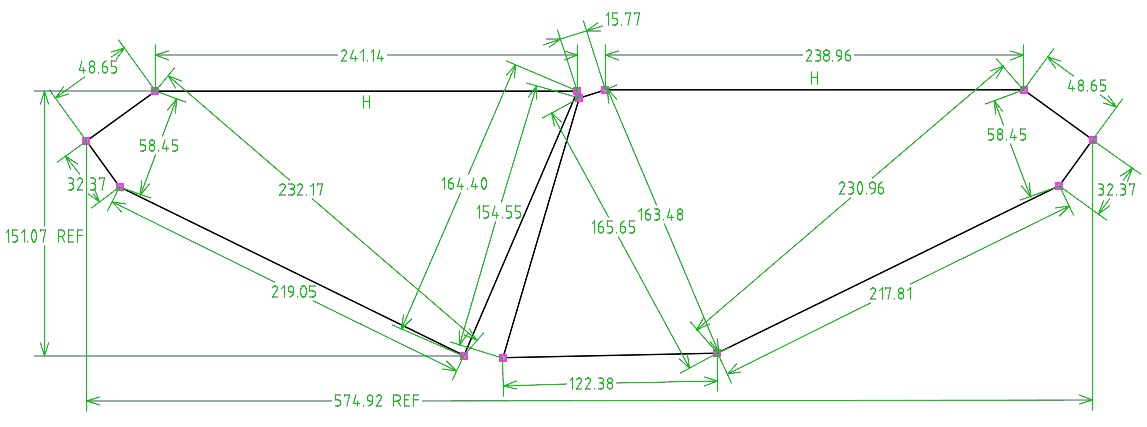
...based on the fabric having usable width of 1.51 metres, and the length required is 5.75 metres.
If we want to go for a deep catenary cut, as I did for the mark-1, here is a possibility:
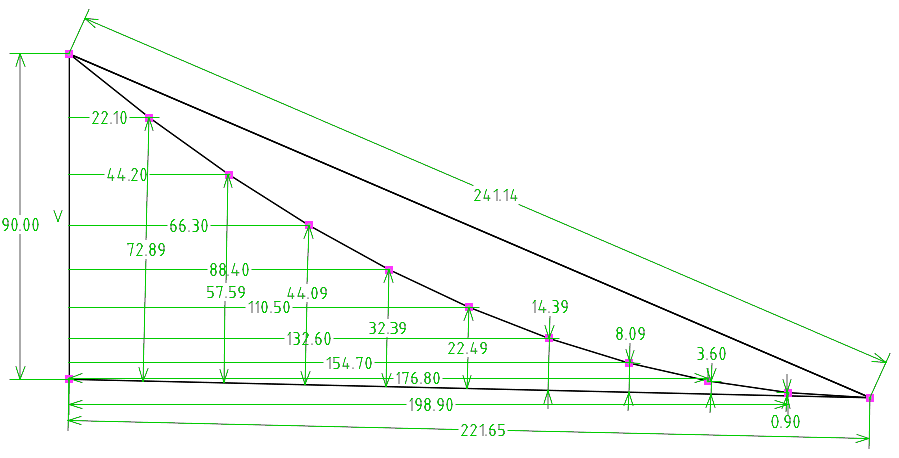
...the left side is the high-end of the tent. Measure down 90cm and
draw a line to the ridgeline on the low-end. Then plot the points as
shown. This will be slightly less deeper than the Mark-1.
So, after cutting out the two sides, cut the ridgelines as per the above curve. Then join them, with 2cm overlap.
I am keen to get going on this, however, currently only have 20D
fabric, and really want to use 10D, as aiming for lightest possible
weight. Have placed an order for 10D, but it is coming by China Post,
and my experience is will have to wait about 2 months. Aaargh! Will have
to find something else to do in the meantime.
EDIT:
According to SolveSpace, the area of the two pieces is 2.537 plus 3.540,
which is 6.077 metre squared. If the 10D silnylon is 31gsm, the weight
of the fabric will be 186 grams. A bit less than that if there is a
catenary cut.
EDIT 2021-07-21:
I discovered that the panel at the high-end actually requires the fabric
roll to be wider than it is. My 10D silnylon has a usable width of 1.51
metres, same for the 20D silnylon. However, found by careful rotation
of the cutout, can get the cutout width to be 1.518 metres, that is,
151.8cm.
Also, the two pieces can be cut out so as to use less fabric length, 5.112 metres, compared with 5.75 metres above:
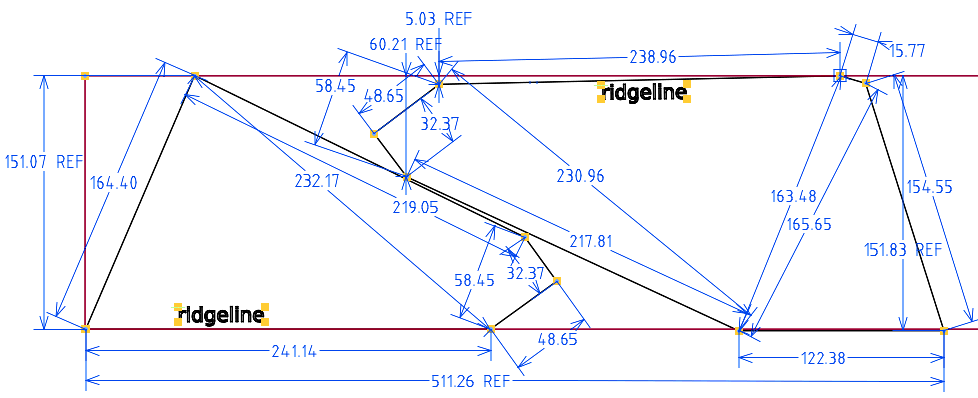
...the brown lines represent the usable
fabric width. The first piece is flipped vertically, so ridgeline is on
the bottom. The second piece, on the right of the above drawing, is
rotated slightly, to minimize the cutout going over the usable width.
Even so, the bottom hem-line of the high-end panel is about 0.8cm over
the usable width, going into the edge of the fabric that is not
silicone-impregnated.
I can live with that. The bottom hem-line of
the high-end panel will be folded over by 1.5cm, and the little 0.8cm
un-impregnated will end up impregnated when the hem is glued.
EDIT 2021-07-21:
I have played with the dimensions, now the second piece fits nicely within the 151cm usable width of the fabric, and without having to rotate it. Here are the updated SolveSpace 3.0 files, gzipped:
mk3-2d-6.slvs.gz
mk3-3d-6.slvs.gz
mk3-cut-6-cloth.slvs.gz
mk3-cut-6.slvs.gz
And here are the dimensions for cutting the pieces out of the fabric:
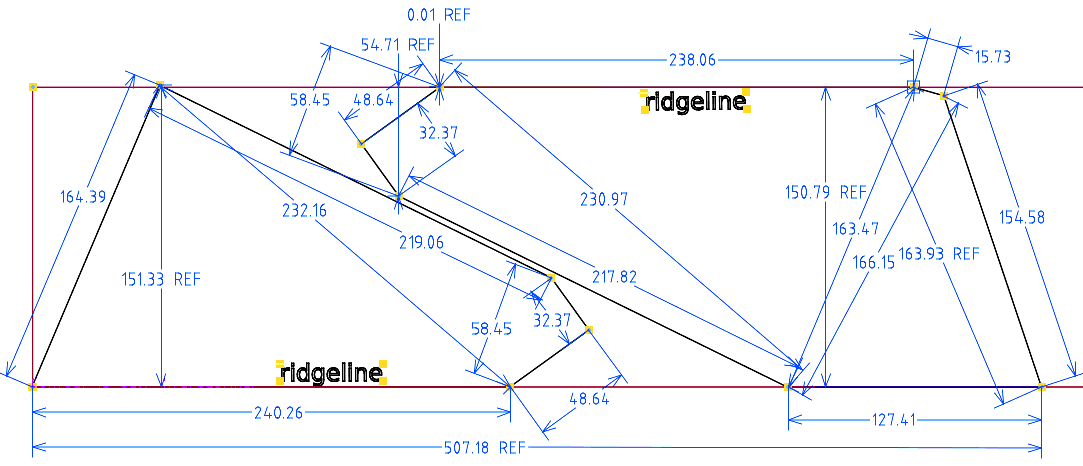
...required length of fabric now just a tad over 5.07 metres.
EDIT 2021-07-25:
I think that when construct the Mark-3 tent, will reduce the depth of the catenary cut a little bit:
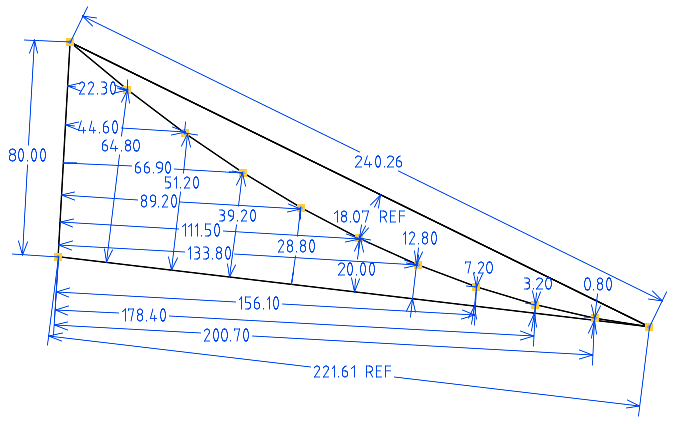
...same thing, measure down 80cm from the
top-peak of the high-end of the piece. having cut the catenary on one
piece, suggest use that as a template for the second piece. Depth
measurement is 18.07cm from the straight-cut ridgeline, compared with
20.9cm for the previous "90cm" catenary cut shown higher on this page.
Not much different, but the ridgeline will rise from the foot-end at a
slightly steeper angle, which I prefer.
EDIT 2021-07-31:
The plans for Mark-3 have been tweaked again, see later post:
https://bkhome.org/news/202107/more-tweaks-for-treehugger-mark-3-tent.html
Tags: light