
VeMoo leaning tadpole trike
I'm always interested in new tadpole trike developments. At one time I looked around for enclosed or semi-enclosed tadpole trikes (or quads), and in 2023 posted this report on the Pedilio and Veemo:
- Enclosed pedal-powered recumbent in production — November 22, 2023
So many of these startups claim to be starting production "soon",
or to have started limited production. But then, years later, they
have faded away. Just a quick glance at the Veemo site, it looks
like they have reached production.
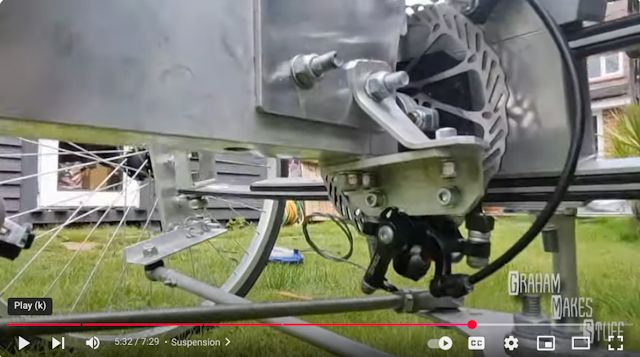
I recently discovered another startup, the VeMoo trike; this one is particularly interesting, as it is a leaning design and also full-suspension. It is partially enclosed. Here is the website:

The VeMoo is intended to be in production in 2025. They are taking pre-orders, but I don't know the price.
I very much want to know how the steering and leaning works, but cannot find the precise details. There are videos, but they don't show much detail:
https://www.youtube.com/@VeMoo_Mobility/videos
However, I got a clue how the leaning works from this video by the "Laidback Bike Report" of the VeMoo at Spezi 2024 exhibition:
https://www.youtube.com/watch?v=mf6iN0zQ8Aw
The guy showed how it tilted, just by pushing it sideways. This means that it is a weight-controlled leaning; so you shift your weight to the side and it will lean. This is a "Type 1" leaning mechanism, that I posted about recently:
- Another look at tilting tadpole trike designs — February 25, 2025
However, the website describes it as a "pendulum suspension". From this I deduce that when sitting in it, it will have a natural tendency to stay vertical. But, lean to the side and it will tilt.
I cannot say how effective this leaning mechanism is; anyone who
has ridden one, let me know! You can post in the comments section
of my YouTube channel, or send me an email.
Tags: light
Meanderer trike project intro video
Previous blog post in the new "Meanderer" leaning full-suspension build-from-scratch DIY tadpole trike project:
- Meanderer trike front suspension plates — March 19, 2025
The intention is to make videos on YouTube as the project progresses; to get the ball rolling, I have created a brief intro video, that outlines what the project is about.
Don't expect much though; this is the first time that I have
video-ed myself. Used my phone selfie-camera, and when played
back, realised two main faults; firstly that I should have been
looking at the camera not at the screen, and secondly shouldn't
have wobbled my head around so much.
Anyway, here it is:
"Meanderer leaning full-suspension tadpole trike PART1"
https://www.youtube.com/@meanderinglight/videos
I'm not bothered about my photogenic lack, nor faulty technique, as this is introducing a technical project, and in future videos most of the time the camera will be pointed at the work underway, rather than myself.
Did start to learn how to use Flowblade video editor, but haven't
progressed very far.
Tags: light
Meanderer trike front suspension plates
Previous blog post in Meanderer trike project:
- Front wheel hubs for tadpole trike — March 12, 2025
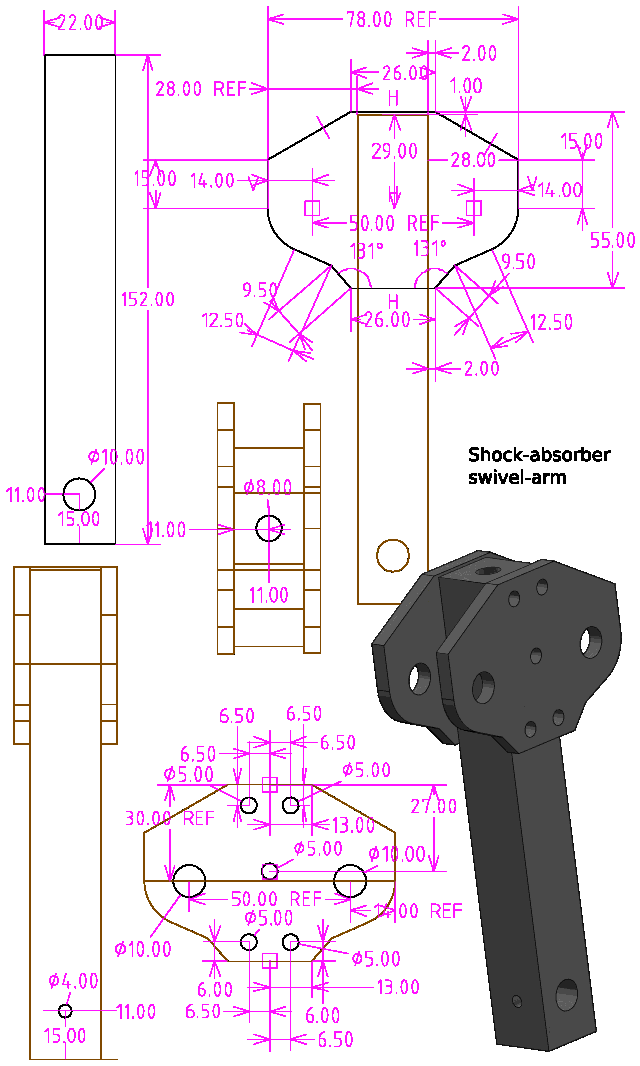
The front of the trike will have suspension, with swing-arms (also known as A-frame or wishbone arms) and shock-absorbers. The swing-arms will hinge on two plates attached to the frame of the trike. The frame is a 25x25mm square tube, 3mm wall thickness. The plates are 110x175mm sheet, 5mm thickness. There will be extra bracing with angle, as illustrated:
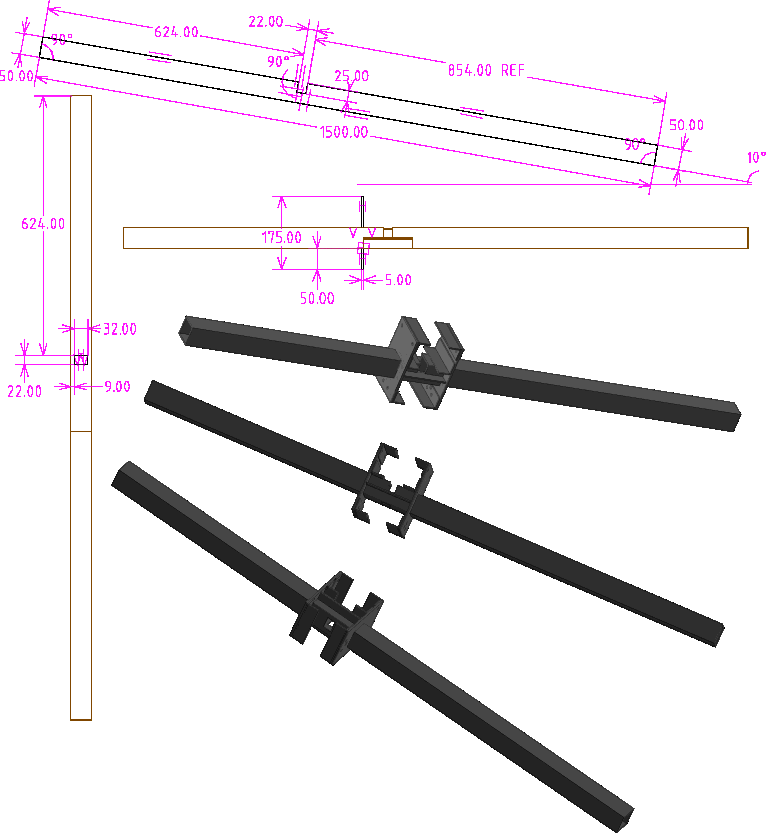
More construction details will be revealed, but for now, contructing just the two plates. They have holes and 50x50mm cutout:
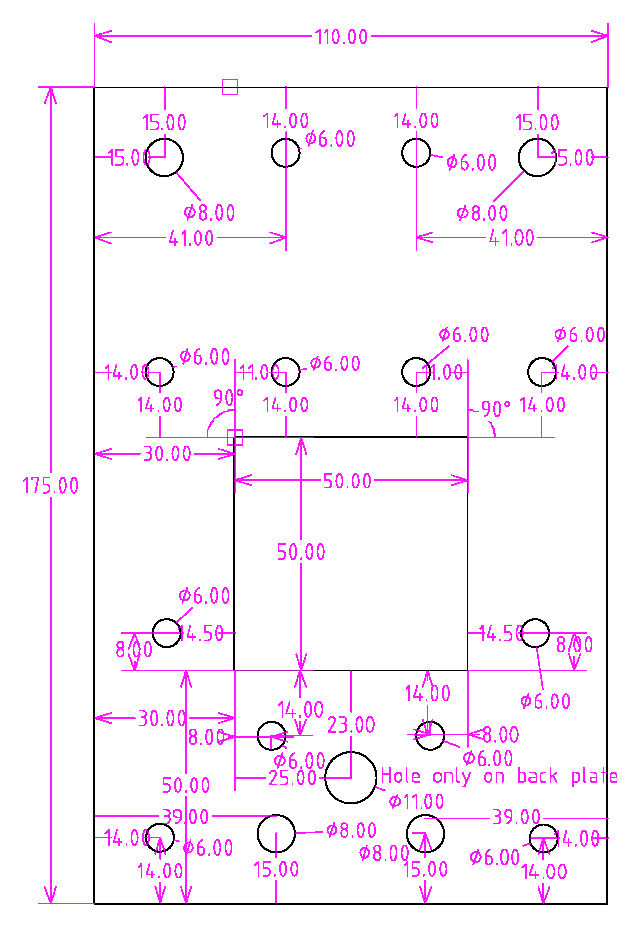
...regarding those 6mm holes; in fact, I used a 4mm drill bit, the intention being to later tap a thread for m6 bolts.
In an earlier blog post, there is a link to where I purchased the
5mm thick sheet. However, in retrospect I would have bought 6mm
sheet, as that is more common and discovered available locally at
a reasonable price.
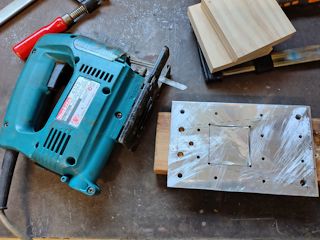
I marked out the holes and cutout, then cut the plates on a metal bandsaw:
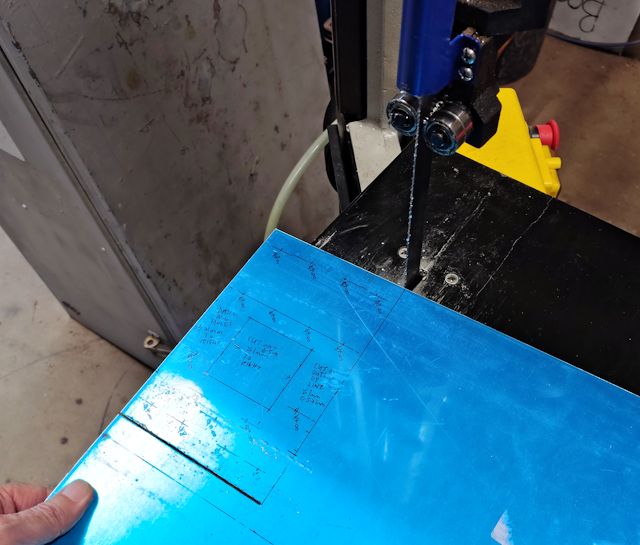
...yes, I know this project is intended to be do-able by anyone in their home workshop; a handheld jigsaw does the job OK also. In fact, I found that a jigsaw was the best choice for the 50x50 cutout.
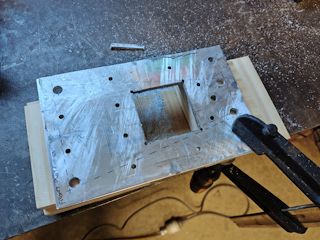
Then put the two plates together, firmly clamped on a block of wood, and drilled the holes with a hand drill (after centre-punching):
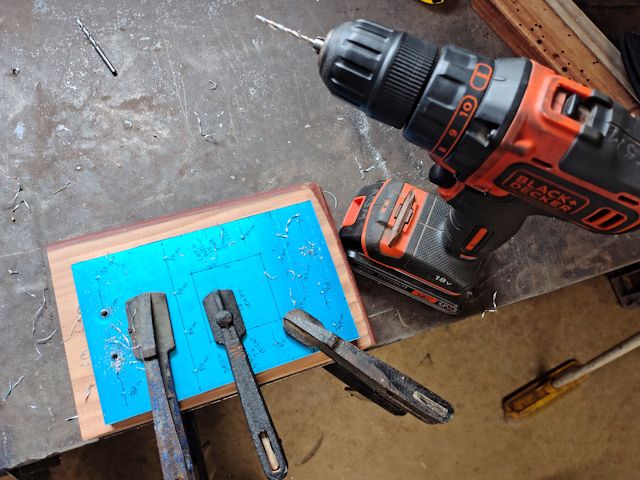
...took the precaution of driiling 2.5mm pilot holes first, for
greater accuracy. For the 8mm holes, it would also be good
practice to drill another intermediate hole, say 5.5mm. The reason
is, large drill bits tend to wander off-centre, and a pilot hole
keeps them centred.
The 50x50 cutout... expected that to be tricky. We started to do it on a large metal router at the Men's Shed:
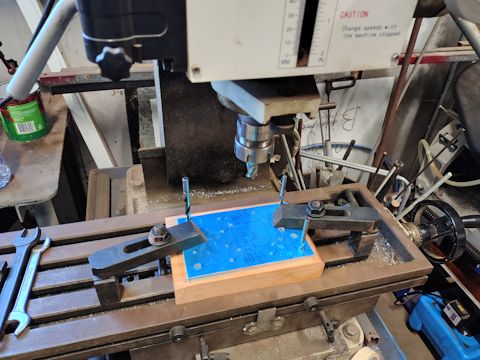
...no, not appropriate for a DIY guy in the home workshop! Besides, we decided that it is a clumsy way to do it. Instead, used a hand jigsaw. Firstly, took off the protective plastic, then re-marked the 50x50 cutout:
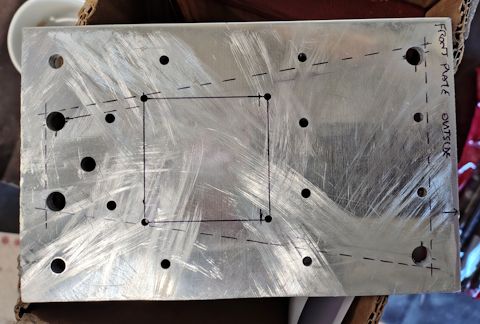
...the four 8mm holes are the suspension hinges for the
swing-arms, and the 50x50 cutout has to be symmetrical. I drew
lines on the outside of the 8mm holes, to help with measuring
symmetry.
I had previously drilled 3mm holes in the corners of the cutout, which we thought might be useful. But in retrospect, probably not. Or maybe just smaller, like 2mm.
Anyway, got the cutout re-marked, then drilled 10mm holes in opposite corners, as close to the marked lines as possible. Then used a square file to make the corners square, for insertion of the jigsaw blade. I used one of the jigsaws in the Men's Shed; it already had a blade in it, didn't know if for wood or metal, but it did have fine teeth, which I wanted:
 |
 |
...yes, nice cutout. Just cut one plate, then used that to re-mark the second.
A bit of fine-tune filing was required, then it was able to slide snuggly onto the 50x50 tube:
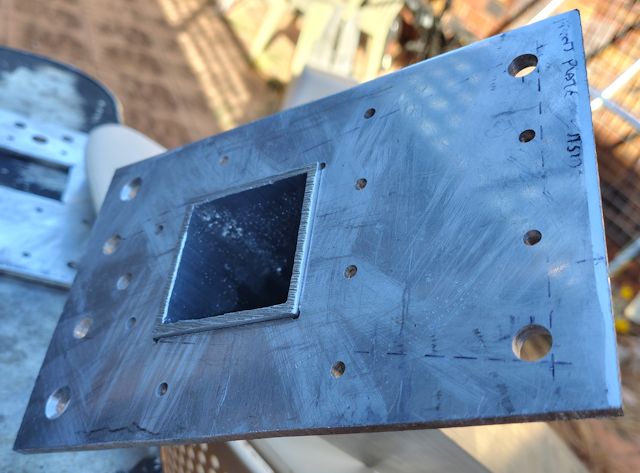
...notice those two holes in the bottom corners; countersunk. The
two closer-in are the 8mm holes for the swing-arms, the two outer
holes were supposed to be drilled with a 4mm drill bit, for later
tapping for m6 bolts. However, a lapse in concentration and I
drilled 6mm holes. So decided instead they will be countersunk
bolts.
So, what's next...
Tags: light
Front wheel hubs for tadpole trike
Continuing the new "Meanderer" build-from-scratch recumbent full-suspension leaning tadpole trike project, here are recent posts:
- Universal-joint for Meanderer trike — March 03, 2025
- Progress planning The Meanderer — March 01, 2025
- Steering swivel-coupling for new trike project — February 28, 2025
- Another look at tilting tadpole trike designs — February 25, 2025
- Planning a recumbent trike built from scratch — February 21, 2025
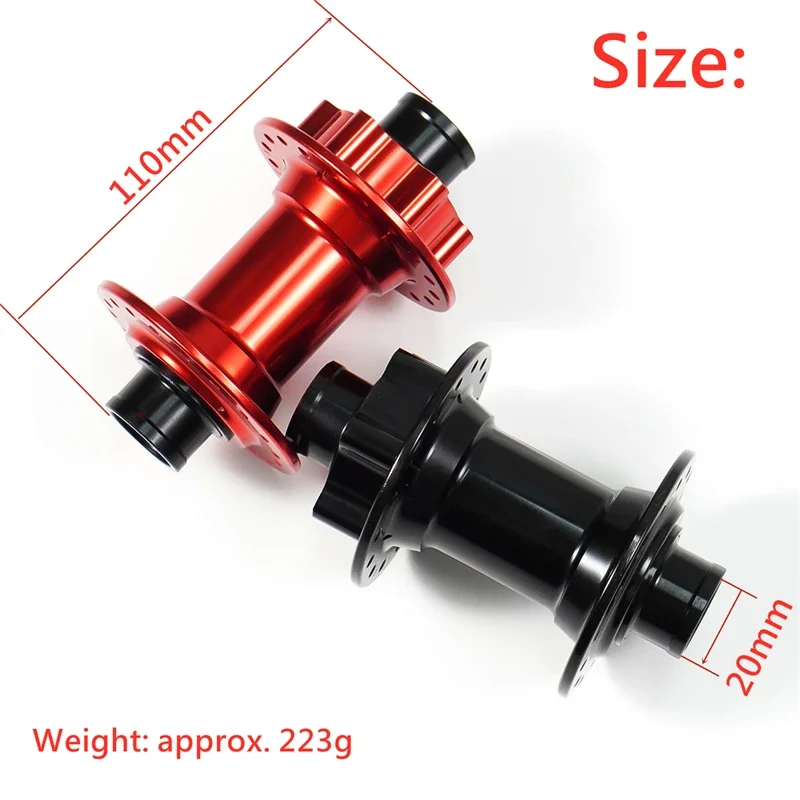
Using bicycle parts where possible, is good; however, there is a problem with the front wheels. A bicycle front wheel has support on both sides of the axle, whereas only on one side on a trike. This is a problem; we need a certain type of bicycle wheel hub, known as a "thru hub". This has a shaft, or axle, that goes right through, usually of 12mm, 15mm or 20mm diameter.
We really want the 15mm or 20mm axles, which is another problem, as they are only used in premium mountain bikes. So, finding that type of wheel secondhand might be difficult. Suitable wheels could probably be purchased from a bike shop, or maybe a cheap secondhand tadpole trike could be located.
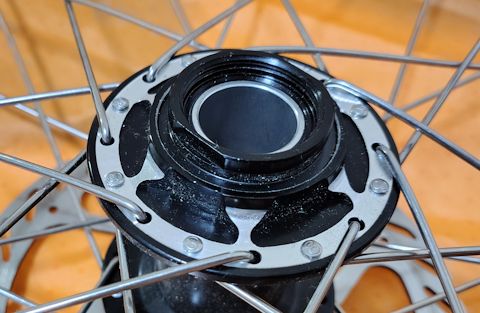
My first trike project, now mostly completed, was a cheap trike that I modified, with front suspension, etc. I'll refer to it as my "current trike". It has wheel hubs for a 20mm thru-axle:
I got a bit confused, as this hub is only about 92mm wide, whereas looking online, available hubs are 100mm, 110mm, or 135mm wide. Nothing under 100mm. So I bought a couple, 15x100 and 20x110, to examine. After they arrived, I realised something; they are not "really" that wide.
To explain, here are photos of the hubs on my current trike:
And the inside:
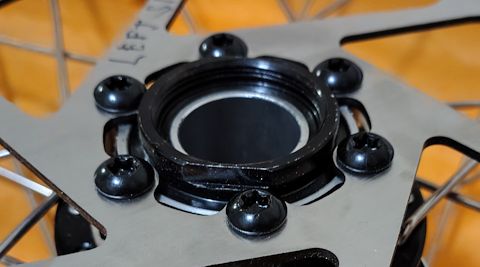
...it looks very much like some extensions on both sides has been
removed. The width of the inner alloy tube is only 82mm, and total
width of the hub is 92mm.
Yes, the two hubs that I purchased have plastic extensions on both ends, extending the width to 100mm and 110mm. But, cut them off, and the with becomes 92mm and 84mm.
This is one that I purchased, 15x100, meaning 15mm diameter thru-axle and 100mm hub width, for AU$28.39 (plus 10% GST):
https://www.aliexpress.com/item/1005005254533680.html
The other, 20x110 32-hole, for AU$41.59 (plux GST):
https://www.aliexpress.com/item/1005008343824211.html
20mm axle hubs are somewhat rarer and much more expensive. Photo:
I reckon those plastic width-extenders could be cut shorter. So,
I plan to build the axle length on the Meanderer wheel knuckle for
a 92mm wide hub. That will handle all three of the above hubs.
Maybe make the knuckle axle a bit longer, and washers can be used
if required.
A note about a tadpole trike; we need to be careful about overall width. For the Meanderer, I want total width to be no more than 730mm, so as to fit through my front door, and motel doors when touring. So taking 10 - 15mm off the hub is important.
If you want to read more about mountain bicycle front wheel hub types:
https://www.bikeradar.com/advice/buyers-guides/mtb-axle-standards
Should also mention, there are axle diameter reducers available. I bought this one to evaluate, 20x100 to 15x100:
https://www.aliexpress.com/item/1005006596535497.html
Plan to build the wheel knuckles soon, and there will be a blog post when that happens.
Tags: light
Universal-joint for Meanderer trike
Earlier posts on this new trike built-from-scratch project:
- Progress planning The Meanderer — March 01, 2025
- Steering swivel-coupling for new trike project — February 28, 2025
- Another look at tilting tadpole trike designs — February 25, 2025
- Planning a recumbent trike built from scratch — February 21, 2025
In the "swivel-coupling" post above, I did post plans for a swivel-coupling, or universal-coupling, but withdrew it. Have reconsidered, modified the plans, and here it is again...
Bought a little universal-joint off Aliexpress, for a 10mm shaft. These are available from many vendors:

However, not happy with it. There is some sloppiness in the movement, and I would like it to have replaceable bearings. Hence a design to make one...
In SolveSpace, it is possible to create what is called an "assembly", multiple 3D components put together. However, I have found that to be very difficult. So, have designed the universal-joint in two parts, then mentally visualized how they would work when put together. Here is Part-A:
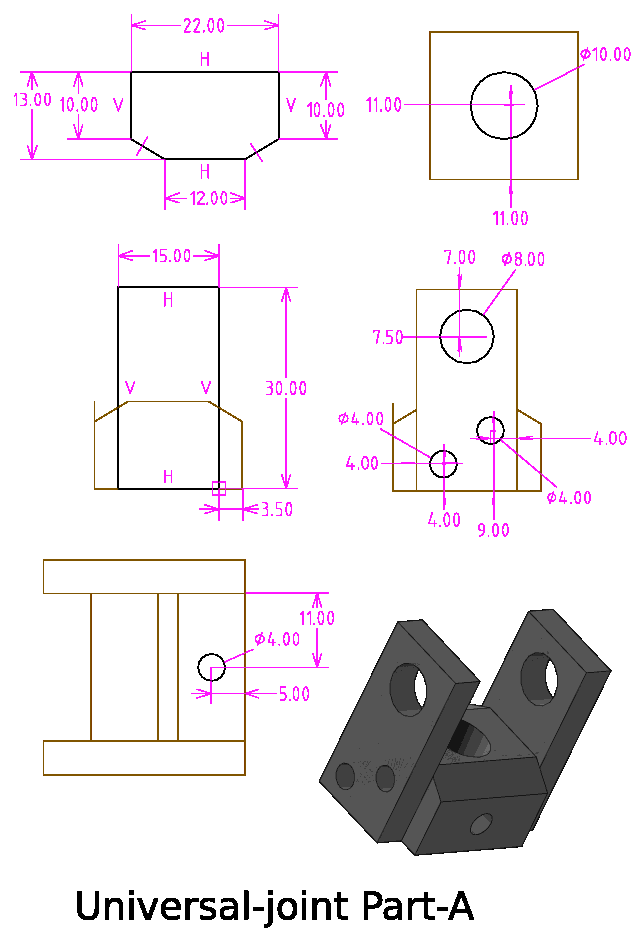
The aluminium sheet is 5mm thick; a couple of local stores only had 3mm, so I bought it at a premium price off Aliexpress:
https://www.aliexpress.com/item/1005003726781313.html
Though, likely there are local aluminium fabricators that would have 5mm offcuts. The main block of aluminium is the 22x22 square, that I provided a purchase link in the previous blog post.
The 8mm hole will have a brass flanged bush, the 12-8x6x6 from here:
https://www.aliexpress.com/item/1005005073792086.html
Actually, I have referred to the bushes as made of brass, but it is listed as "copper-based alloy"; whatever, it is very strong, not soft like copper, and has a different colour than brass.
One thing; to get sufficient flexibility, those square corners near the 8mm holes, will need to be rounded off. That will be easy enough; just cut off the corners and round off with a file.
Here is Part-B:
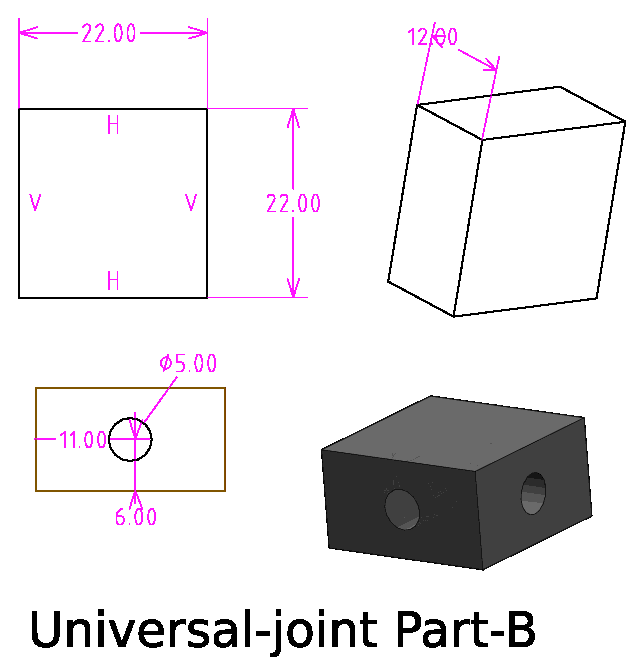
Again, a piece of the 22x22 square aluminium.
I'm having to mentally visualize whether it will have adequate
flexibility; seems OK.
In the above diagram, the 5mm holes are for tapping a thread for
an m6 bolt. In the first diagram, the 4mm holes on the sheet will
be drilled out to 5mm, and in the main block tapped for an m5
thread. The m5 bolts will go through and bolt the sheets onto the
main block. There will be m5 grub screws to lock the 10mm rod.
Note, m5 standard thread has a pitch of 0.8mm and the required drill size is 4.2mm. So a 4mm drill bit is a bit small. Might have to experiment to cut a m5 thread in that smallish hole.
The 5mm thick sheet hasn't yet arrived; however, tomorrow can manufacture the three 22x22 main blocks (there will be two Part-A).
Here is the SolveSpace design, files renamed with a false ".gz":
https://bkhome.org/news/202503/images/t2-universal-joint-parta-2.slvs.gz
https://bkhome.org/news/202503/images/t2-universal-joint-partb-2.slvs.gz
Tags: light
Progress planning The Meanderer
I don't know if that name, "The Meanderer" will stick, for the new full-suspension leaning recumbent tadpole trike. Here are recent posts:
- Steering swivel-coupling for new trike project — February 28, 2025
- Another look at tilting tadpole trike designs — February 25, 2025
- Planning a recumbent trike built from scratch — February 21, 2025
...in the post of Feb 28, I posted plans for a swivel-coupling, then changed my mind and removed it. The swivel-coupling, or more correctly a universal-joint, needed a bit more thought. For other components of the trike, waiting on parts to arrive. So what can I build now? -- can build the swivel mechanism for the shock absorbers.
Getting the parts together, need various lengths of aluminium extrusion. Want 50x50x3 mm square extrusion, about 3 metres. Not available at Bunnings (our main hardware chainstore here in Australia), so looked online. Got a quote from one company, but this is a big company and 50x50x3 is sold in 6.5m lengths. They will sell by the metre, but about double the price. Then they wanted AU$150 to deliver, about a 50 minute drive away.
Hmmm. Found a local little family business; they had 50x50x3 in stock and were happy to sell by the metre, and very cheap. Pickup only, so I rode my ebike there:
![]()
...don't laugh! Was able to ride the bike with that load.
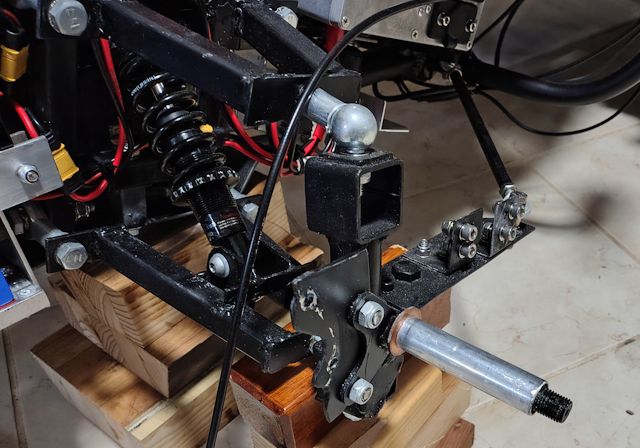
The proposed tilting is by a swivel-bracket where the shock absorbers join, see this blog post:
- Two-shock design with swinging steering linkage — November 18, 2023
In SolveSpace, created a design for that swivel-bracket. Here it is:
EDIT 2025-03-05:
Following diagram and SolveSpace file have been updated:
https://www.aliexpress.com/item/1005004854415047.html
The diagram shows five holes of 10mm diameter. The four at the top will have brass bushes, to take 8mm rods for the shock absorbers. There are bushes available with 1mm wall thickness, and it is a good idea to put those in, so as to have replaceable wear surfaces, rather than wearing the aluminium holes. The 10mm hole at the bottom of the post will not require a bush.
Have the 22x22, but want sheet 5mm thick; only have 3mm. Have some 5mm on order; have to wait until it arrives.
A note about the spacing of the two sheets. The required spacing
depends on what shock absorbers are used. I'm not sure, but I
think that motorcycle shock absorbers are 19mm, whereas those on
bicycles and scooters are 24mm.
Just remembered also; the bicycle shock absorbers require 8mm bolts, the motorcycle type require 10mm. At least, for ones that I have looked at.
Here is the SolveSpace file, gzip-compressed:
https://bkhome.org/news/202503/images/t2-susp-swivel-2.slvs.gz
In the above diagram; the 10mm hole at bottom of the post will have a 10mm rod through it. There will need to be grub screws either side, as the swivel-bracket is required to be locked to the rod. Likely I will drill either 4.2mm holes for a m5 bolt, or 5.0mm holes for a m6 bolt (the diagram shows 4.0mm). Probably the smaller. Note, the rod is required to be locked to the swivel-arm as that is part of the tilt control; will probably drill the 4.2mm holes slightly into the rod, before threading, so as to have very positive locking of the rod.
The 5.0mm holes are for m6 bolts, so will need to be drilled-out
to 6mm through the sheets, and tapped in the post.
Oh, and to round off the explanation a bit more; that central
post has a 8mm hole right through, and at the top a m8 bolt can be
slid into it to lock tilting. There will be aluminium sheet above
the swing-arm, with a 8mm hole; slid the bolt through that and
into the post, then no more tilting. Just in case the rider
doesn't want the tilting mechanism, that is how easy it will be to
disable it.
Tags: light
Steering swivel-coupling for new trike project
I have started a new project, to build a full-suspension tilting recumbent tadpole trike from scratch. Here are earlier posts:
- Another look at tilting tadpole trike designs — February 25, 2025
- Planning a recumbent trike built from scratch — February 21, 2025
Cannot guarantee that will finish this project; main interest right now is the technical challenge of implementing the new steering and tilting idea, rather than the end result. Thinking of all those DIYers out there, having detailed plans for parts of a trike will be helpful. This post is one component, the steering swivel-coupling. Measurements and details in this blog post, but there is also intended to be a video on YouTube, showing how it is contructed with a link back to this blog.
The new trike needs a name, so how about "The Meanderer"?
EDIT:
I decided to remove this first contruction post, as it is
a bit premature. I'm still thinking out some details.
Tags: light
Another look at tilting tadpole trike designs
I have started a new project, to build a full-suspension leaning tadpole trike, from scratch. Previous post:
- Planning a recumbent trike built from scratch — February 21, 2025
I have been looking at leaning-trike designs over the last couple of years, and had intended to implement it in the current trike build. But, decided it is too complicated, and ended up with a non-leaning trike. Here is the tilting mechanism that I considered, late in 2023:
- Two-shock design with swinging steering linkage — November 18, 2023
The problem back then, was could not figure out how to connect the tilt mechanism to the steering arms. Have come a long way since then, and now have a design that is simple and looks like it will work. However, taking a bit of a retrospective look, at what others have done and posted on YouTube...
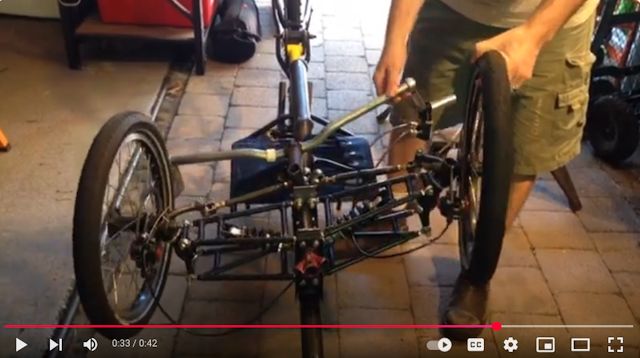
1: Tilting by balance
Most of these are DIY projects. A few guys have built trikes that rely on balance, like you balance on a bicycle. The entire trike, from the rider back to rear wheel, is free to rotate and relies on the rider shifting weight to keep upright. The two front wheels do not rotate, they stay vertical on the ground. In the last couple of blog posts, posted links to "Graham Makes Stuff" YouTube videos; in Part-6, he attempted a leaning mechanism, and went for the balance method. He used a disk brake and caliper, like this:
There is a lever on top that locks the disk, so no tilting. Once underway, the rider releases the lever, then relies on balance, just like a bicycle. However, Graham's experience was that it was very difficult to stop the trike from just falling over.
On a bicycle, the rider is high, making it easy to balance; not so on a recumbent trike. There are a few of these type of designs, including this one, in the "Metal Machine Shop" channel:
https://www.youtube.com/watch?v=NkPyv3-LZmU
...he also experienced balance problems, and has proposed a "MK2" with higher seating. That will help, but is it enough?
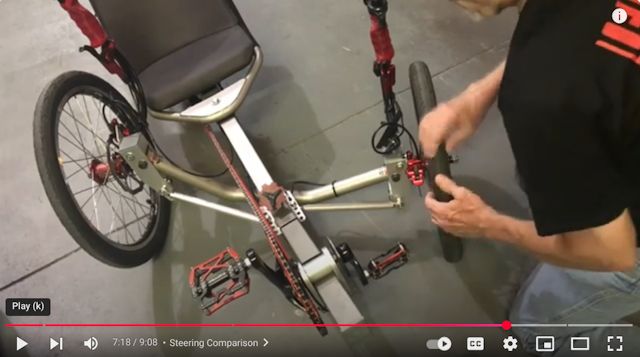
2: Tilting hard-linked to the turning arms
What I mean by this, is that the lean is directly linked to how much the rider turns the steering arms. So, turn the steering arms to go left or right in a wide arc, the trike will lean a little bit. Turn to go around a sharp corner, the trike will lean into the corner a lot.
An example of this is the AR3 trike:
https://www.youtube.com/watch?v=t1sUOtY4fYs
Reports from tests are that directly linking leaning to turning
radius is not so good. For example, you might turn the steering to
negotiate a very sharp turn, at very low speed, and the trike will
lean way over into the corner; potentially causing the trike to
topple, especially if the back wheel has luggage above it, causing
a rather high centre of gravity -- that back wheel can drag the
entire trike over.
The AR3 has another problem, that you can see from the photo; despite being tilting, the width has to be wide, as the entire front assembly pivots. This trike actually got to production, but was not a success.
3: Independent turn and tilt control
There have been a few of these type, DIY projects. The one that I am most familiar with, was made by Martin, who lives in Western Australia. That was his "EATSRHPV" trike, about 9 years ago:
"EATSRHPV Tilt mechanism with Steering levers completed"
https://www.youtube.com/watch?v=koADanl4-vo
...He has posted a series of videos showing construction; very complicated, but it does work. The steering arms are swiveled forward and back to turn, or moved left and right to tilt. So, independently controlled.
There are some others posted on YouTube that look like this independent control, though construction details and mechanism close-ups are not shown.
Of these, Number-3 is clearly superior.I have worked out a design for the proposed new trike, that is the same principle as number-3, with the steering arms independently controlling steering and tilting. It is also a very simple design. The plans have already been drawn up on the computer. I keep looking at the plans, wondering if I have missed anything obvious. But, seems OK; full-suspension with correct camber/toe/Ackermann, as well as tilting. Well, we shall see, have parts on order.
EDIT 2025-02-26:
I forgot to mention, there was a Number-2 type that was
manufactured in 2014 and was in production, briefly. It was the
"Wild Wave", made by Stein Trikes. Here is a video:
https://www.youtube.com/watch?v=zFv9jWgSOOc
There isn't much information about it, but
looking at that video, it seems like Number-2, turning and
tilting locked together.
Stein Trikes seems not to have published
reasons why they discontinued it. Google's "Generative AI" does
give reasons, but they are just guesses.
EDIT 2025-08-30:
Discovered another "Number-3":
https://bkhome.org/news/202508/more-tilting-trike-designs-found.html
Tags: light