
Distiller painting inside and out
What will eventually become DIY plans for building a solar water
distiller has another instalment. Here is the previous post, to follow
the chain of posts:
https://bkhome.org/news/202001/distiller-diy-floor-construction.html
I used slightly-off-white exterior acrylic paint on the outside, two
coats. Did not coat the top edge of the frame, where the glass will sit,
as that will have to be coated with silicone sealant -- and want the
sealant to be spread directly onto the wood, for maximum adhesion.
Note, the paint that I used was just an old tin in my garage. It is
Taubmans Sunproof exterior self-priming acrylic, designed to go directly
onto raw wood, no primer required.
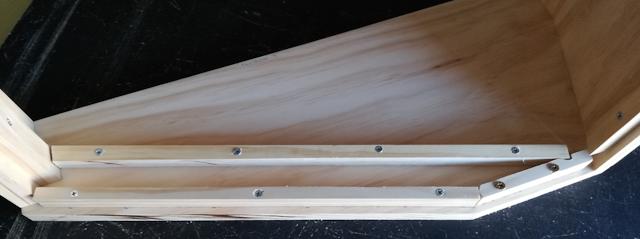
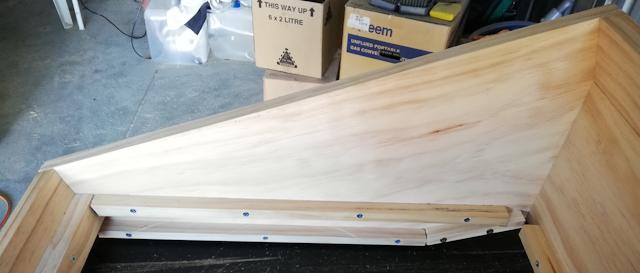
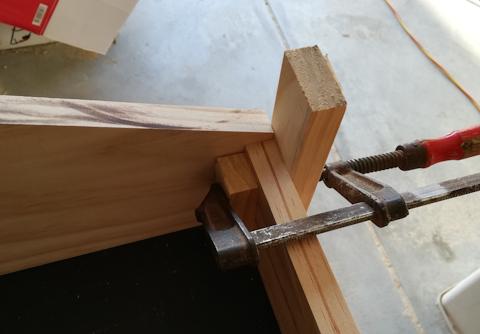
Oh, one thing, I decided to reinforce the plywood floor of the basin.
It is 6mm marine ply, and feels quite rigid, but I had some strips of
pine that had been cut in earlier projects, so decided why not. Here
they are, glued on with silicone sealant:
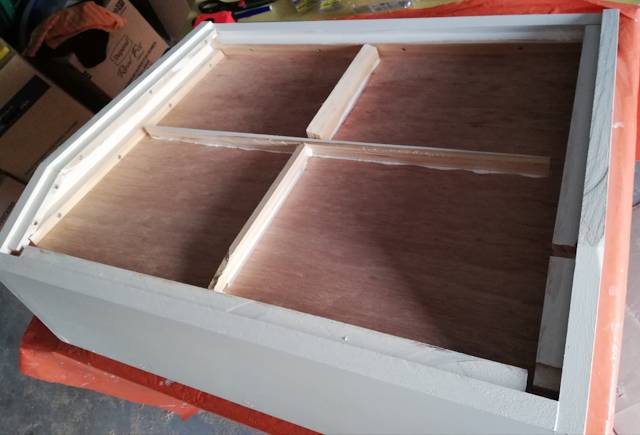
...with that long piece, I also put three 6G 20mm screws from the
other side, just to be sure the ply won't lift off the wood strip. The
photo also shows the white-painted outside.
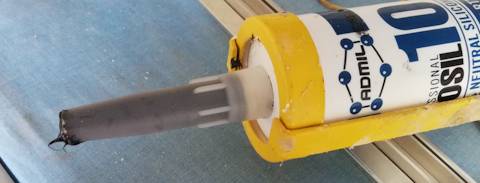
To spread the silicone sealant, need to buy sealant of course, and
also spreaders. The sealant is Admil Prosil 10 neutral-cure silicone,
rated as "food safe", and I purchased two white tubes and two black
tubes. I bought them online, from these guys:
https://www.indrub.com.au/prosil-10-100-neutral-silicone-300g-cartridge.html
The manufacturer's site:
https://silicone.com.au/product/prosil-10/

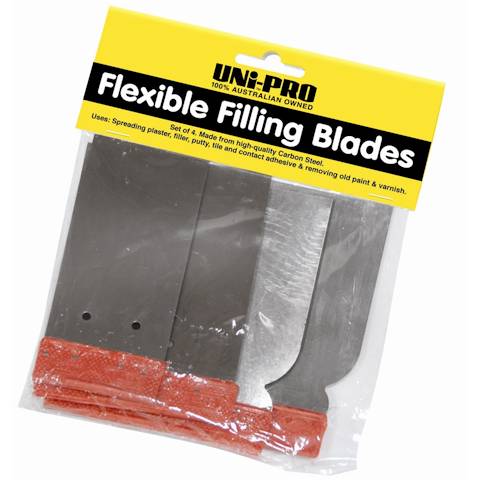
The spreaders were purchased from Bunnings. These flexible steel blades were good for doing the inside sides of the distiller:
https://www.bunnings.com.au/uni-pro-4-piece-filling-blade-set_p1670761
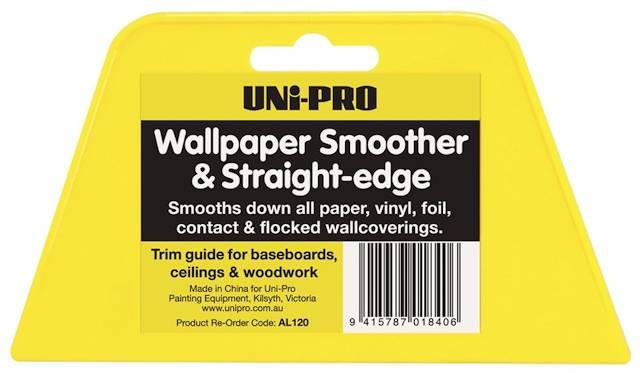
For spreading on the floor of the basin, I used this large plastic flexible spreader:
https://www.bunnings.com.au/uni-pro-wallpaper-smoother-and-straight-edge_p1661659
I used the steel spreaders to spread the white silicone on the walls.
Did it in two goes, firstly just the walls, then the next day did the
top-edges of the frame, and touched up on the walls. Here is a snapshot
after the first coat:
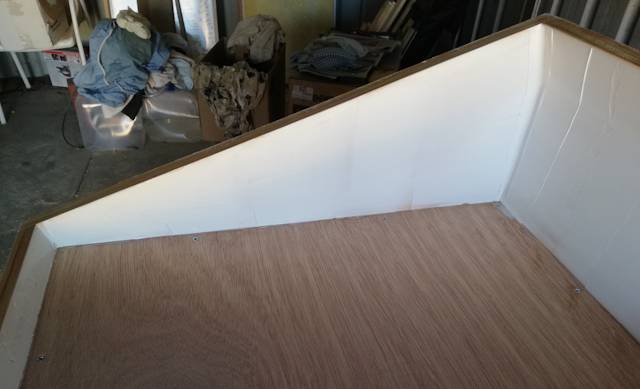
...you can see some thin spots, so it definitely needed going over a second time.
Note: please do wear disposable latex gloves when spreading silicone
sealant, and a well-ventilated room. An old cloth to wipe the spreaders
is also required.
Now for the floor, which will be black. I did this in three goes. Firstly, around the edges:
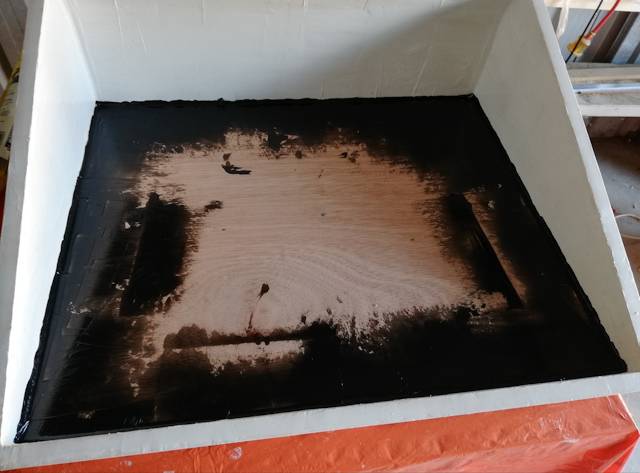
The next day, spread the rest of the floor. The basic technique is to
zig-zag the sealant thickly over the floor, then drag the spreader,
fairly firmly pressed. On the third day, did another coat to cover some
thin spots. To achieve a fairly thick extrusion as I zigzagged onto the floor (ditto for the first-go, extruded thickly around the edges), the nozzle was cut well down from the tip:
Here is the shopping list:
| Prosil 10 silicone sealant, white, 300g tube |
2x AU$10.62 |
| Prosil 10 silicone sealant, black, 300g tube |
2x AU$10.62 |
| Flexible steel spreading blades, 1 set |
AU$7.32 |
| Large plastic spreader |
AU$2.48 |
The next step will be to construct the distilled water runoff, and holes in the floor for water inlet and outlets.
Tags: nomad
IFS versus live-axle 4wd
Having owned a Suzuki 4wd a very long time ago, with live-axle
front suspension and mediocre handling on the road, I have an interest
as to why the on-road driving experience was less than optimal. I posted
about these early experiences:
https://bkhome.org/news/201904/car-ball-and-nut-steering.html
...I must add though, I really don't know much about the mechanics of
vehicle suspension and steering. Just some fairly superficial reading
here and there, so possibly some details in that post are not completely
accurate.
https://www.youtube.com/watch?v=6nP3uyZn8A8

In fact, what 4wd's are still made with live-axle, apart from the Suzuki Jimny? A search found this (2017):
https://www.whichcar.com.au/gear/traditional-4x4-versus-high-tech-4x4
Quoting:
With the recent demise of the GU Patrol and Land Rover Defender, the only four vehicles left on the [Australian] market with live axles front and rear are the 70 Series Land Cruiser, Jeep Wrangler, Mercedes-Benz G-Class and the tiny Suzuki Jimny
Another point raised by the above link is monocoque construction
versus separate chassis. The Jimny has a separate chassis.
Tags: nomad
Jimny 4wd near a Isuzu MUX
I have been posting photos of the little Suzuki Jimny 2019-model alongside larger 4wd vehicles. For earlier posts, see here:
https://bkhome.org/news/201908/another-photo-jimny-next-to-large-car.html
Today I found this one, posted to Facebook by Adam Poole, his Jimny behind an Isuzu MUX 4wd:
...I suppose, when someone posts a photo to Facebook, then Facebook
owns it? Whatever, hope no one minds it being reproduced here.
It should be noted that the perspective of the photo makes the Jimny
look smaller, if they were alongside, the Jimny might not look so small.
Anyway, I still find these photos amusing.
It is nice to see those trees, still green. We currently have fires
sweeping though vast tracts of bushland here in Australia, with hundreds
of homes destroyed and lives lost:
Actually, so far it is not as bad as 2008-2009, when over 2,000 homes were lost:
https://en.wikipedia.org/wiki/List_of_Australian_bushfire_seasons
Tags: nomad
Distiller DIY floor construction
The previous post, construction of the wood frame:
https://bkhome.org/news/201912/distiller-diy-assembling-the-frame.html
Now for the plywood floor. I decide to increase the thickness of the
floor insulation from 60mm to 66mm. This is a consequence of deciding
not to indent the glass into the wood, rather to just sit it on top,
with silicone foam strip between glass and wood frame. This gives a bit
more height under the glass at the front, so the floor can be raised a
bit.
I purchased marine plywood, 6mm thick, so marked out a height of 60mm
from the bottom of the distiller, for affixing framework to hold the
ply. I also put framework along the bottom, as it is intended to affix
6mm ply on the bottom of the distiller also.
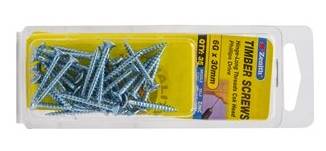
As I had some 42x19mm pine, I cut it lengthwise into three strips
about 13mm wide each. This was done with the rotary saw. The strips were
then screwed to the distiller frame, using 6G 30mm screws, predrilled
with 2mm drill bit and 3.5mm into the top 19mm, and countersunk by hand
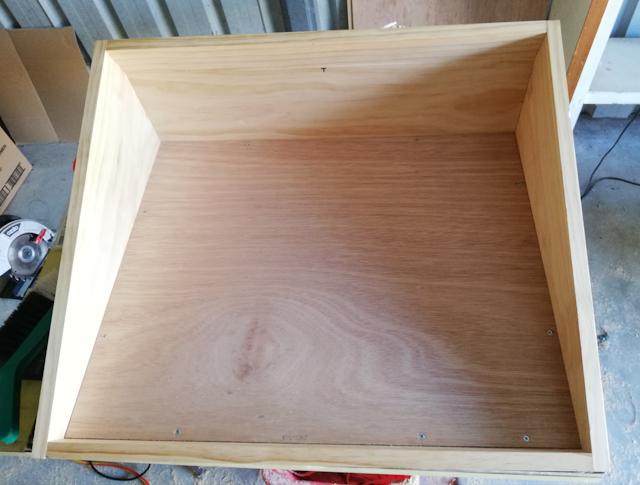
using a 7mm drill bit. This is what it looks like:
A straightforward operation, no need for detailed plans, anyone can
do this just by seeing this photo. One detail though: the back wall is
vertical, so no problem, however the front wall is 20 degrees off
vertical. Therefore, the strip of wood that I used along the front, I
cut with an angle of 20 degrees (my rotary saw has angle adjustment,
making that operation easy). This photo shows the strips looking from
the top, so that you can see the 20 degree cut on the front strip:
...the wide-angle lense on the phone distorts the image -- the back wall is actually vertical.
I cut the plywood with a handsaw, a tenon saw actually, 654x531mm,
with a slight angle to front, and it fitted in snuggly. I then used 6G
20mm screws, predrilled with a 2mm drill bit and countersunk by hand
with a 7mm drill bit.
| 6Gx20mm zinc-plated countersunk-head, 40pk |
AU$3.98 |
EDIT 2020-01-11:
The 6Gx20mm screws were purchased from Bunnings, Zenith zinc-plated
countersunk-head. Looking at Bunnings website now, can't see any
zinc-plated, but there are brass-plated:
https://www.bunnings.com.au/zenith-6g-x-20mm-brass-plated-hinge-long-threads-countersunk-head-timber-screws-40-pack_p2420082
...there are 6G 15mm zinc-plated, which would have enough reach.
Assembled view:
That was when I made an "interesting" discovery: While brushing wood
particles off the surface of the basin floor, tiny wood hairs lifted off
the surface of the plywood, and stuck up. I looked on the other side,
and the surface is more consolidated, wood hairs do not lift up.
This is a concern. Now that it is screwed in place, I really don't
want to lift it up and flip over. Besides, I chose that orientation as
the plywood sheet had a very slight bow -- only slight -- which I want
to to have the convex side on top. now that it is in place, it is very
flat.
I will probably give a fine sandpaper, but not if it is going to lift
up more hairs. Anyway, will try and get rid of the hairs, and hope that
when spreading the silicone sealant none of the hairs stand up.
EDIT 2020-01-11:
I used 120grit (fine) wood sandpaper on the plywood surface, and it took
off the wood "hairs". Looks good, ready for the sealant to be applied.
A construction detail that is not in the above photos: the distilled
water runoff pipe will be on the right side, coming out underneath in
the extreme right corner. So I left a gap in the floor support strips,
of about 15mm in the front right corner (as viewed standing in front of
the distiller). I could have cut out the corner of the plywood also,
however decided to drill it after the silicone has been spread.
There will also be inlet and drain holes.
Tags: nomad
Distiller DIY assembling the frame
I posted yesterday, the start of constructing the simple
basin-type solar water distiller, for which it is intended to publish
DIY plans:
https://bkhome.org/news/201912/start-of-diy-plans-for-solar-water-distiller.html
Today I cut the pieces for the wood frame, and screwed them together.
I mentioned yesterday that the frame could be cut with just a
handsaw. However, I mostly used a rotary (circular) saw, as this made it
easier to cut nice straight lines, and vertical cuts -- what I mean
about "vertical cuts" is when cutting the wood want the cut to be 90
degrees to the plane of the wood -- I have trouble with this with a hand
saw, usually end up with a slight slant to the right.
Of course, it would be nice to have a wood-working bench, but as I
only have a table, have to improvise. For example, this is the setup to
cut across the 235x19mm pine:
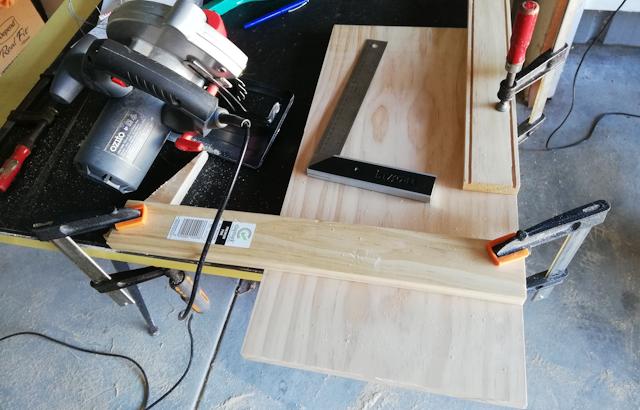
...three g-clamps were used, and the metal square is extremely
helpful. I quickly learnt exactly where to put the wood guide for the
rotary saw to cut along the desired line.
There were five pieces cut, and I put four of them together on the table prior to screwing:
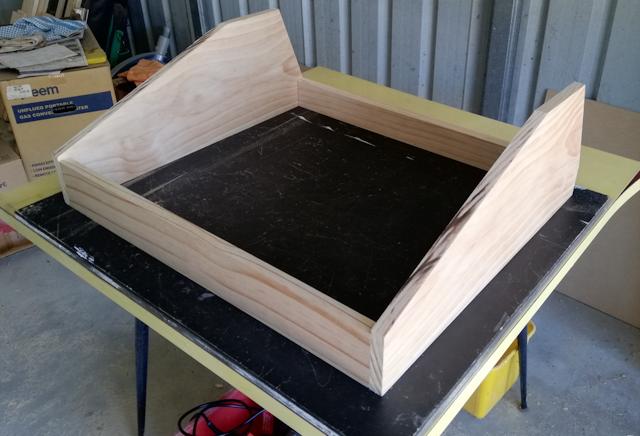
...that is of course upside-down.
When constructing the previous prototype, I used some silicone
sealant to hold the corners in-place and left it to set overnight, then
screwed it the next day. I received an email from Rick about this:
With regards to holding the sides together for screwing. You could just use a block of wood, or even the thicker side of a set square, together with two clamps (G or sliding), align until satisfied and screw together. No waiting for silicone to dry.
Yes, I did one corner with two g-clamps, after that used just one clamp, like this:
...that provided enough alignment, and used one hand to press the corners together and the other hand to hold drill. Worked OK.
Regarding the insertion of the screws, I have watched those house
restoration shows on TV, where they just bung the screws in, no
pre-drilling. Well, I pre-drilled. I do this from prior experience with
MDF, that de-laminates very easily. Pine is much better, however as
screwing into the end of the wood, I decided to play-safe and pre-drill.
I used 6G 40mm countersunk zinc-plated wood screws. I firstly drilled
the full 40mm depth with a 2.5mm drill bit, followed by a 3.5mm drill
bit drilled only 19mm deep (I put a pen mark on the drill bit to get
this right). Finally, used a 7mm drill bit, held by hand, to gouge for
the countersunk head.
Todays shopping list, from Bunnings:
| 6G 40mm, zinc countersunk wood screws, 25 pk |
AU$3.98 |
| 6G 30mm, zinc, countersunk wood screws, 25 pk |
AU$3.98 |
...one small detail, the Zenith 40mm screws have recently been rebranded as 38mm.
EDIT 2020-01-11:
A clarification: the screws I used are self-tapping wood screws,
actually designed to be used without pre-drilling in soft wood. Example
link:
https://www.bunnings.com.au/zenith-6g-x-30mm-zinc-plated-hinge-long-threads-countersunk-head-timber-screws-35-pack_p2420068
The five pieces are now screwed together. Tomorrow, the plan is to install a mounting frame for the plywood floor.
Tags: nomad
Start of DIY plans for solar water distiller
Hopefully, anyway. Posting in stages to my blog, and if the end
result is good, then will put the plans together in a single page.
The basis of this is the "simple basin-type prototype #2", with some
further refinements, named as "prototype #3", as posted here:
https://bkhome.org/news/201912/designing-distiller-basin-type-proto3.html
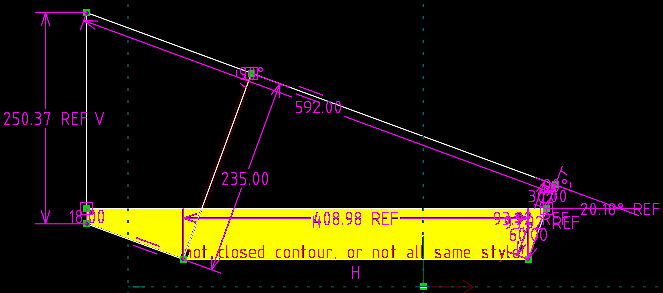
I have refined the design in SolveSpace. Here is the diagram exported as a PNG:
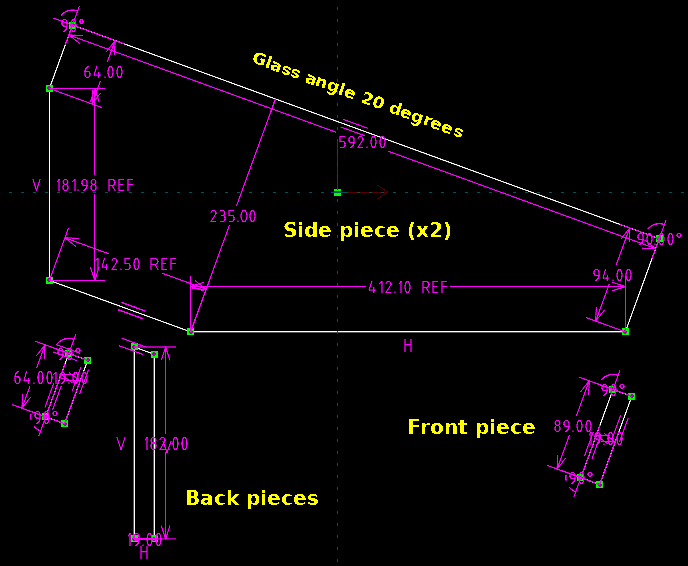
The wood is dressed pine, 19mm thick. The two side pieces are to be cut from a single 235x19mm 1.2m piece of pine.
EDIT 2020-01-11:
Here is the SolveSpace file for the above picture. It is for SolveSpace v2.3 and will need to be uncompressed first:
https://bkhome.org/news/201912/files/basin3-frame3b.slvs.gz
For construction to be as simple as possible, I want the wood surface
on which the glass will lay, to be perfectly flat, hence the unusual
proportions on the back side. Along the back side, there will be a
64x19mm piece of wood, at 90 degrees to the plane of the glass. Then
there will be a 182x19mm (actually, Bunnings sell 184x19mm) piece
oriented vertical -- cut with a 20 slope on the top so as to fit against
the piece above it.
At the front, there will be a 94x19mm (will use 89x19mm from
Bunnings) piece, oriented at 90 degrees from the plane of the glass.
I will use 572x672mm glass, 3mm thick. You can see that the length of
the side piece is 592mm. That is to allow the glass to sit on top of
the wood frame, with 10mm wood outside of the glass, all around. I was
planning to use a router to cut an indent in the wood, so that the glass
can sit flush with the wood surface, however, to keep construction as
simple as possible, won't use a router.
Instead, the glass will just sit on top of the wood frame, held down
with aluminium brackets. There will be silicone sponge between glass and
wood.
Ideally, I would like these DIY plans to require absolute minimum of tools, perhaps even just a hand saw. So, the router is out.
My piece of glass is 572x672mm, taking off 9mm all round where it
sits on the wood frame, that leaves active dimensions of 554x654mm,
which is a surface area of 0.362 metre-squared. If you want to build a
bigger distiller, aiming for more than 1.8 - 2.0 litres per day in
summer, you can keep the wood dimensions that I have shown above, just
make the front and back pieces longer (in my case, they will be 672 -9
-9, which is 654mm). For example, if you use 572x872mm glass, that will
give you an active surface area of 0.473 metre-squared, upping the water
output to around 2.4 - 2.6 litres. However, you might then want to
consider using 4mm thick glass, for the strength.
The previous prototype used expanding foam for floor insulation, with
black silicone sealant spread directly on top of the foam. It was very
light, but the method needs improvement, as there were "waves" in the
floor. This time, I propose to use a piece of 6mm plywood:
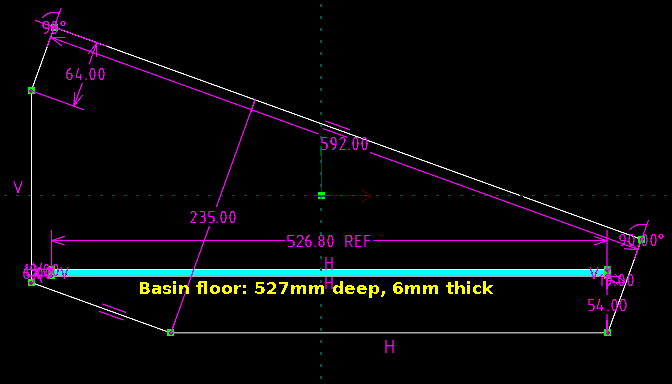
...by "deep", I mean 527mm will be the measurement of the plywood
from front to back, and it will be 654mm long (or wide, depending on
your point of view). It will require some framing underneath. The floor
of the basin will be 60mm above the bottom of the distiller.
EDIT 2020-01-11:
When I got to actually constructing the distiller, I decided to raise
the basin floor by 6mm, so the "54mm" in the above photo has become
60mm. Also, the plywood now measures 530.7x654mm. The corrected
SolveSpace v2.3 file (uncompress it first):
https://bkhome.org/news/201912/files/basin3-frame3b-internal2.slvs.gz
I have not yet decided what insulation to use. I am now wary of
expanded foam! Might use fibreglass insulation -- Bunnings do not sell
individual batts, so maybe I can use the leftover batts somewhere else.
Fibreglass insulation does have one advantage -- I can take it out if
want to mess around with the plumbing underneath. Also, if the plywood
gases due to the heat, the gas can escape.
There is proposed to be plywood on the bottom of the distiller.
I have toyed with various ideas for the floor and sides of the basin,
such as black silicone sheet stuck onto the floor. However, have
decided to stay with what has already been tested, and used in the
previous prototype, spreading silicone sealant onto the wood.
Here is the shopping list for the pine:
| Section (mm) |
Length (m) |
Price (AU$) |
| 42x19 |
2.4 |
7.65 |
| 64x19 |
1.2 |
5.00 |
| 89x19 |
1.2 |
6.00 |
| 184x19 |
1.2 |
13.00 |
| 235x19 |
1.2 |
21.00 |
And marine plywood:
| Dimension (mm) |
Price (AU$) |
| 1220x810x6 |
34.60 |
A grand total of AU$87.25.
EDIT 2020-02-13:
Bunnings doesn't seem to have that size of marine plywood any more. You
need sufficient for the floor of the basin and underneath the distiller.
You may have to buy a bigger piece, or two smaller pieces. Not online
anyway -- you could check in-store.
If I was to rummage around in scrap yards, I am sure that suitable
wood could be found, at a fraction of that price. For me, it is a matter
of convenience, as the Bunnings store is only a 5 minute drive from my
home. Also, I want pine for the light weight, but if that was not a
concern then a hardwood would be OK, and more durable. Perhaps also,
marine plywood is not needed, a cheaper plywood should be OK - or a
sheet of aluminium or steel.
Tags: nomad
Designing distiller basin-type proto3
This is intended to be the "final" design, for which I will
create DIY plans. I have ideas about a collapsible design, however,
think it better to stay with the latest basin-type that is working very
well, with some tweaks.
The simple basin-type, prototype #2, was evaluated here:
https://bkhome.org/news/201912/further-analysis-of-basin-type-distiller-test.html
...it achieved efficiency 87% relative to the F-Cubed C1000, and 47% absolute efficiency.
Note: F-Cubed claim 55% for the C1000, but 65% for the C3000. The latter is the same width, but 3 metres long, and apparently the longer air rotation path improves the efficiency.
I am proposing that the DIY plans be basically the same as proto-2, except for:
- Thicker insulation in base, 60mm instead of 35mm
- Thicker side walls, 19mm instead of 12mm
- 3mm glass instead of 4mm
- 20 degrees glass angle, instead of 10 degrees
I did two tests of prototype #2, the second with the distiller
sitting on extra insulating plywood and a towel, and got higher water
output, 2.06 litres up from 1.86 litres.
The thinner glass is expected to improve efficiency. The higher angle
of the glass will decrease efficiency, however, the distiller will work
better in winter.
I will use a 572x672mm sheet of glass, 3mm thick, one of the pieces that was used in the sloping wick-type prototype #4.
I constructed a side-view in SolveSpace:
https://bkhome.org/files/basin-proto3a.slvs.gz
Note: SolveSpace hangs on my laptop. This is a known problem with intel video. In my case, the fix was to exit X to the commandline, and run "xorgwizard", and change from "sna" acceleration to "uxa" acceleration.
This is the side view, outside dimensions:
...the yellow-filled area is insulation, mostly 60mm thick, but tapering down to 18mm at the back (to keep the width to 235mm).
I managed to constrain the thickness so that a 235x19mm, 1.2m, piece
of pine, will do the job for the sides. Although the glass short-side is
572mm, another 10mm is added on each end for the pine sides. It is
proposed to use the router to indent the glass into the wood frame.
The right side of the above snapshot is messy, so here it is expanded:
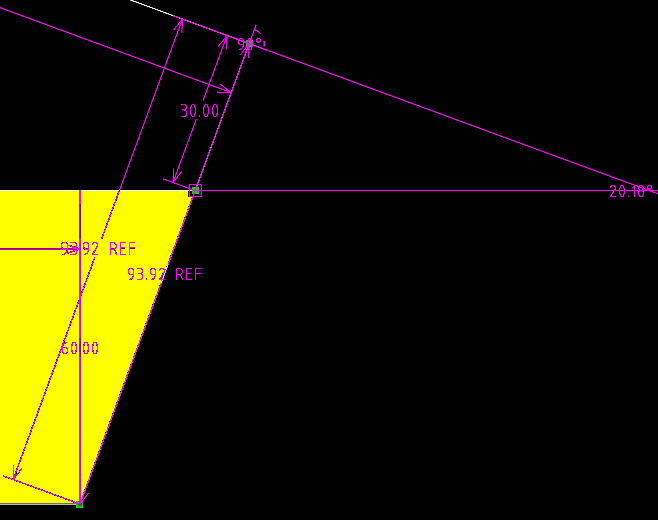
...only 30mm between floor of basin and top-outside of the glass, but
that is enough. The water depth is only going to be about 5-10mm.
The design looks reasonable, so a trip to Bunnings is coming soon...
Tags: nomad
Further analysis of basin-type distiller test
I posted a couple of days ago, a showdown between three solar water distillers:
https://bkhome.org/news/201912/solar-distiller-showdown-take-2.html
That was a very hot day, the ambient temperature peaking at 41
degrees C (106 Fahrenheit), with a slight breeze (11-23km/h, as reported
by the Bureau of Meteorology for my suburb), and the distillers
gave their best. My simple basin-type was measured to be 87% as
efficient as the F-Cubed c1000 distiller.
So what is the absolute efficiency of my basin-type? Well, taking the
claim by F-Cubed that the C1000 is 55%, that works out that the
basin-type is 0.87*55, which is 47.8%. But, can I calculate it myself,
from basic principles?
Interesting question. I looked at some research papers, and the
formulae given are complicated, or confusing (for me anyway). However, I did find some web pages with basic explanations...
From basic principles, for a day test, we want the energy of the sun
coming in, the water output, and a conversion constant which is the
energy required to convert the water to distilled water. That constant
is called "the latent heat of vaporization".
This is not my field. I was a solar energy researcher for awhile, in
1979-80, but that was in photovoltaics. Besides, I was an electronic
engineer. Anyway, from online reading, this seems to be the appropriate formula:
Efficiency (%) |
= |
Water-out (kg) x latent-heat-of-vaporization (kJ/kg) Energy-input (kJ) |
x 100 |
Latent-heat-of-vaporization is a constant, 2260.
Distiller water output is shown as kilograms, but 1 kilogram equals 1 litre. My basin-type gave 2.06kg.
That leaves energy input, in kilojoules. This is the awkward one to
calculate. The sun was pouring energy into the distiller, and I took
hourly measurements of the instantaneous power input, in watts per
metre-squared.
1 joule is 1 watt times 1 second. Joule is an energy figure, so if I
break the day into 1 hour chunks, I can just multiply the watts hitting
the distiller times 3600 seconds (1 hour), to calculate the energy.
The problem though, is that the sun is hitting the distiller at an
angle, quite an acute angle early in the morning and late afternoon. I
need to calculate the distiller surface area that is perpendicular to
the sun, at each hour of the day. To help with that, there is a graph
here:
http://www.see.murdoch.edu.au/resources/info/Tech/house/index.html
This is mid-summer here in Perth, Australia, and the glass angle is
10 degrees, so at midday the sun is directly perpendicular to the glass
-- so that one is easy, the area is just the area of the glass -- well,
less the thickness of the wood frame it is sitting on.
There needs to be a start-time and end-time for the analysis. I took
8.00am as the start-time, as the distiller was mostly in shade earlier
than that, and hadn't even started to warm up at 8.00am. I set the
end-time as 5.00pm, as virtually no water was coming out after that.
With the help of the above link, I constructed this table:
| Time (am,pm) |
8.00 |
9.00 |
10.00 |
12.00 |
2.00 |
3.00 |
4.00-5.00 |
| Irradiance (W/m2) |
840 |
970 |
960 |
1012 |
1005 |
970 |
917 |
| Perpendicular area (m2) |
0.216 |
0.27 |
0.317 |
0.352 |
0.317 |
0.27 |
0.216 |
| Power into distiller (W) |
181 |
262 |
304 |
456 |
318 |
262 |
198 |
| Energy into distiller (kJ) |
651.6 |
943.2 |
2188.8 |
3283.2 |
1144.8 |
943.2 |
712.8 |
...the energy is the power times seconds, divided by 1000, giving kilojoules.
The total energy input is the sum of the entries in the bottom row, which is 9867.6 kilojoules. Putting it into the formula:
Efficiency |
= |
2.06 x 2260 9867.6 |
x 100 |
| = |
47 |
The basin-type distiller has an absolute efficiency of 47%
This agrees closely with the earlier estimate of 47.8% ...I kid you
not, I did not fiddle with those figures. There is some approximation
involved calculating the energy input, but seems to be pretty close to
the actual energy input.
This is very pleasing. Various researchers have given different
estimates of the maximum efficiency obtainable from a simple basin type,
from 30% to 45% (and higher for a "non simple" design, such as
ribbed-floor in basin, or a stepped-basin, up to around 60%), so I am at
the top for the simple basin-type.
There were a couple papers that I read, where I could not agree with
the logic of the efficiency calculations. For example, one paper claimed
a seasonal efficiency variation from 14.8% to 31.1%, but it did not
consider the angle of the sun, that is, the actual energy hitting the
distiller. I thought that the meaning that they had given to the word "efficiency" was wrong, but I won't post
links to those papers, as, as I have stated, this is not my field.
Further thoughts on tilted wick-type versus simple basin
I have already indicated that I am now favouring the simple basin-type, due to simple construction and easy-of-use.
There is another point to consider: the survival of pathogens, even the possibility of them breeding inside the distiller.
The simple basin-type exposes almost every part of the interior to UV
radiation -- the exception would be just behind the distilled-water
runoff at the front of the distiller -- however, I think that the
white-painted walls would be reflecting UV into every shaded area. On
the other hand, the tilted
wick-type has a lot of places where pathogens can hide from UV light. In
particular the F-Cubed design, where air rotates around the underside,
but even a simpler conventional design would allow pathogens to hide in
the wicking material.
Then there is internal temperature, the higher the better. Again, the
basin-type wins. An internal temperature of 80 degC might not
immediately kill some pathogens, but they are bound to be killed
eventually.
My recent tests highlighted the need to have sufficient water flow
through the tilted wick-type, to avoid dry patches. This can result in a
lot of waste water. With the C1000, There was about 15 litres in the
container, and I had to refill it early in the afternoon. So,
mid-summer, rough estimate is to have at least 25 litres in the
container, and also mounted high enough, about 1.4 metres above the
ground.
With the simple basin-type, there is no worry about water delivery
rate. You just put in enough at start of day -- which could be governed
by an overflow outlet inside the distiller. In my test, I put in 5
litres, and got 2 litres of distilled water. The left-over water then
needs to be flushed out at end of day, to avoid build-up of sediments.
Well, probably more importantly, left-over water is required so that
there are no dry-spots on the basin floor, which would cause sediments
to become baked-on to the floor.
Perhaps running some extra water through the distiller at end of day
would help with flushing. The design could quite easily cater for this.
So perhaps comparing the two types of distiller from the water-maintenance side of things is a 50-50 situation.
Well, no, I think that the basin-type wins, as in a campsite
situation I don't really want to have to provide something 1.4 metres
high on which to place the water container. The alternative is a small
water pump, but that is getting too complicated.
Tags: nomad