
Solar distiller showdown take-2
Yesterday I tested three solar water distillers side-by-side:
https://bkhome.org/news/201912/solar-distiller-showdown.html
There was a hiccup with the F-Cubed panel, the cloth becoming partly
dry, so have repeated the test today. Friday, 13 December, 2019, in
Perth, Australia.
Two changes from yesterday. This time I lowered the water container
for the F-Cubed panel, down one rung on the ladder -- so the water
container went from 1430mm above ground, down to 1120mm. Secondly, put a
bit more insulation under the basin-type distiller -- previously had
one 12mm MDF, this time added a 16mm plywood sheet and a towel:

The test proceeded same as yesterday, here are the results:
| Time am/pm |
Sun W/m2 |
Amb. degC |
Top, degC C1000, wick, basin |
Comments |
||
| 8.00 |
840 |
34.7 |
38.3 |
39.7 |
33.8 |
|
| 9.00 |
970 |
35.4 |
58.2 |
49.5 |
44.8 |
Official: 34degC, 23km/h |
| 10.00 |
960 |
36.9 |
67.2 |
59.1 |
58.4 |
Official: 36degC, 23km/h |
| 11.00 |
1030 |
38.7 |
72.4 |
66.0 |
70.9 |
|
| 12.00 |
1012 |
39.9 |
74.5 |
72.0 |
79.2 |
Dry patches in C1000 |
| 1.00 |
960 |
40.8 |
69.1 |
70.8 |
81.5 |
Official: 39degC, 13km/h |
| 2.00 |
1005 |
40.0 |
73.5 |
69.8 |
79.6 |
Official: 40degC, 11km/h |
| 3.00 |
970 |
40.9 |
68.3 |
63.9 |
75.3 |
Official: 41degC, 14km/h |
| 4.30 |
890 |
38.7 |
49.6 |
47.9 |
61.7 |
Official: 39degC, 26km/h |
Stopped at 5.30pm.
About midday, dry patches were starting to appear in the cloth of the
C1000, at the bottom. I moved the water container back up to the higher
rung, and that fixed it, quite quickly. Lesson: better to have more
water flowing through than not enough!
Notice how hot the basin-type got! One good thing -- that will kill any pathogens inside the distiller.
Here are the results:
| C1000 |
wick |
basin |
|
| Tally (litres) |
6.77 |
1.53 |
2.06 |
| Normalized (litres/m2) |
6.77 |
4.60 |
5.89 |
Wow, stellar performance! So, the simple basin-type is 87% as efficient as the F-Cubed C1000 distiller. Pretty good.
I am wondering if my wick-type distiller might have performed better
with more water flow through it. Waste water output reduced to just
about nothing in the afternoon, but I could not see if the cloth was
drying out. Although I very much like the basin-type because of it's
simplicity, both in construction and usage, I might do one more test
with the wick-type, with the water container higher up ....maybe.
Tags: nomad
Solar distiller showdown
Today, Thursday, December 12, 2019, in Perth, Western Australia,
latitude 31 degrees in the Southern Hemisphere, it is mid-summer. The
prediction for today is 40 deg C (104 Fahrenheit) and sunny. I decided
it is time for a showdown, a "shootout" between the F-Cubed Carocell
1000, my tilted wicking-type prototype #4, and my simple basin-type
prototype #2.
There were individual tests done on these:
https://bkhome.org/news/201906/testing-f-cubed-carocell-1000-solar-distiller.html
https://bkhome.org/news/201911/solar-distiller-prototype-4-first-test.html
https://bkhome.org/news/201912/testing-basin-type-solar-distiller-prototype-2.html
In those tests, I published comparative efficiency figures, however,
they were based on tests taken at different times of the year, different
weather conditions, and also some figures published by the F-Cubed
company.
The only way to accurately compare them is to test them together. Which I have done today.
I started putting them out in my backyard about 7.00am. A gusty
breeze. They are in the shade of my garage, but that is only a temporary
situation. This photo shows the shading:
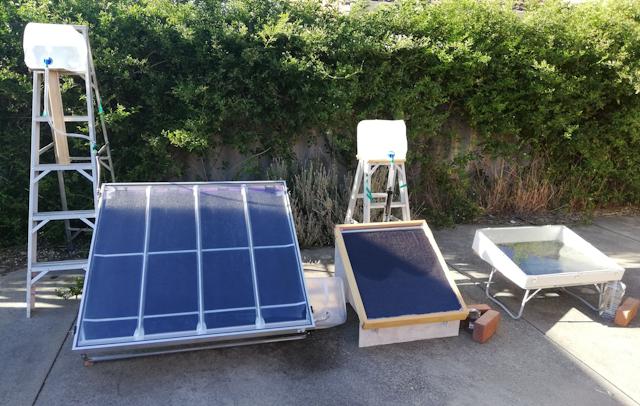
...which does put the F-Cubed panel at a disadvantage, however, none
of them were producing any output at this time, and the shade rapidly
disappeared. By 8.00am, there was just a bit of shade in the bottom
corner of the F-Cubed panel.
One good thing, the placement, and being mid-summer, avoids the
afternoon shade from the patio, so I was able to run the test until late
afternoon.
There was some haziness in the sky, which persisted for most of the
day, though still got fairly high sun intensity readings -- but perhaps,
the distilled water output might not be quite as high as if the sky was
clear blue.
Here are the tabulated readings. The "Top" temperature measurements
are taken with the IR meter, held about 3 inches above the glass, about
3/4 of the way up. Ambient readings were obtained by pointing the IR
meter into the patio.
| Time am/pm |
Sun W/m2 |
Amb. degC |
Top, degC C1000, wick, basin |
Comments |
||
| 8.00 |
840 |
26.5 |
30.7 |
29.1 |
25.7 |
No water o/p yet |
| 9.00 |
900 |
29.4 |
50.3 |
44.5 |
40.1 |
Official: 28degC, 23km/h |
| 10.00 |
950 |
30.8 |
63.3 |
54.8 |
53.8 |
Official: 31degC, 21km/h |
| 11.00 |
910 |
34.1 |
70.2 |
62.5 |
64.1 |
Official: 34degC, 26km/h |
| 12.30 |
750 |
36.4 |
66.8 |
61.9 |
70.7 |
Problem with C1000 panel |
| 1.00 |
1005 |
37.2 |
66.8 |
61.9 |
70.7 |
C1000 almost recovered |
| 2.20 |
965 |
37.0 |
66.0 |
62.3 |
73.4 |
Official: 38degC at 2.00pm |
| 3.15 |
960 |
36.8 |
65.8 |
59.1 |
71.0 |
|
| 4.00 |
950 |
36.0 |
58.9 |
53.2 |
65.5 |
Official: 39degC, 16km/h |
| 5.00 |
855 |
36.6 |
45 |
46.8 |
56.8 |
Official: 39degC, 18km/h |
The test was stopped at 5.45pm.
There was a problem around midday with the C1000 panel. I had reduced
the water inlet flow, by turning the tap from the water container to
nearly off. This was because I thought too much water was flowing
through the still. I probably should have just lowered the water
container to reduce the head. Anyway, at 12.30pm discovered that most of
the wicking cloth had gone dry.
This is a bad situation, as it can take awhile for the cloth to wet
right through again. When dry, water tends to run over the surface,
instead of seeping into the cloth. Anyway, it recovered fairly quickly,
and the cloth looked Ok by about 1.00pm. It will be expected that this
will reduce the distilled water output.
Notice also the sun irradiance (intensity) was only 750 watts per
metre-squared. This was due to increased haziness in the sky around
midday.
Here are the results, the accumulated distilled water output for the day:
| C1000 |
Wick |
Basin |
|
| Tally (litres) |
5.32 |
1.27 |
1.86 |
| Normalized (litres/m2) |
5.32 |
3.817 |
5.314 |
There was only 5.32 litres from the C1000 panel, I would have
expected about 6 litres. This test will have to be repeated, probably
tomorrow.
The table shows the simple-basin-type giving almost as much output as
the C1000, and even higher than the previous test of 1.85 litres (see
previous test link at top of this page). That previous test was a hotter
day, and higher sun intensity -- so how come I got an extra 0.01 litres
today?
In the previous test of the basin-type, the distiller was sitting on a
small picnic table, same today, but I placed a 12mm thick sheet of MDF
on the table, so there was more insulation, which is known to be an
important factor for efficiency.
Note, the distillers were not moved all day. They were oriented facing due North.
My tilted wicking-type distiller gave very poor performance. It is
now eliminated. Though, will probably include it in tomorrow's showdown,
since it is setup.
Tags: nomad
Radical rethink of the basin-type distiller
I posted this morning some reflections on how the simple-basin
prototype #2 achieved a high efficiency, with thoughts to enhance even
further:
https://bkhome.org/news/201912/reflections-on-the-basin-type-proto-2-test.html
I have now got an idea how the frame can be collapsible, completely
flat, for easy transportation. That is one new thought, that will be
explained in a later blog post.
Another rethink is how to achieve a flat black floor for the basin.
So far, have been spreading black silicone sealant, two 300gm tubes
required for a 0.35 - 0.4 metre-cubed floor.
There are various problems with spreading silicone sealant. One is to
find all pin-head holes. Another is to get the surface smooth. Then
there is the messiness of the application.
A solution is a glass floor for the basin, with a thin black silicone
sheet stuck on it. This would give perfect flatness, that will not
warp, and suitable for very high temperatures.
The problem is to find a supplier of a large enough black silicone sheet. The exact dimensions yet to be determined, but somewhere around 700x550mm, 1mm thick. Last night I made some online enquiries to Australian suppliers, today only received one reply.
Reglin Rubber, based in Victoria, sent me a quote for a roll, 1200mm width, 10m long, sheet thickness 1mm. The quote is AU$148 including GST, and AU$40 postage. That would be enough for 28 distillers.
The biggest that I could find on eBay is 500x500mm, ditto Amazon. However, on Aliexpress I found this:
https://www.aliexpress.com/item/32910589054.html
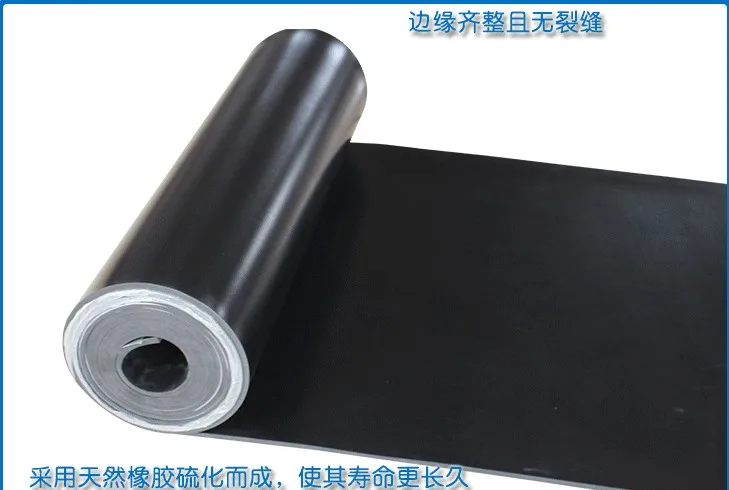
...1m by 1m, 1mm thick, black silicone, AU$18.76 plus GST, and
AU$27.05 for EMS ePacket postage (13 - 20 days delivery to my home, from
China). Grand total AU$50.39. Rather a lot of money for a piece of
silicone sheet, but want it, so ordered it.
EDIT 2019-12-09:
Yikes! I have received another reply. From Complete Rubber, based in Victoria:
Thinnest Black Silicone we can offer is 1.5mm Thick
1000 x 1200mm piece costs $499.00 + GST + Freight
We can supply 0.5mm, or 1.0mm Thick in RED or Translucent colour if acceptable
0.5mm - 1000 x 1200mm Piece @ $441.00 + GST + Freight
1.0mm - 1000 x 1200mm Piece @ $385.00 + GST + Freight (Yes cheaper as is more common size purchased in the Market Place)
...a bit of a jump from $18.76 direct from China, and $148 for 10 metres from Reglin Rubber.
Tags: nomad
Reflections on the basin-type proto-2 test
Yesterday was hot, ambient peaked at 41 degrees C (105.8
Fahrenheit), mostly clear blue sky, light breeze, mid-summer here in
Perth Australia (Latitude 31 degrees), so the conditions were right to
obtain maximum distilled water output that my basin-type prototype #2 is
capable of. Here is the report of the test:
https://bkhome.org/news/201912/testing-basin-type-solar-distiller-prototype-2.html
The panel produced 1.85 litres (0.49 gallons), with an effective
glass area of 0.35 metre-squared, which calculates at about absolute
efficiency of 48%, extraordinarily high for a simple basin-type
distiller.
This blog post reflects on how that high efficiency was achieved.
There are three main factors:
- White painted inside walls
- Glass close to water surface
- Very low water depth
1. White painted inside walls
I posted about a research paper that obtained a 6.8% absolute efficiency gain by doing this:
https://bkhome.org/news/201911/white-walls-inside-basin-type-solar-still.html
In my case, I used white silicone sealant, Prosil 10.
2. Glass close to water surface
There are several research papers that have found the closer the glass
to the water surface, the higher the efficiency. To achieve this, many
designs have gone for a stepped basin-type still.
In my case, it is a compromise. The glass is about 15mm above the
water at the front end, and about 115mm away at the back side. The
distance of the glass at the back side is kept low by a very low glass
angle of 10 degrees.
The downside of the 10 degrees is that for the latitude of Perth, 31
degrees, the efficiency of the distiller is going to drop right off in
winter. The acute angle of the sun to the glass is going to mean most
light will be reflected off the surface of the glass, instead of going
into the distiller. I was thinking of using an external reflector in the
winter.
3. Very low water depth
I only put 5 litres of water into the distiller, giving a water depth of
14mm average. However, my prototype #2 has a very uneven basin floor,
due to misadventure experimenting with expanding foam, so the depth was
variable, but there was water covering the entire surface.
There is one research paper that experimented taking the water depth
down to 5mm and efficiency kept increasing as depth was reduced. This
paper tested depths of 5, 10 and 20mm:
https://www.ijstr.org/final-
...they achieved output of 1141, 758, 305 millilitres in a day, from
5, 10 and 20mm water depth respectively. Quite an extraordinary
variation.
So, if I had got the basin floor more flat, and setup the still to be
very level, I could have put in less water and achieved higher
efficiency.
Raising the efficiency further
Apart from lowering the water depth, is there anything else that can
be done to further increase the efficiency of the simple basin-type
distiller? Yes, there is...
I used 4mm thick window glass. Here are two more factors to increase efficiency:
- Thinner glass
- Low-iron glass
I have a collection of glass panes, that were cut for me by Casey at
Perthglass, used in the various prototypes, and I just happened to have
that 4mm piece available so used it. However, there is a research paper
that has determined the efficiency improves as glass thickness is
decreased.
This overview paper references another paper that shows efficiency improvement going from 4mm down to 3mm glass:
https://link.springer.com/article/10.1186/s40807-017-0038-8
...that "other paper" is not free to download. Unfortunately, most
academic research papers are seen as a business opportunity by companies
such as Elsevier.
It was found that efficiency improved by 16.5% going from 6mm to 3mm thick glass.
I did locate another free-to-download paper that investigated glass thickness, can't locate it now.
Point-5 is low-iron glass. I have used ordinary window glass, that
has some iron in it. This reduces the efficiency. However, low-iron
glass is expensive. This paper reports that low-iron glass gave an
increase of 6% efficiency compared with normal window glass:
https://www.appropedia.org/Original:Understanding_Solar_Stills
I don't think that I will bother with obtaining that extra 6%. Will
stay with normal cheap window glass, but certainly will go for 3mm,
unless the panel is large and the extra strength of 4mm glass would be
desirable.
EDIT 2019-12-06:
I found some academic papers, free to download, that analyze glass thickness:
4mm, 4mm-two-layers, 4mm-two-layers-air-gap:
http://ijesi.org/papers/Vol(4)1/A0410108.pdf
Comparing 4, 8, 12mm thickness:
https://www.ijrer.org/ijrer/index.php/ijrer/article/view/65/pdf
Comparing 4, 5, 6mm thick:
https://link.springer.com/content/pdf/10.1007%2Fs40866-016-0007-0.pdf
3, 4, 5, 6mm low-iron:
https://www.hindawi.com/journals/jen/2014/247287/
...interesting, that last one determined that 4mm glass gave the
highest output, not 3mm. They all obtained significant efficiency
improvements going down to thinner glass, except for that last paper.
There is another consideration to improve efficiency: insulation
thickness. My prototype has 35mm expanding foam under the basin floor,
but tapering to 12mm at the back, and the wood side-walls are thin only
12mm. So, pretty obvious that this could be improved.
So, add this as item number 6:
- Thicker insulation
But how thick? This academic paper analyzes various thicknesses and different materials:
https://www.researchgate.net/publication/245160387_Effect_of_insulation_thickness_on_the_productivity_of_basin_type_solar_stills_An_experimental_verification_under_local_climate
pdf d/l:
https://www.researchgate.net/profile/Abdul_Jabbar_Khalifa/publication/245160387_Effect_of_insulation_thickness_on_the_productivity_of_basin_type_solar_stills_An_experimental_verification_under_local_climate/links/5ab09b66a6fdcc1bc0be1de9/Effect-of-insulation-thickness-on-the-productivity-of-basin-type-solar-stills-An-experimental-verification-under-local-climate.pdf
...it depends on the material, but the ball-park figure they have got
is 60mm thick is optimum, beyond which efficiency does not improve
much. So, my prototype can be improved with thicker insulation.
Tags: nomad
Testing basin-type solar distiller prototype-2
Today, Tuesday, December 3, 2019, Perth, Western Australia, it is
mid-summer and the forecast is 39 degrees C, with scattered clouds. A
good day to test the second prototype basin-type solar water distiller.
This distiller is pushing the limit of low angle for the glass,
aiming for the narrowest possible design. The glass angle is 10 degrees
and the depth of the distiller is 140mm -- well, kind of, it is
constructed with 140x12mm pine on the sides.
Some posts on design and construction of the basin-type prototype #2:
https://bkhome.org/news/201911/first-go-at-using-expanding-foam.html
https://bkhome.org/news/201911/more-planning-basin-type-prototype-2.html
So, 10 degree angle, white inside walls, how will it perform? The
angle is probably going to be optimum in summer, and dismal in winter.
Anyway, I set it up early this morning, around 7.30am. Initially in the
shade of my garage. Orientation due North. Here it is, while still in
shade:
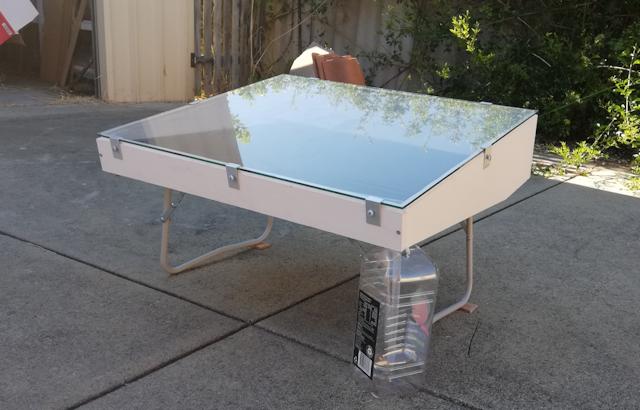
...it is sitting on a small camping table, but could have used any old cardboard box.
By 8.30am it was about 45% still shaded and hardly even warm.
8.45am: Sun just over entire panel. Sun intensity: 890 W/m2, ambient
temperature 34 degrees C (yes, already hot!). Holding the IR meter about
3 inches above the glass, about 3/4 the way up, temperature is 32
degrees C, back side of the distiller is 32 degrees C. There is a slight
breeze.
| Time am/pm |
Sun W/m2 |
Ambient deg C |
Top deg C |
back deg C |
Comments |
| 8.45 |
890 |
34 |
32 |
32 |
|
| 9.00 |
33 |
Official temp., via phone. Wind 24km/h |
|||
| 9.35 |
945 |
35.6 |
49.8 |
44.6 |
Only a very tiny amount of water out |
| 10.35 |
940 |
37.7 |
64 |
51 |
Still not much water out |
| 11.35 |
960 |
39.7 |
74.1 |
57.7 |
Some wispy clouds |
| 12.00 |
41 |
Official temp., via phone, wind 13km/h |
|||
| 12.35 |
960 |
40.2 |
79.8 |
62 |
Lots of puffy clouds, ait mostly still or slight breeze |
| 1.00 |
Moved the still slightly, facing sun at 1.00pm |
||||
| 1.55 |
985 |
40.6 |
74.9 |
56.5 |
Cloud cover increased, puffy clouds. Slight breeze |
| 2.00 |
40 |
Official temp. Wind 24km/h |
|||
| 3.00 |
950 |
40 |
69.1 |
54.2 |
Clouds mostly gone |
| 4.00 |
910 |
38.2 |
62.2 |
52.2 |
Blue sky, no clouds |
| 5.30 |
760 |
36.3 |
50.4 |
46.3 |
No water coming out |
Packed up at 5.45pm. Collected distilled water: 1.85 litres
The temperature readings of the glass are very high. This is obtained
by pointing my IR meter at the glass, about 3 inches away, 3/4 of the
way up. So it is not the inside temperature that is being measured, only
an indication, and I think inside it would be even hotter.
So, my previous thinking that the inside of the distiller would not
reach 80 degrees C was wrong, and I need to think carefully about what
materials are used, that will retain integrity at that temperature.
The effective surface area of the glass is 0.652*0.542 which is 0.35 metre-squared.
How does this compare with the other distillers? I have not yet
tested the F-Cubed C1000 distiller in mid-summer, only in winter, when I
got 3.1 litres. So I will use the claimed mid-summer output, claimed by
F-Cubed, which is 6 litres. That is a 1 metre-square panel.
Here is an earlier post discussing the claimed performance of the C1000 panel:
https://bkhome.org/nomad/water-desalination.html
I am no longer going to compare by litres/hour, as the different
designs work differently. The basin type is slow to get going in the
morning, as it has to warm up, and internal stored heat may cause it to
produce water a bit longer in the afternoon. This gives a different
water output profile then the tilted wick-type, so it is simpler just to
compare the total water produced in a day.
Another factor: with the sun oriented differently in the sky in
mid-summer, the shade from my patio that came across the distiller late
afternoon in the winter, can be avoided in mid-summer. meaning that
today I got the sun on the distiller for more hours in the afternoon
(albeit at an extreme angle).
Another note: I did move the distiller slightly, so as to avoid the
afternoon shade from the patio, and also changed the orientation
slightly, facing the sun at 1pm whereas before it was facing 12 noon. I
probably should not have changed the orientation, even though only
slight.
Normalizing the water output of my distiller, so as to compare with claimed output of the C1000:
1.85*(1/0.35) => 5.28 litres
That means my prototype #2 is 88% as efficient as the C1000 distiller!
I tested basin-type prototype #1 here:
https://bkhome.org/news/201911/first-test-basin-type-proto-1.html
Which produced 1.525 litres, though I did not leave it out quite so
long in the afternoon, as it was not moved to avoid the afternoon shade.
Prototype #1 has a larger piece of glass, 0.493 m2. Normalizing to
compare with the F-Cubed:
1.525*(1/0.493) => 3.09 litres
Much less efficient. I wrote it down somewhere -- I think the glass
angle was 35 degrees, rather high. Lots of side walls to loose heat.
Interesting, the glass didn't get so hot.
Where to next? Enough prototypes! Basin-type prototype #2 has
excellent efficiency, enough for me. The absolute efficiency of the
C1000 is claimed to be 55%, so that means my prototype #2 is 0.88*55
=> 48.4% -- that is very high for a basin-type.
I think that the "final design" needs a bigger glass angle, to
perform better in winter, and I am thinking of 20 degrees. Also, the
proportions of the glass can be changed, wider, less depth from
front-to-back.
Tags: nomad
Using SolveSpace to design distiller
I wanted to explore the dimensions of a distiller constructed
with different timber cross-sections. For the current basin-type
prototype, I used 140x12mm dressed pine, and the distiller has a glass
angle of 10 degrees.
For the next prototype, and what I intend to be the final design, I
am thinking that a bigger glass angle would be better. Bunnings sell
pine in profiles of 140x19, 184x19, 235x19 and 285x19mm. I would like to
go for 19mm thick for the improved insulation.
Figuring out the dimensions and angles of the distiller is
non-trivial, and there are many constraints. Fortunately, we have the
superb SolveSpace application, that I wrote about recently:
https://bkhome.org/news/201911/solvespace-parametric-3d-cad-in-easyos.html
I am not interested in the 3D aspect, just want a side view, to
explore what angles can be obtained with different timber profiles. I
have created a file in SolveSpace v2.3, in Easy Buster, and uploaded it:
https://bkhome.org/files/distiller-basin1.slvs.gz
Note that SolveSpace will be in the next release of Easy Buster, and
ROX-Filer will recognise the mime-type, so users will be able to click
on .slvs files to open them in SolveSpace.
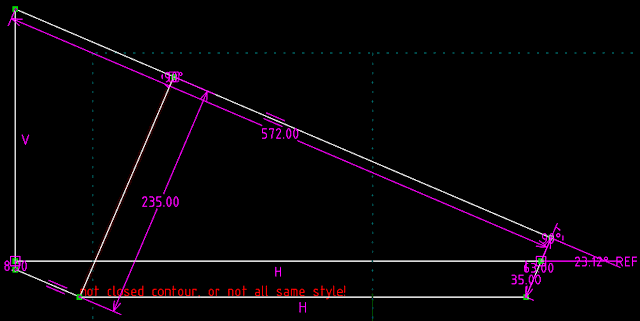
Here is a snapshot of the file, exported to PNG and edited in mtPaint:
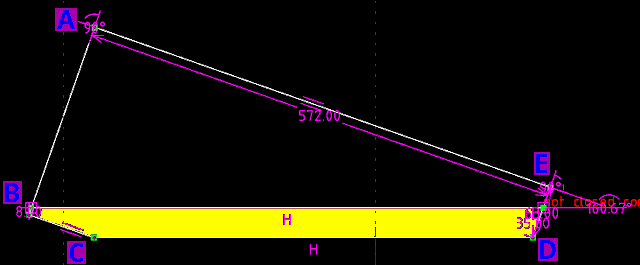
This is exploring using 235mm pine, which is the distance between A
and B. CD is the bottom of the distiller, that will sit on a table. AE
is the glass. Here are the constraints:
Lines AB and AE have to be at 90 degrees
Lines AE and ED have to be 90 degrees
The insulation thickness (yellow-filled area) is 35mm, except at the back where it tapers to 8mm
The length of ED is 63mm
The angle between AE and CD is 19.33 degrees
Lines AE and BC are parallel
Line CD is horizontal, as is top of insulation
With all of those constraints, the distance between A and B is 235mm.
The beauty of this app is that any measurement can be changed and the
result immediately seen. The glass measurement of 572mm for example, or
the glass angle.
A little detail about this design. With a glass angle of 19.33
degrees, and the angle of AB-AE being 90 degrees, it will mean that
midday in midsummer in Perth, Australia, the AB back side of the
distiller will be in shade, causing up to 40mm shade on the water. For
most of the year, no problem. The reason for having the sides of the
distiller at 90 degrees to the glass, is that is simplifies
construction. Anyway, the shading can be avoided by putting some tapered
insulation on the inside back wall.
EDIT 2019-11-29:
Playing around a bit more:
https://bkhome.org/files/distiller-basin1d.slvs.gz
....for 235mm timber and vertical back side, can get the glass angle up to 23 degrees.
Tags: nomad
Ultra light camper trailers
Interested in these, for stowing extra gear when on a camping
trip. There is a chap on Facebook, lives in Western Australia and owns a
Suzuki Jimny 2019 model. As the engine is very small, 1.5 litres, and
legal towing limit is only 1300kg, he bought a motorcycle trailer, the
Erde 122:

...it has a nice pod lid, and total weight is just 65kg. Ah, not at
all clear from the webpage, but that 65kg is without the plastic
lockable top. Found out the top weighs 21kg. This UK site shows there
are lots of accessories:
They have another trailer, complete with tent and only 115kg:

Erde trailers are imported from France, so anyone in Europe should be able to acquire them.
Here is another trailer, the Asyon pod, that weighs 100kg (though, their front page states 130kg):
https://www.asyon.com.au/asyon-pod
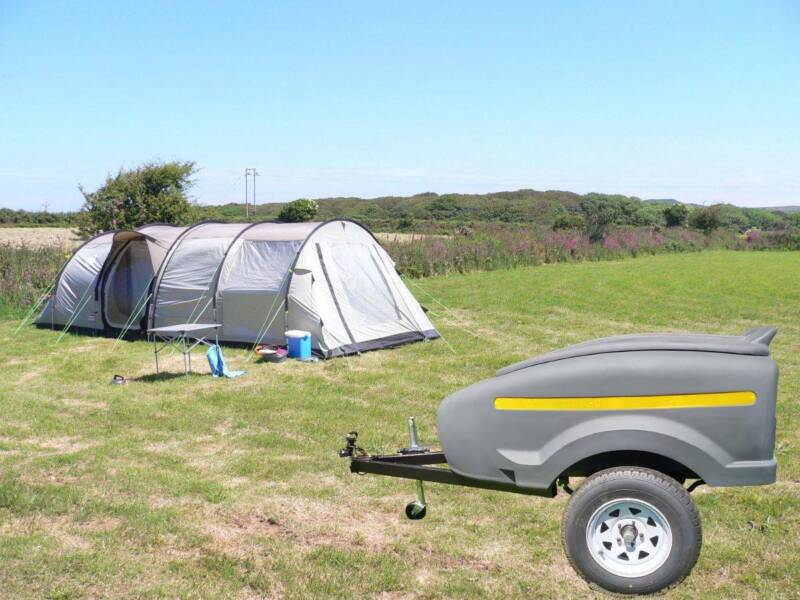
...sold in the Eastern States, from the description, look like local manufacture.
Very interesting!
Tags: nomad
First go at using expanding foam
Well, that was a learning experience... aiming for extreme light
weight, I had the idea of not using plywood for the floor of the basin,
instead just the insulation itself. The problem though, is plywood would
be required when applying the insulation, so as to get a flat surface,
then afterward the plywood could be removed.
Expanding foam, that comes in pressure cans, is polyurethane, which
is a thermosetting plastic, and can be expected to keep its integrity at
the expected maximum temperature inside the solar still -- that is,
won't sag.
I also found information that silicone sealant will stick to it. So I
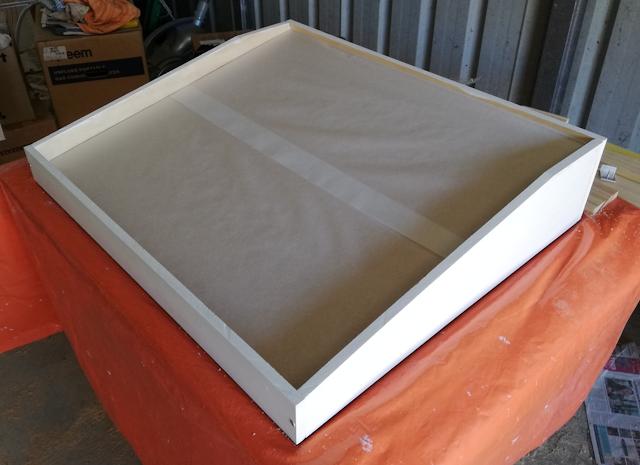
decided to go with this idea. The insulation is going to be 35mm thick
(except toward the back, where it tapers to a bit less, as you will see
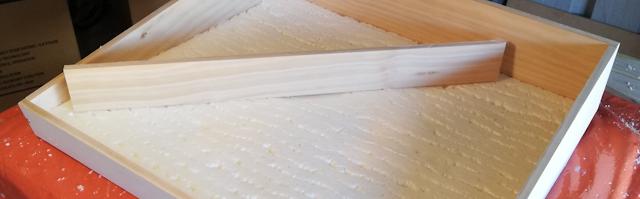
in the photos). I have a piece of 12mm MDF, so cut that to fit snuggly
inside the still. Needed some supports to hold the MDF:
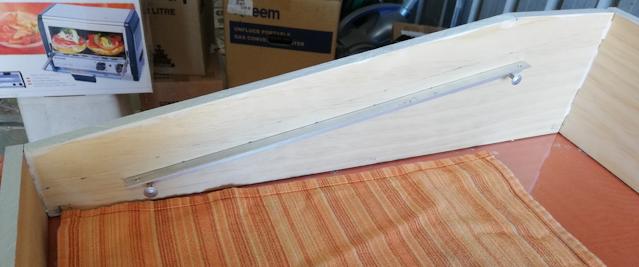
I read on the Internet that expanding foam will not stick to baking
paper, due to its wax coating, so I put that on the MDF, held in place
with sticky tape, and inserted into the still frame:
OK, the idea seems simple enough, apply the expanding foam, let it
set, then use a large saw to trim. I am a complete novice with expanding
foam, so watched some YouTube videos first. I took the recommended
precautions, face mask, latex gloves, and sprayed the surface lightly
with water before application.
I bought a 500ml can of Sika Boom AP expanding foam, claimed coverage
25 litres. The area that I need to fill is about 0.6*0.7*0.035, which
is 0.0147 metre-cubed. One litre is 0.001 metre-cubed, so that works out
as 14.7 litres. That can should be more than enough...
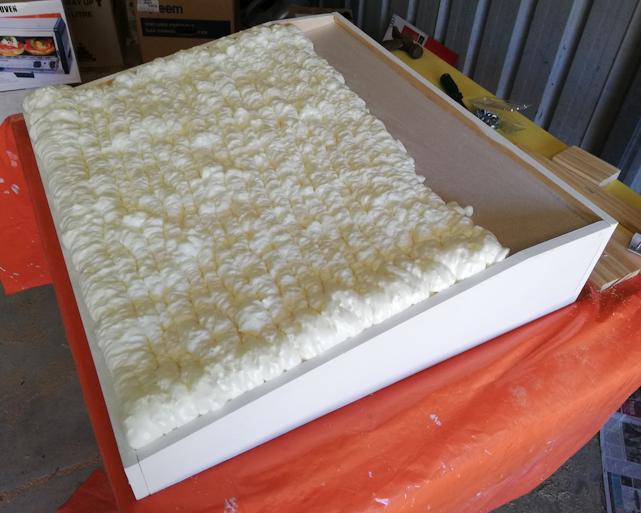
...that is what it looked like after I arrived back from Bunnings
with another can. The second can is 340ml Parfix, the cheapest and
smallest.
Another spray of water, then finished it off. then waited until the next day. Cutting the foam was easy:
...it will need to be planed a bit more even.
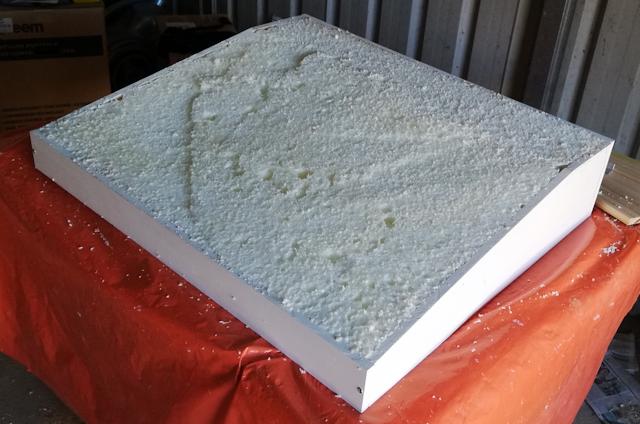
Now for the other side, which will become the floor of the basin. I
pulled off the MDF, and found that the surface is not flat, it has
waves:
The waves are up to 5mm deep, not acceptable. I think that what has
happened is that as the foam expanded, it lifted from the base. It was
not stuck to the base, due to the baking paper.
I read about using baking paper on the Internet, but no one said
anything about this. I could spread something over it, to make it even,
however, I have gone off this technique.
I will give it some more thought, but I think that I will pull the
foam out, and instead install a thin plywood floor with some structural
support, then apply the foam -- it should stick to the wood and not lift
off.
Or, I could use fibreglass batts. But, grumble, I would then have to
buy an entire pack of 9 batts, cheapest at Bunnings is AU$37.45. Weigh
that against 850ml Sika Boom expanding foam, at AU$18.96. I might let
this rest for awhile, feel that I have given Bunnings enough money
recently!
EDIT:
After reflecting on the situation and an afternoon snooze, I decided to
keep the foam fill as it is, and fill the waves. I have lots of
partly-used acrylic sealant tubes in the garage, plus a couple of full
tubes, so this looks like the best choice to fill the dips in the basin
surface.
Most acrylic sealants have a "service
temperature" of 80 degrees C, and there are some fire-rated ones up to
90 degrees C. For example, Sikaseal Joint & gap, Sika Caulk, and
Full Caulk In Colours are all rated at 80 degrees. One exception I found
is Sikacryl 100, interior use only, rated at 70 degrees.
Using the wide spreader, I have applied the
first layer. It will need at least two layers I think, partly because
acrylic sealant shrinks as it sets. First layer was less than half
of a tube, so the situation isn't so bad.
Of course, this workaround is not suitable for
the final DIY plans. When I do finally get to publishing such plans,
will probably specify a plywood floor for the basin.
EDIT 2019-11-28:
I receive emails in response to blog posts, don't normally forward them
to a blog post, just the occasional one. Like this comment from Sage
(Puppy Forum name):
Expanding foam: you'll pardon my sniggers - I've used this quite a lot for building works, including garages and garden sheds. It runs wild not always into intended interstices and seems to have a mind of its own. Voids abound. Ended up cutting off more than exuded! A crude, if cheap, solution best suited to builders and desperate householders.
Yes, it does indeed have a "mind of its own". I
received advice from Rick, that it would have been better to have
forced the foam to stay flat by using 3mm plywood on the basin floor and
back of the distiller, and injecting the foam into the cavity.
Tags: nomad