
Wiring of powerbox underway
I have started the internal wiring of the lithium powerbox, and
this post is a progress report. Here is the previous post for this
project:
https://bkhome.org/news/202004/powerbox-external-assembled.html
It is progressing slowly, but surely. I had to pause for awhile to
think about some construction details. Anyway, here is a photo showing
the wiring so far:
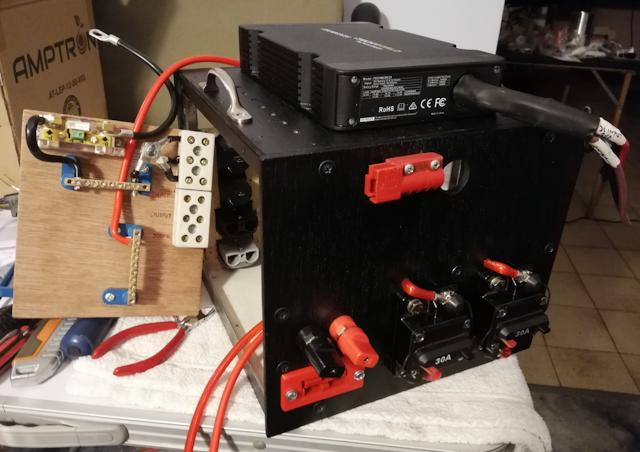
...notice that the box is now painted black! I used a cheap "flat black" enamel paint spray can.
A change from the previous photo (see above link) is that I removed
the Anderson plugs from the DC-DC charger and cut a round hole for the
cables to go into the box. Next to the round hole is "half" of an
Anderson plug -- this is for the wiring to the vehicle ignition key.
The wiring-board is propped alongside the box, for the photo.
Top-left of the wiring-board is the shunt for the coulometer, the two
black and red cables sticking out the top will go to the battery.
The "+bus" and "-bus" busbars were purchased from Jaycar:
https://www.jaycar.com.au/machined-brass-busbar-8-way/p/SZ2003
The terminal blocks at top-right are for wiring to the DC-DC charger. I purchased porcelain blocks:
https://www.jaycar.com.au/3-wire-porcelain-terminal-block-30-amp/p/HM3185
...however, afterward I noticed these, which would probably do the job:
https://www.jaycar.com.au/60-amp-12-way-screw-terminal-strip/p/HM3204
The blank space on the wiring-board is where the fuse holders will
mount. This is where I had some problems, as the blade fuse holders in
local shops, of the surface-mount terminal-block type, seemed too
"light" to handle 20-30 amperes. The engine-bay is a more extreme
environment, but this Redarc video does show the potential for
catastrophic failure when using blade fuses:
https://www.youtube.com/watch?v=kZ76NsvvBE0
Snapshot from the video, of a melted inline blade fuse holder and fuse:
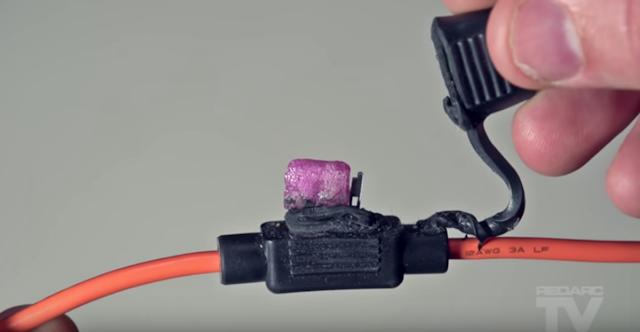
I intend to post soon about what fuse holders I chose, and what got rejected.
Tags: nomad
Powerbox external assembled
This is continuation of the new lithium powerbox project. Previous post:
https://bkhome.org/news/202004/powerbox-side-panels-and-battery-clamp.html
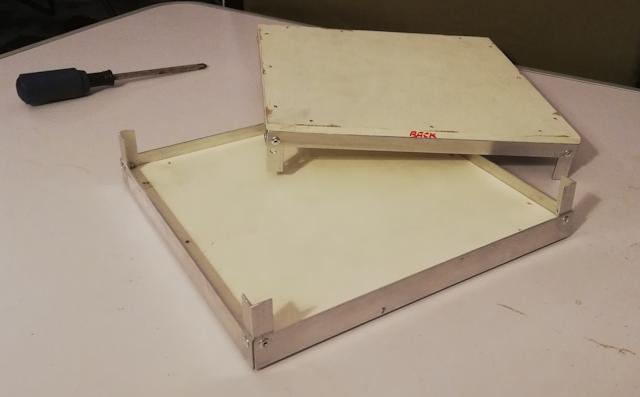
I have cut out the front and back panels, here it is assembled, front view:
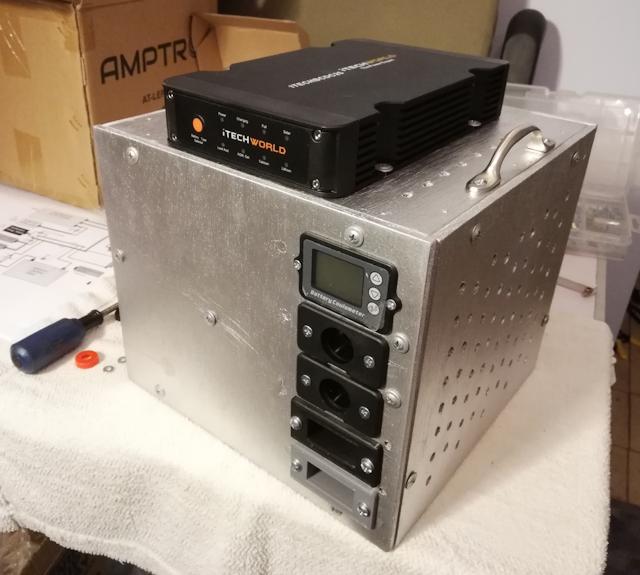
...no internal wiring yet! Here is the back view:
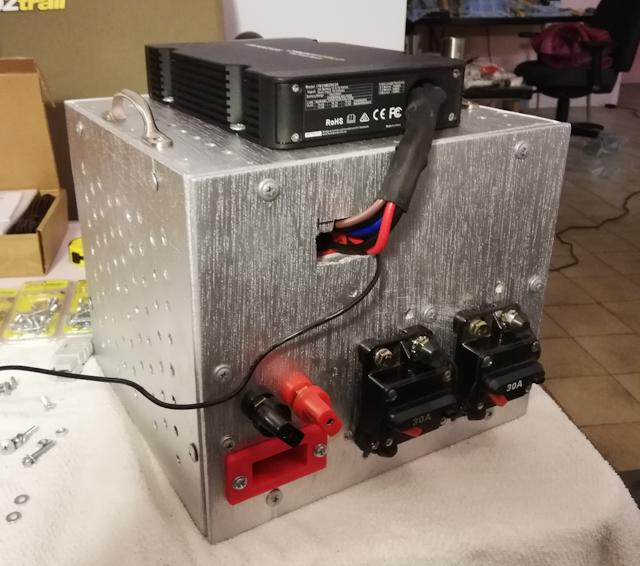
So, in retrospect, am I happy with the design of the box? If it was done again, would I change anything? Yes...
- I used 6mm ply front and back, which is too thin. The Anderson plugs require considerable force to plug-in and unplug. I strengthened with some strips of pine screwed on internally, however, use of 9mm ply would have been better.
- Dimensions are a tight squeeze. OK, but if someone wanted to use a slightly different battery, it probably wouldn't fit. For my Amptron 50AH battery, I would have preferred an extra 5mm internal height, to make sliding in and out via the side easier -- though probably once it is in, it will stay in -- I expect the battery to outlive me.
- It might have been simpler and easier to go for a wood frame
rather than aluminium. Bunnings sell 12x12mm section medium-hardwood,
which would have done the job.
I used SolveSpace to figure out where to place the cut-outs on front and back panels. Here is the front panel layout:
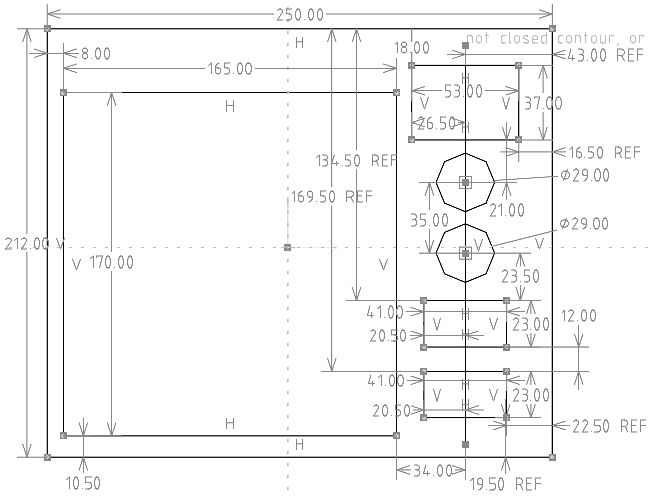
...the 165x170mm rectangle is the internal battery, so there is
nothing cutout on the front panel in that area. Here is the back panel
layout:
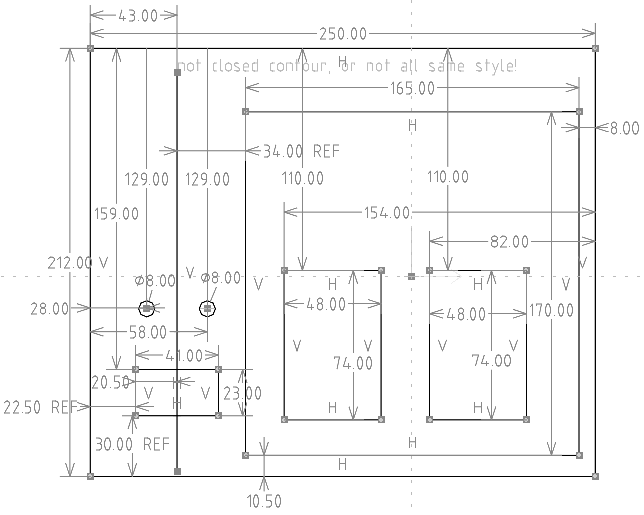
...again, the battery is shown. The two 48x74mm rectangles are not
cut-outs -- that is where the 30A circuit breakers will mount
externally.
I painted it aluminium-silver, however, reckon that matt-black would
be more appropriate. Black would match the DC-DC charger, and some of
the power sockets.
There are a couple of details to finish off, before starting on the internal wiring.
EDIT 2020-04-21:
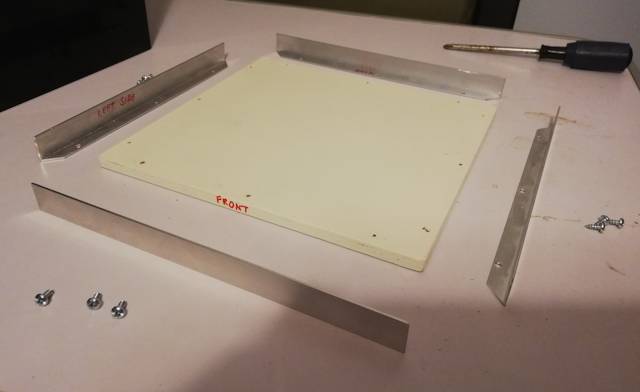
For the record, this is where I purchased some of the items screwed onto the front and back panels:
I ordered one of each colour of the Anderson
panel-mounts. The vendor agreed on one payment of AU$9.90 to ship all
three by Aust. Post Express (you have to ask for that):
This is the cigarette lighter socket:
https://www.jaycar.com.au/dash-panel-mount-cigarette-lighter-socket-with-cap-15a/p/PS2004
Binding posts came from Altronics:
https://www.altronics.com.au/p/p9225a-heavy-duty-red-50a-binding-post/
...they have holes for banana plugs, but
Altronics also have binding posts without the banana plug holes. Note,
the tops screw right off, so that eye-type lugs can be attached.
The externally-mounted 30A circuit breakers are
available from many places. They are very expensive from some local
vendors. I purchased via eBay:
EDIT 2020-04-22:
Here is another vendor of the flush-mount Anderson housings, at almost half the price. They stock grey, red, black and blue:
https://andersonconnect.com.au/store/index.php?main_page=product_info&cPath=36_72&products_id=352
Tags: nomad
Powerbox side panels and battery clamp
Here is the previous post in the new lithium powerbox project:
https://bkhome.org/news/202004/top-plate-of-lithium-powerbox.html
Today I cut out the side panels, and implemented a solution for holding the battery down.
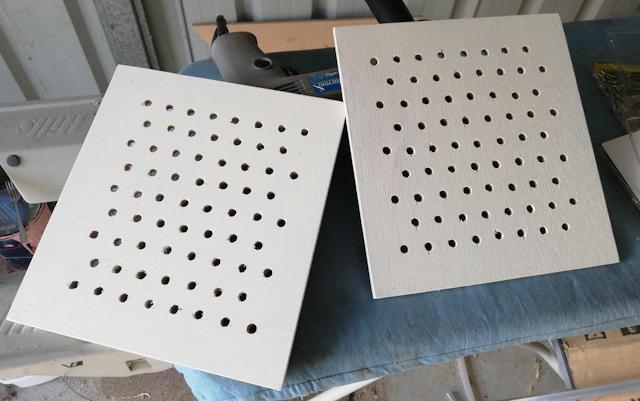
Firstly, the side panels. These are 228 horizontal by 212 vertical,
6mm thick plywood. These will screw onto the sides, and be removable --
the left is where the battery will slide in, and the right is to access
the electrical wiring.
Pretty simple, cut them out using a tenon saw, drilled holes in an offset-pattern, and a coat of acrylic paint:
Out of curiosity, I contacted a local business that specializes in
custom perforated aluminium. Their quote for the same thing in
aluminium, 1.5mm thick, 40%-open pattern, was AU$80 + GST. That would
mostly be labour cost of course.
The battery needs to be held in place, both horizontal movement and
jumping vertically. I will put some angle to make sure it doesn't creep
horizontally. To stop jumping, I created two vertical posts:
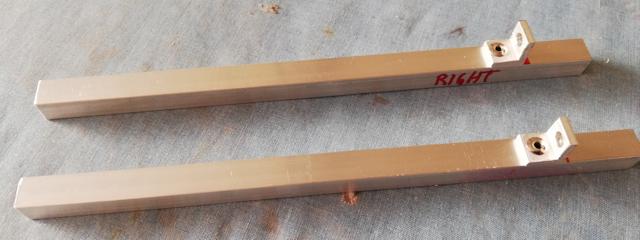
...two pieces of 10x10x1.5mm aluminium channel, with 12x12x3mm angle
riveted to them. I used stainless steel rivets, for the extra strength,
which I think will be OK -- but if someone is following these plans, you
might consider using 12x20x3mm angle, with two rivets.
Um, Bunnings only have 12x12 and 20x20 in the 3mm thick angle. Here is the 12x12x3mm:
https://www.bunnings.com.au/metal-mate-12-x-12-x-3mm-1m-aluminium-equal-angle_p1067857
After riveting it into the box:
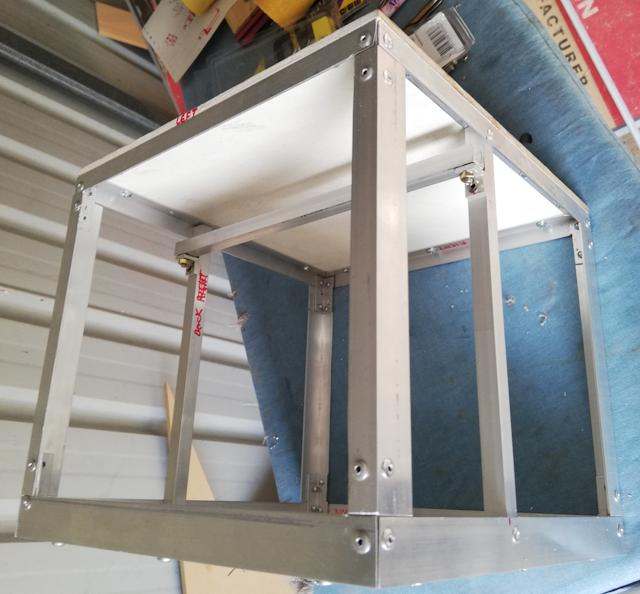
...10x10x1.5mm channel is used as the cross-piece. The clamping bolts
are M4 10mm hex-head, which is a very convenient size, as the hex-head
fits snuggly into the channel.
I have 10mm length, however might pop down to Bunnings and buy 16mm
length, so as to be able to use two nuts (to lock them in place):
Or:
The cross-piece is shown in the photo for illustration, but it would
only be inserted after the battery is placed inside the box.
So, what is next? Front and back panels I think.
Tags: nomad
Ready-made lithium powerboxes
My new project is a "lithium powerbox", see most recent post here:
https://bkhome.org/news/202004/top-plate-of-lithium-powerbox.html
It is interesting to see what is out there, ready-made. There are
many powerboxes, of varying capacities and features. Most of them are
designed to be portable and readily removed from the vehicle. One of the
biggest of these highly-portable types, that I know of, is a 60AH unit
made by iTechWorld:
...which is a very nice all-in-one solution, at an excellent price.
It has compromises, such as only charging via the cigarette light
socket, so probably limited to 10A charging. The documentation states
that it cannot be used when charging.
The more "hard core" solution is a powerbox that is intended as an
alternative to a permanently wired-in system. Many 4wd owners go the
latter route, with a custom permanently wired-in installation -- which
often looks very messy and may be space-inefficient.
The semi-permanent "hard-core" powerbox may be left permanently in the vehicle,
or taken out, perhaps if you are not going camping for awhile and need
the space for something else, or change to another vehicle. These
powerboxes are designed to charge directly from the car battery, at 20A
or more.
I did a quick survey of what is available in Australia, in this
"hard-core" category. One that I knew of from before is "The Lithium
Box":
http://rvlithiumsystems.com.au/Portable-Power/portable-power.html

...the smallest has a 100AH battery and weighs 21kg -- too heavy for me! I can't see prices anywhere.
A Perth company has put together the "National Luna" box:
https://perthpro.com.au/product/customised-national-luna-redarc-portable-battery-box-dual-battery-system-with-25a-dc-dc-charger/

...with Amptron 100AH lithium battery, price is AU$1,990. Weight is 18kg.
Here is another, the "JTS Power Easy" box:
https://jts12volt.com.au/product/lithium-dual-battery-power-easy-pack/
...price is AU$2,795, with 100AH battery. Weight is given as 55kg ...gulp!
But wait, there's more! If you would like a battery box with DC-DC
charger but without the battery, so that you can add your
battery-of-choice later (AGM or lithium), there is the "Kickass Premium
Battery Box", at AU$689:

...though, not yet available. ETA is August 2020. It is their DC-DC
charger that is holding things up -- it has been on pre-sale for a few
months. No doubt it is coming from China, and will do once the factories
start up again, and shipping improves.
Tags: nomad
Top-plate of lithium powerbox
The plywood floor is 235x225x9mm, with 12x20x1.5mm angle assembled around it, see previous blog post:
https://bkhome.org/news/202004/base-of-lithium-powerbox.html
The top of the powerbox will be a flat surface. This is plywood
measuring 238x228mm (3mm longer on both sides than the base plate). In this case I have used 6mm ply, which will also
be used for the sides. It is just that I have 6mm marine ply in my
garage, and want to make use of it.
I also have some 12x12x1.5mm angle in the garage, so have used that around the edges:

...that is upside-down. Here it is the right-way-up:
The screws are 6G 9mm dome-head, for metal and wood, which meant the
tips stick out the other side of the plywood. However, it was easy to
file the metal tips flat to the surface.
This gives me a completely flat surface on top, on which the DC-DC charger will be mounted, plus two grab-handles.
A practical detail for anyone in the future who might follow these
plans to build their own powerbox: if you cut the pieces of aluminium
angle too short, no problem as they will be hidden by external plywood
cladding.
On the other hand, if a tad too long, a simple way to grind the end is like this:
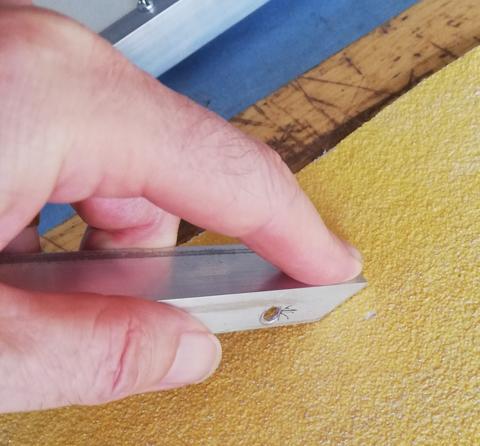
I used coarse sandpaper, 40-grit. The sandpaper is intended for
sanding wood, but worked OK grinding aluminium -- the grains did not
come off. The trick to doing it is press firmly with the finger closest
to the end, and drag towards you -- pushing away from you does not work
so well.
The top and bottom plates require corner posts. These are angle
pieces riveted on the inside corners. I used 12x12x1.5mm angle, 30mm
long. The rivets are aluminium 3.2x3.2mm (requiring a 3.2mm, or 1/8
inch, drill bit). Here they are installed in all corners:
Another practical detail: I used two "clamping pliers" to hold the
corner posts while drilling. Otherwise, you could use a small block of
wood and g-clamps.
EDIT 2020-05-01: Important design change
After building the powerbox, I found a very big problem, it was very
difficult to access the battery terminals. The fix is to make the
top-plate removable.
Which it isn't as shown in the above photos, as the screws are
underneath, inside the box. So, instead, screw from the top, through the
plywood into the aluminium.
Please see this post, that shows the final box with battery inside:
https://bkhome.org/news/202004/dc-dc-charger-issues-and-powerbox-improvements.html
The box will then have removable panels on all four sides and the top. The screws used are 8G 15mm button-head timber screws:
The drill bit used is 2mm. The wood screws are able to self-tap into the aluminium.
Placement of the screws needs to be thought about. I placed them 8mm
in from the edges of the plywood, and they need to be placed so as not
to be underneath where the DC-DC charger is proposed to be located.
Also, there are two handles on the top, which will also have screws that
tap into the aluminium.
Tags: nomad
Confusing online voltage drop calculators
I received an email from Gerard, claiming that my voltage-drop
formula is wrong, by a factor of 2. That is, where I calculated 1.11V
drop, Gerard said it should be 2.22V. See this post from a couple of
days ago:
https://bkhome.org/news/202004/cable-sizes-for-battery-camping-system.html
The factor of 2 difference should have been the big hint. I was
confused for awhile, as some online calculators seemed to support what
Gerard claimed. But then we both realised the reason for the
difference...
Most of the online calculators are for AC cable, with ISO sizes, and
use of twin-core. The online calculators require the length of the
actual cable to be entered, not the total "round trip" through each
core. So for my 15m cable from the solar panel, "15" has to be entered
into the online calculator, not "30".
In other words, where it asks for "cable length" it means the length of the twin-core cable, not adding the return path.
Regarding ISO sizes, these are used for electrical building wiring in
Australia and just about everywhere internationally. There is a nice
table here that shows AWG versus ISO sizes:
https://topwiretraveller.com/sizing-automotive-wiring/#3---table-of-common-cable-sizes-
In fact, that page is an excellent read to understand about all of
the different cable sizes -- and in particular how confusing "auto
cable" is:
https://topwiretraveller.com/sizing-automotive-wiring/
...that page has an online calculator, that requires entry of the
length of one core, so in the case of 15m twin-core, enter "30".
Tags: nomad
Base of lithium powerbox
I have constructed the base, or floor, of what is intended to
become a lithium battery power box. See previous post in this new
project:
https://bkhome.org/news/202004/powerbox-fuse-redesign.html
The foundation is a good place to start, as you would build a house.
Having the floor, how the rest will fit in can start to be seen. Here is
the floor, with battery:

...that empty space on the side of the battery is where the
electrical wiring will go, with a side-opening to enable easy access.
Also in that gap, at the front there will be the front-panel sockets and
coulometer LCD display.
There is about 20mm gap at the back-side of the battery, where there
will be some cabling. The externally-mounted circuit-breakers will be
directly behind the battery.
The DC-DC charger sits on top of the box, and grab-handles will also be screwed onto the top of the box.
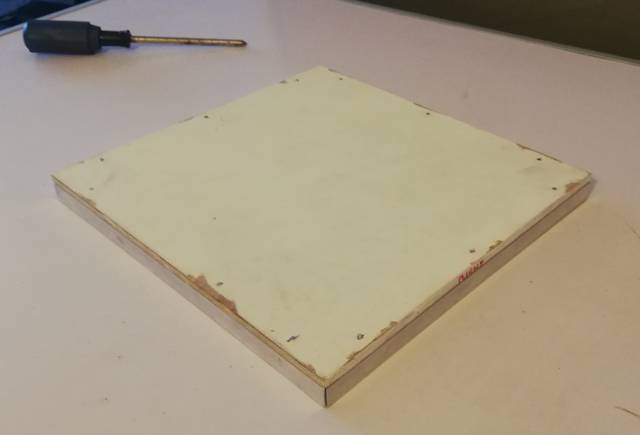
Here is the detail of the floor of the box:
The floor is a piece of 9mm thick plywood, 235mm along the front,
225mm deep. I painted it, hence the off-white colour. I used marine ply,
but anything will do, even a chopping board from Kmart or BigW.
Though, the chopping board would need to be 9mm thick or more. The
screws are 6G 9mm dome-head metal/wood type, from Bunnings -- I couldn't
find any shorter screws, hence the thickness requirement of the
plywood. Well, actually, 8mm plywood/chopping-board would do, as the
aluminium angle is 1.4mm thick.
The aluminium is unequal-angle, 12x20mm, 1.4mm thick. I cut each
piece 3mm longer than the board, 45 degree cuts using a mitre-board and
hacksaw. Three holes in each for the screws. I pre-drilled holes in the
plywood, so as not to stress the plywood when screwing the screws in --
as they are close to the edge of the plywood.
I bought 20x12x1.4mm angle, 3m length:
https://www.bunnings.com.au/metal-mate-20-x-12-x-1-4mm-3m-aluminium-unequal-angle_p1079496
Also, for later in the project, 3m of 10x10x1.5mm channel:
https://www.bunnings.com.au/metal-mate-10-x-10-x-1-5mm-3m-aluminium-channel_p1079640
Only simple hand tools have been used, which I anticipate will be the case for the entire powerbox.
Tags: nomad
Powerbox fuse redesign
Previous post for new camping powerbox:
https://bkhome.org/news/202004/cable-sizes-for-battery-camping-system.html
A couple of days ago, created a preliminary circuit diagram, with quasi-physical layout:
https://bkhome.org/news/202004/portable-lithium-power-for-camping.html
After more study of other circuits, I have redesigned with two more fuses:

Previously, if the bottom-right circuit breaker was switched to
open-circuit, while still charging from the car's alternator, it may
have an odd effect on the +bus. Now, that circuit-breaker disconnects
from the +bus, and another fuse has been added to the "DC out" (black
Anderson plug).
It may be overkill, but I also added one to the grey plug, going out to the solar panel.
I also made a note for the red Anderson plug. Modern cars have
"smart" alternators, where there is a shunt between the battery negative
terminal and chassis-earth, just like I have done with the lithium
battery in above diagram.
For the electronic control system of the car to recognise the
existence of the DC-DC charger, the negative lead from the red plug must
go to chassis-earth, preferably close to the car battery.
EDIT 2020-05-03:
A "protected +bus" has been added -- the "+bus" is connected directly to
the lithium battery, whereas the "protected +bus" is on the other side
of a 30A circuit breaker. Also, binding posts have been added. Both of
these changes are discussed in a later blog post:
https://bkhome.org/news/202004/dc-dc-charger-issues-and-powerbox-improvements.html
Consequently, the circuit diagram has been updated:

This was created by Dia (a Linux GUI application, available in EasyOS, Quirky, Puppy Linux, and most other Linux distributions). Here is the Dia file:
https://bkhome.org/news/202004/files/powerbox-wiring-diagram3.dia.gz
Here is the file exported to SVG:
https://bkhome.org/news/202004/files/powerbox-wiring-diagram3.svg.gz
Tags: nomad