Solar-powered recumbent trike
Page created May 17, 2023
Updated December 21, 2024
This has been a slow project, over 12 months. I bought a "320" frame TrikExplor basic recumbent tadpole trike, and proceeded to modify it over succeeding months. The main structural change was the front wheels were brought closer together, with coil suspension, making it a full-suspension trike. A motor and LFP battery were added, with electrical control systems and a solar panel.
As to motivation, these were the main reasons:
- The original trike was 910mm wide; however, the maximum legal width in Western Australia is 800mm. Besides, I wanted it to fit through my front door, so as to keep inside.
- Want full-suspension, for a comfortable ride on corrugated
gravel roads common in rural Australia. The original trike only
had rear suspension.
- Love the idea of touring the countryside, not just in the
comfort of a reclining "lounge chair" ride, but having solar
assistance for the motor. The promise is, on relatively flat
terrain, ride all day, with only token input to the pedals.
They are the main ideals, but of course many compromises along
the way. Hardly knowing anything about bicycle design and
maintenance was also a challenge; especially design of the
steering geometry. The solar panel has a nominal rating of 200W,
less than I would have liked. The motor is 250W, again a legal
requirement, and also less than I would have liked.
Over the approximate 12 months, I posted progress to my blog. Due to the highly experimental nature of what I was doing, there were some attempts that got aborted; design of the front suspension for example, went through a couple of iterations. Here are the blog posts, in reverse-chronological order...
The early days
This is the "genesis" post:
- Outback adventure solar-powered recumbent trike — May 14, 2023
Did lots of online research, posted interesting information about
trike design and riding:
- What kind of people ride recumbent trikes? — May 17, 2023
- DIY solar e-bike guides and kit — May 18, 2023
- How to be safe on a recumbent trike — May 18, 2023
- More recumbent solar-powered trikes — July 23, 2023
- Tadpole trike front suspension ideas — September 12, 2023
I puchased a "320" frame trike, with rear suspension:
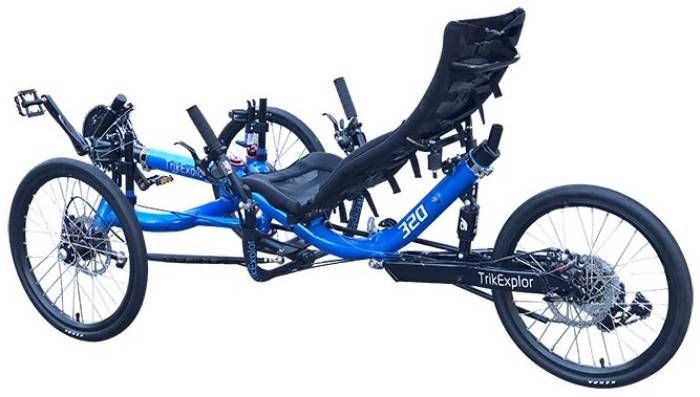
There are some oddities about the design, and in retrospect I would have chosen some other trike. Also, I think a steel frame would be more amenable to a DIY project.
Embarking on the project, the front suspension was a major undertaking. I had to learn about caster, camber, toe-in and toe-out, Ackerman, etc. The first attempt at a front suspension was not very good; that got aborted. Ended up with a steel framed front suspension, and it was difficult to match it to the weird 320 frame.
Front suspension design
Originally was very ambitious, wanted a leaning front-suspension trike. Ended up deciding the leaning part is too complicated. Anyway, here are posts from that time period:
- Design of front suspension for recumbent tadpole trike — October 17, 2023
- Design of front suspension for leaning recumbent trike — October 18, 2023
- Tyre scrubbing on trike with suspension — October 24, 2023
- Tyre scrubbing on trike with dual-shock suspension — October 25, 2023
- Leaning trike single-shock suspension revisited — October 26, 2023
I continued looking around online, on the lookout for other designs and ideas. For example:
- Graham's simple DIY trike build — November 04, 2023
- Solar leaning trike safety concerns — November 17, 2023
Kept on playing with suspension designs:
- Two-shock design with curved rod — November 18, 2023
- Two-shock design with swinging steering linkage — November 18, 2023
...that last post is close to the design finally settled on.
Axles and knuckles
Construction of the axles, or more encompassing, what are known as the "knuckles", proved to be a major challenge, as I did not use any of the original knuckle mechanism:
- Construction of front axles for custom trike — December 09, 2023
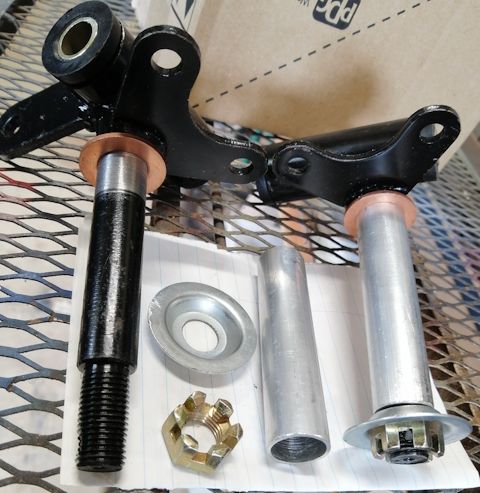
Matching the knuckle to coil-suspension swing-arms went through
some design iterations. There was also an aborted first attempt at
the swing-arms:
- Construction of wheel knuckle hinges and learning to weld — January 08, 2024
- Starting assembly of trike front suspension frame — January 10, 2024
At this time, I was still thinking of it being a leaning trike. Designed the suspension framework accordingly:
- Construction of trike front suspension pivot — January 30, 2024
...actually, retained that potential for a leaning trike in the
"mark-2" and "mark-3" swing-arm designs, except locked it in place
and not used.
Suspension and steering
As already mentioned, the mechanical design and geometry of the suspension and steering was a major learning exercise. Some posts:
- Heim versus ball joint — March 12, 2024
- Considering ball joints for wheel knuckles — March 27, 2024
- Considering heim joints for wheel knuckles — March 28, 2024
- Connecting trike front suspension to frame — April 16, 2024
Here is the "mark-2" front suspension:
- Recumbent trike front suspension Mark-2 assembled — May 17, 2024
...that used wood for the swing-arms and framework. Didn't like
it, decided to go for an all-steel design, which is "Mark-3", the
final design.
| |
A digression; what do recumbent trikes weigh?
|
I was working on the steering geometry, learning and trying to get it to a final build:
- Trike steering cannot kick the can down the road anymore — May 23, 2024
- Ackermann steering compensation — May 31, 2024
...getting there.
The final design
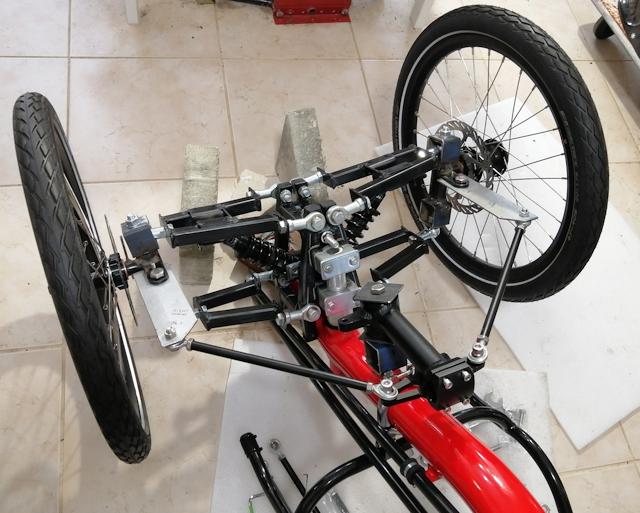
Now onto mark-3 design, all-steel, with the weird attachment to the trike alloy frame:
- Recumbent trike front suspension Mark-3 — June 01, 2024
- Trike Mark-3 swing-arms constructed — June 14, 2024
More reasons why I did not like that 320 trike:
- Trike 320 frame rear fork large gap — June 13, 2024
- Motrike 320 rear shock mounted with ordinary bolts — June 16, 2024
- Trike 320 rear fork large gap fixed — June 21, 2024
...apart from those complaints, which can be fixed or
worked-around, the quality is good, and it is strongly
constructed.
For the mark-3 steering linkage, I ended up with a compromise, mostly because just wanted to get something built:
- Trike hinge for steering arms — June 20, 2024
- Trike simplified steering linkage — June 22, 2024
- Trike simplified steering linkage assembled — June 24, 2024
- Wheel knuckle modifications — June 29, 2024
Photo of mark-3, upside-down:
Assembling the trike
From there on, progressed to assembling the trike.
- Bash plate for trike — July 09, 2024
- Fenders for custom trike — July 25, 2024
- Solar panel frame for trike take-2 — August 09, 2024
- Chain installed on recumbent trike — August 12, 2024
...almost there.
| |
A digression, this is something that you seriously need to consider when riding a trike:
|
Another major structural change was at the rear of the trike. The luggage rack and pannier frame were bolted directly onto the rear fork. Simple from the manufacturer's point of view; however, I wanted them to be above the shock absorber:
- Custom trike rear extension — August 23, 2024
- Custom trike luggage rack completed — October 04, 2024
...even closer to almost there.
| |
Here is another digression. One wonders how stable a trike will be with solar panel on top, when there are strong side winds. Well, there are people riding two-wheel ebikes with solar panels, and surprisingly stable:
|
Progressing to the electrical systems...
Electrical design
Now getting onto the electrical design. I wanted more safety than
you normally get in an ebike, and designed an electrical junction
box with three circuit-breakers and various other switches. As
mentioned in an earlier post, have used a LFP (LiFePo4) battery as
it is safer than the usual NMC Lithium type. Electrical design
posts:
- MPPT controller for custom trike — September 13, 2024
- Lensun MPPT has to be isolated from frame — October 11, 2024
- Junction-box for custom trike — October 17, 2024
- Junction box for custom trike part-2 — November 04, 2024
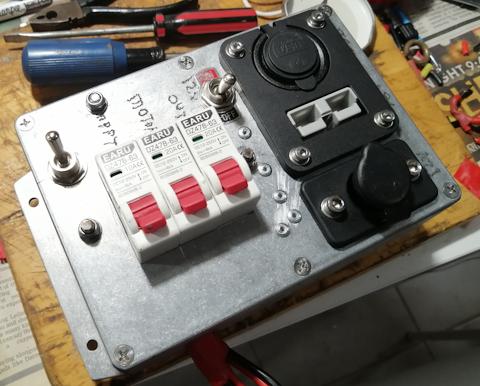
...that junction-box is mounted under the seat, within easy
reach.
| |
Another digression, useful information about LFP batteries:
|
...I wonder how much longer LFP will be considered as the safest choice? There is sodium-ion on the horizon.
The assembled trike
Having constructed the frame for the solar panel, what remained was to put the solar panel on top, then wire it to the MPPT controller:
- Planning to affix solar panel to trike — December 04, 2024
Finally, taking the trike outside for its first test:
- Custom recumbent trike first test — December 07, 2024
- Trike test elejoy MPPT controller — December 10, 2024
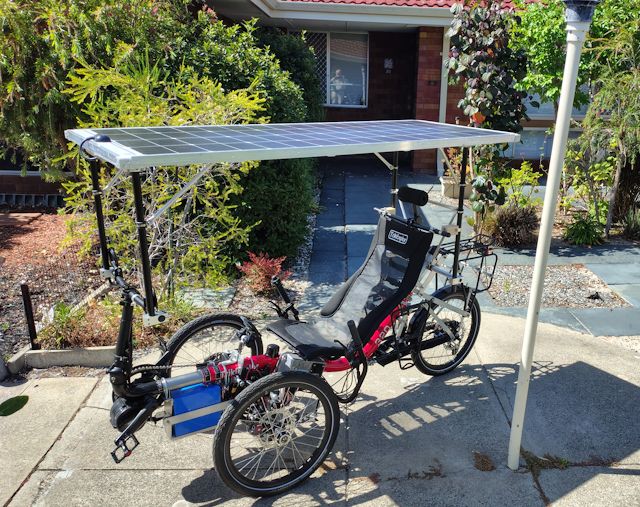
A further note about the solar panel: the above posts show rather
low power output, but I expect to be getting closer to the 200W
rating; probably about 150 - 170 watts when sun is high in the sky
and the BMS working as expected.
...ready for adventures!
Conclusions
The project is not finished. The very nature of such an experimental project is, once built, the mind is full of ideas for an improved "next project". Don't know if I will ever do a complete rebuild; for now, want to use what exists, and hopefully go on multi-day countryside touring.
I will mention one thing that I would change if do a rebuild; bringing the front wheels closer together has the downside that it restricts the turning radius. Turn too sharply and there is the risk of the wheel touching the rider's foot. This is a 20-inch wheel, and I think with 16-inch wheels could manager sharper turn without touching the foot.
One more thing; the rear wheel is 20-inch, and I don't like the derailleur gear mechanism being so low to the ground. Would prefer at least a 24-inch wheel.
Yet another: might build my own lithium battery, with a BMS that
has same +ve and -ve wires for charging and discharging. This has
some advantages, including simplified charging and discharging
simultaneously.
My blog will have more posts as I outfit the trike for this proposed country touring, so please do monitor:
https://bkhome.org/news/tag_light.html
https://bkhome.org/news/tag_nomad.html
I have also started a YouTube channel. Nothing much there yet:
https://www.youtube.com/@meanderinglight
Hope this page has inspired you!
Tags: nomad
